
Do you want to create a user review form on your WordPress website?
Collecting user reviews online is so important so you can sell more products. You can use testimonials on different pages on your website, and make it simple for leads to learn more about your product by reading reviews.
So in this tutorial, we’ll show you how to make a user review form on your WordPress website that asks people to submit their thoughts (the easy way).
How Do I Add Customer Reviews to My Website?
The easiest way to add user reviews to your website is to use a WordPress plugin like WPForms.
You can use WPForms Pro to access a user review form template that can have you up and running in minutes.
Create Your User Review Form Now
And if you’re asking yourself why create a user review form on your website, we’ve listed some fantastic reasons next.
Why Create a User Review Form on Your Site

Did you know people’s friends have the most influence on mobile purchasing decisions? That’s a bold but true eCommerce statistic every website owner should know.
That’s because social proof is super important to making sales online.
Regardless of if you’re selling physical goods, digital products, or a service, user reviews can help you boost sales.
- User reviews give you a way to collect positive feedback and testimonials you can use in your marketing campaigns
- You can put your user review form on a form landing page and send it in a follow-up email after a purchase has been made
- Having a user review form on your site increases the chances you’ll get reviews
- Customer reviews and testimonials can greatly increase sales using psychology
- The more user reviews you can get, the more likely you’ll find positive user reviews you can use
- User review forms can give you an easy option to ask people if you can share their reviews (we’ll show you how).
Great, now that you have an idea of why people make user review forms and put them on their small business websites, let’s jump right in and explain how they make them.
How to Make a User Review Form for Your Site
If you’re using WPForms Pro, you’ll have instant access to a template that will get you up and running fast with this form. Here’s how to set it up.
Step 1: Install the WPForms Plugin
The first thing you need to do to add a user review form to your WordPress site is install and activate the WPForms plugin.
It’s very easy, but if you need any help with this part, check out this great tutorial on how to install a WordPress plugin.
Alright, now that you’ve activated the plugin, you can begin creating your new form.
Step 2: Launch the Blog Post Submission Template
Next, you’ll need to open up a form to start working on it. For this, we’ll use the blog post submission template. If you’re curious what this is used for, check out this guide on how to allow users to submit blog posts.
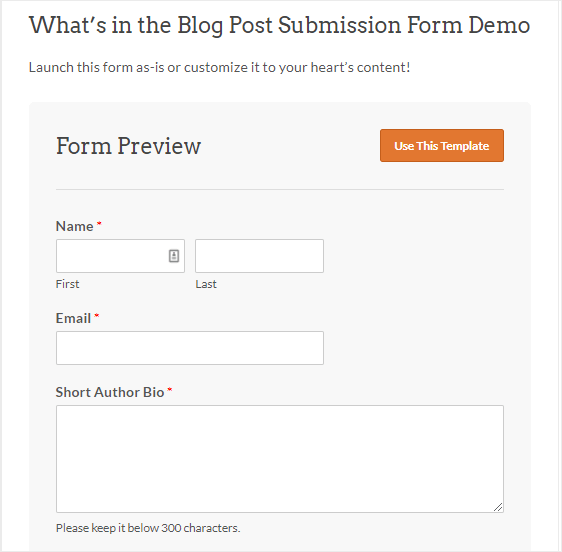
But for user reviews, we’ll need to customize a few things on this form first. But don’t worry, once we customize it, this form will let you publish the reviews you get to the front end of your website so other people can see them!
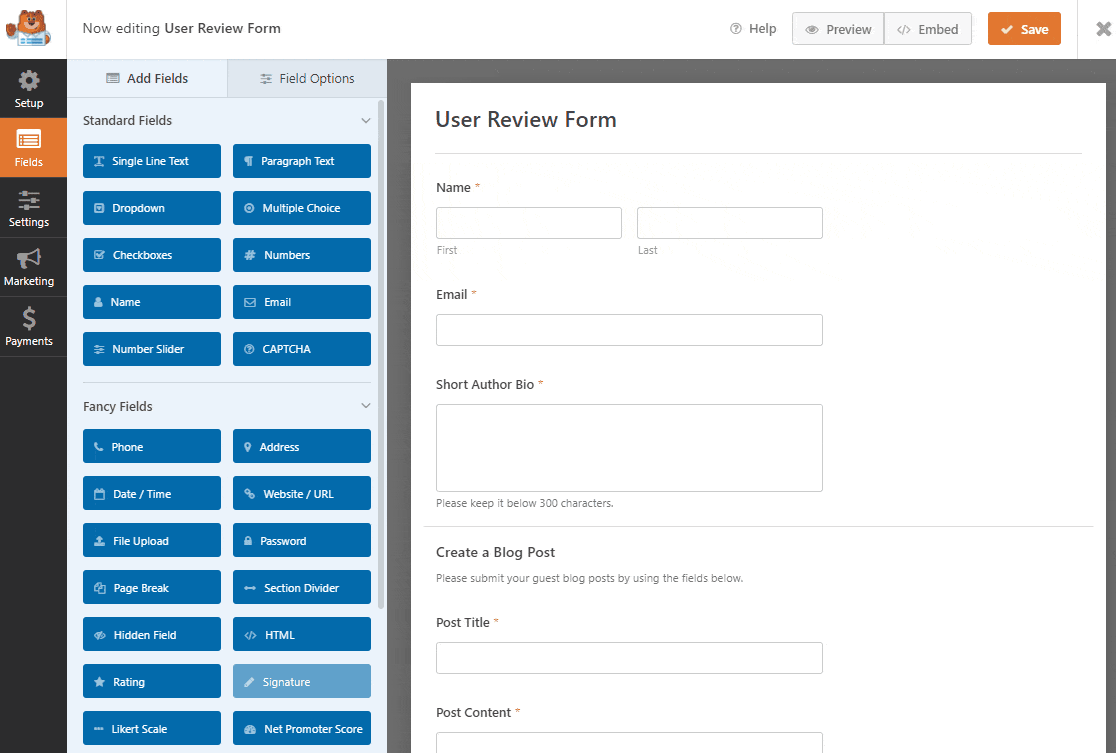
Head over to WPForms » Add New and type in a name for your User Review form.
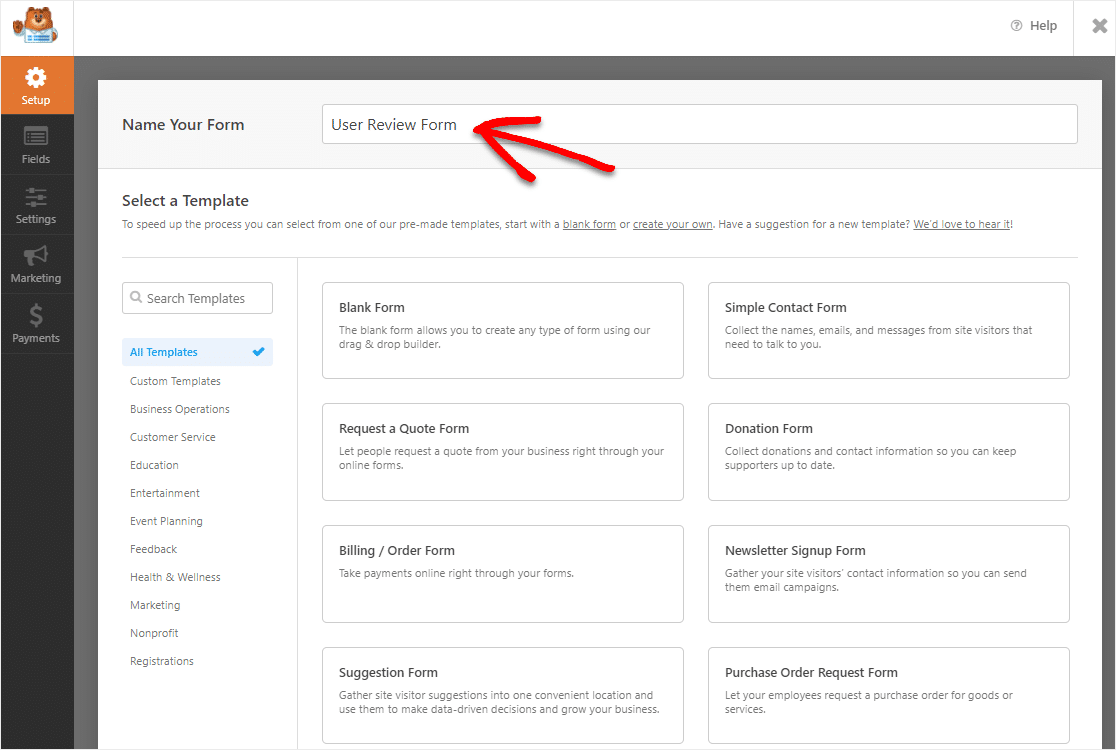
Once you’re done naming the form, head to the search bar on the right and type Blog Post Submission in the search bar. Then select Use Template on the form.
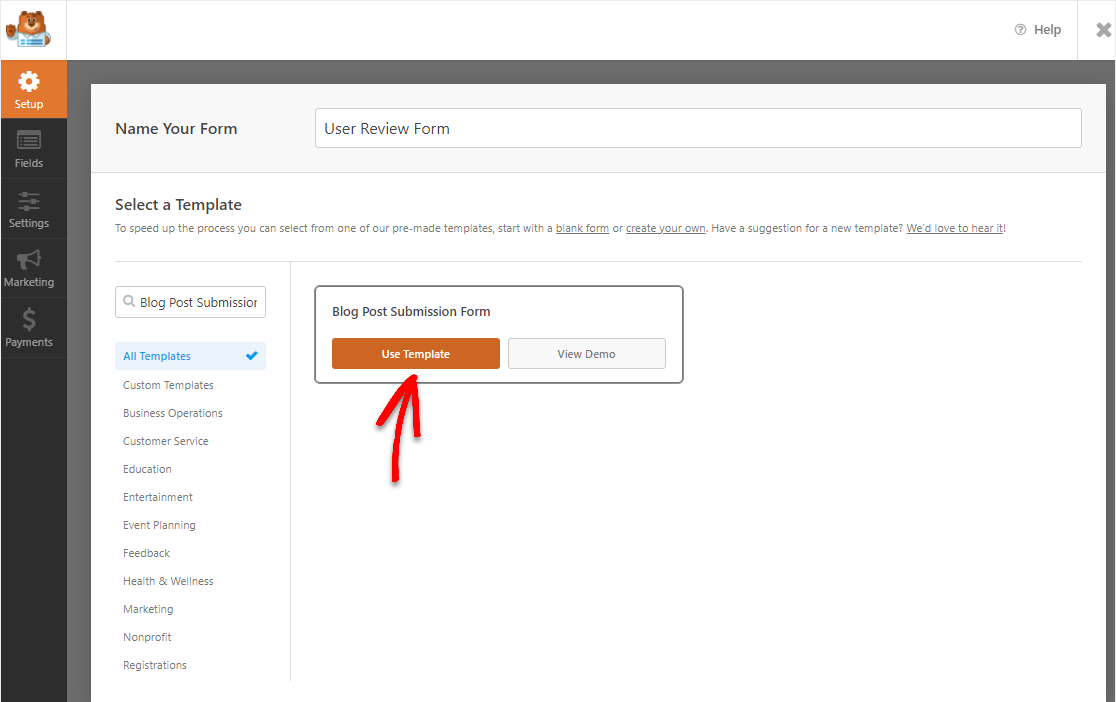
Once you click the button, you’ll need to activate an addon. We’ll do that next.
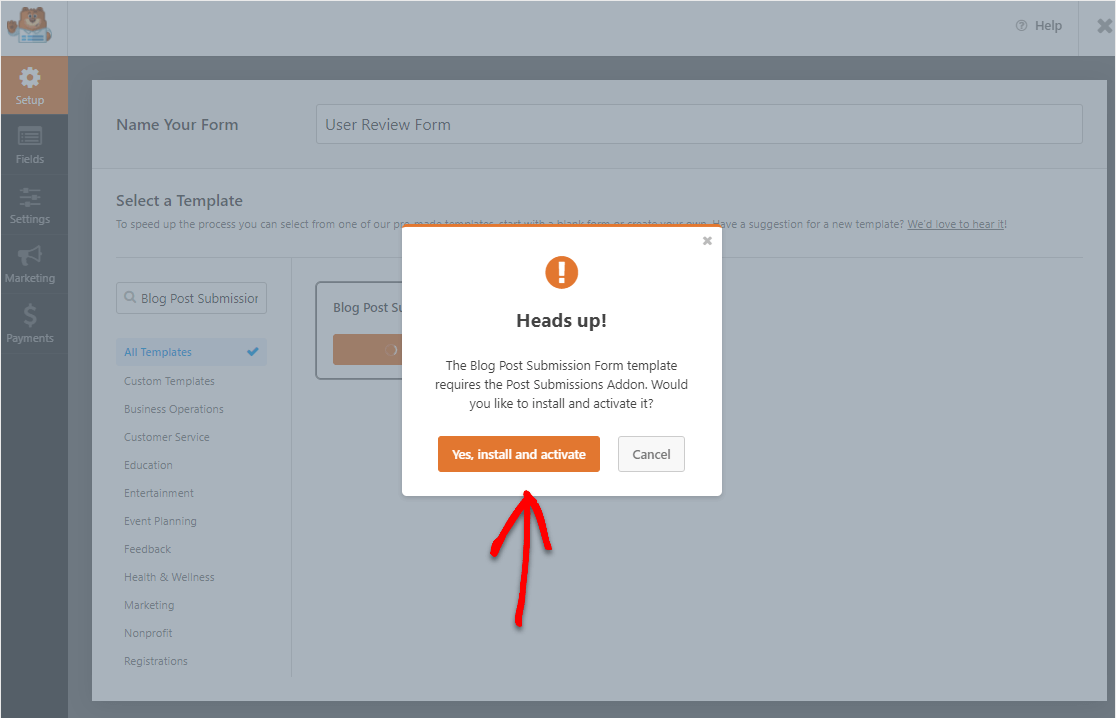
Step 3: Activate the Post Submission Addon
Once you open the template, you’ll be prompted to activate the Post Submission Addon which is included with WPForms Pro. Click on Yes, install and activate.
Now your form will load and you’ll be ready to customize it to turn it into a User Review form.
Step 4: Customize Your User Review Form
Up next, we need to add a few fields to this form to make it a proper User Review form. To add a field, find it in the lefthand field and drag it onto your form on the right.
Here are the fields you’ll want to add:
- File Upload
- Hidden Field
Head to Add Fields » Fancy Fields and then drag the File Upload field and Hidden field onto your form.
Now, we simply need to change the names of these fields.
Step 5: Re-Name Form Fields
To rename your form fields, click on the field to open the Field Options tab. Under General you’ll find a Label field.
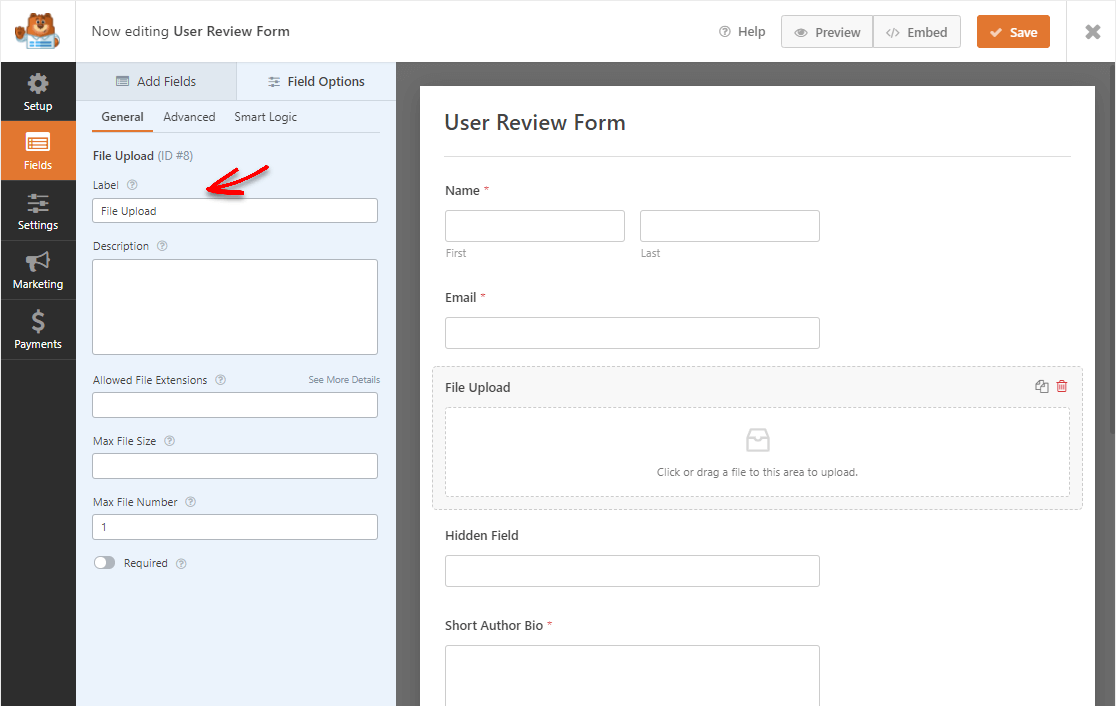
Go ahead and update this field to the new name. Here are the names of the field you should update:
- Change ‘File Upload‘ label to ‘Personal Photo’.
- Change the ‘Create a Blog Post‘ field to ‘User Review’ and update the description to match.
- Change the ‘Hidden Field‘ label to ‘source’ (this one won’t be visible).
Next, click on the red trash icon to delete the Post Title field.

Then, drag and move the Hidden Field down to where the Post Title was. We’re swapping the normal Post Title field for a WPForms hidden field.
The reason we’re doing this is to spare users needing to fill that out and to help boost form conversion rates. Instead, we’ll set the form to automatically use the visitor’s name as the post title when we configure the post submission settings later.
Step 6: Configure Your Form Settings
To start, go to Settings » General.
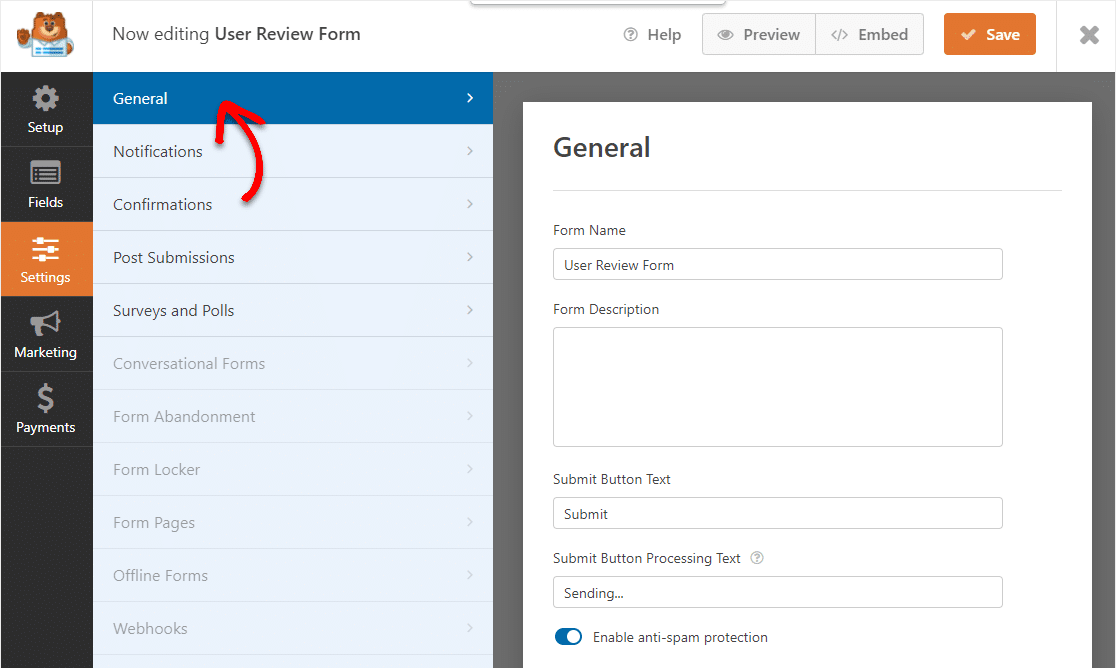
Here you can configure the following:
- Form Name — Change the name of your form here if you’d like.
- Form Description — Give your form a description.
- Submit Button Text — Customize the copy on the submit button.
- Spam Prevention — Stop contact form spam with the anti-spam feature, hCaptcha, or Google reCAPTCHA. The anti-spam checkbox is automatically enabled on all new forms.
- Advanced CSS Classes + Dynamic Fields — For developers who want deeper customization.
- AJAX Forms — Enable AJAX settings with no page reload.
- GDPR Enhancements — You can disable the storing of entry information and user details, such as IP addresses and user agents, in an effort to comply with GDPR requirements. Check out our step-by-step instructions on how to add a GDPR agreement field to your simple contact form.
Next, click Save.
Step 7: Customize Your User Review Form Notifications
Notifications are a great way to send an email whenever someone submits a user review form on your website.
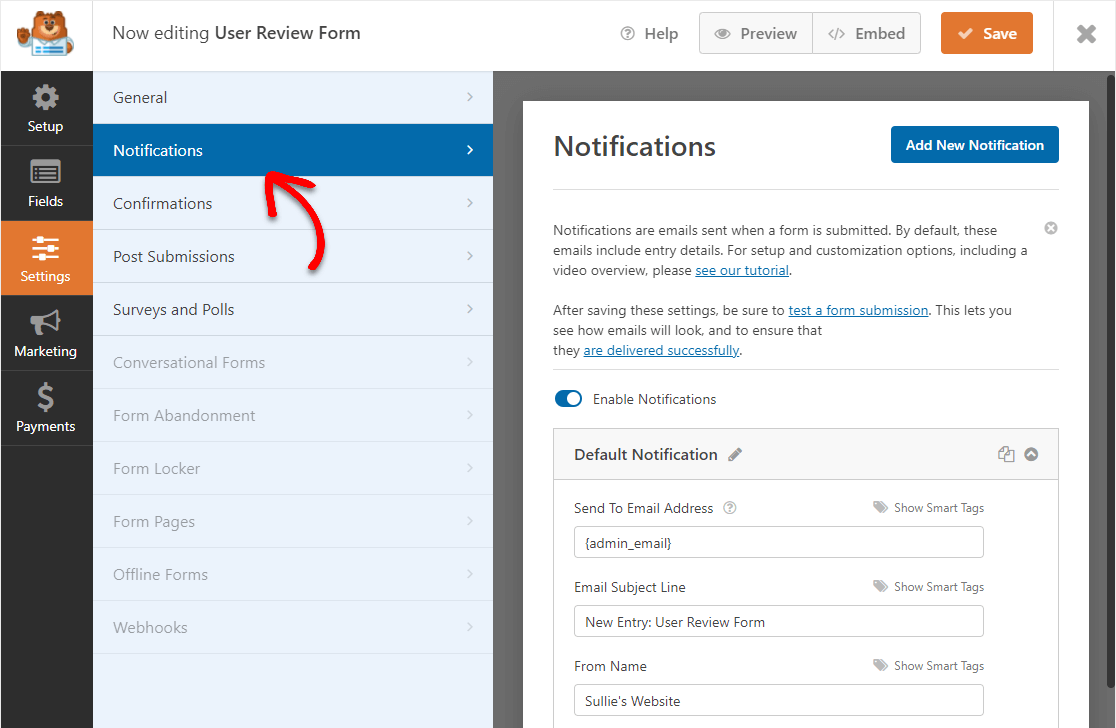
In fact, unless you disable this feature, whenever someone submits a form on your site, you’ll get a notification about it.
If you use smart tags, you can also send a notification to people who the testimonial form, letting them know you’ve received their submission. This lets users know their review form has gone through properly.
For more help with this step, check out our documentation on how to set up form notifications in WordPress.
Also, you can send more than one notification when someone submits a user review form on your site. For example, you can send a notification to yourself. Plus, to the user who submitted it and other people on your team who may want to see it or access the review.
For help doing this, check out our step-by-step tutorial on how to send multiple form notifications in WordPress.
Lastly, if you want to keep branding across your emails consistent, you can check out this guide on adding a custom header to your email template.
This will give your form a professional feel.
Step 8: Configure Your Form Confirmations
Form confirmations are messages that display to people once they fill out and submit a form on your website. They let people know that their form has gone through and offer you the chance to let them know what the next steps are.
WPForms has 3 confirmation types:
- Message: This is the default confirmation type in WPForms. When someone submits a user review form, a simple message confirmation will appear letting them know their form was received.
- Show Page: This confirmation type will take customers to a specific web page on your site thanking them. For help doing this, check out our tutorial on redirecting customers to a thank you page.
- Go to URL (Redirect): This option is used when you want to send people to a different website.
Let’s see how to set up a simple form confirmation in WPForms so you can customize the message people will see when they fill out the user review form on your website.
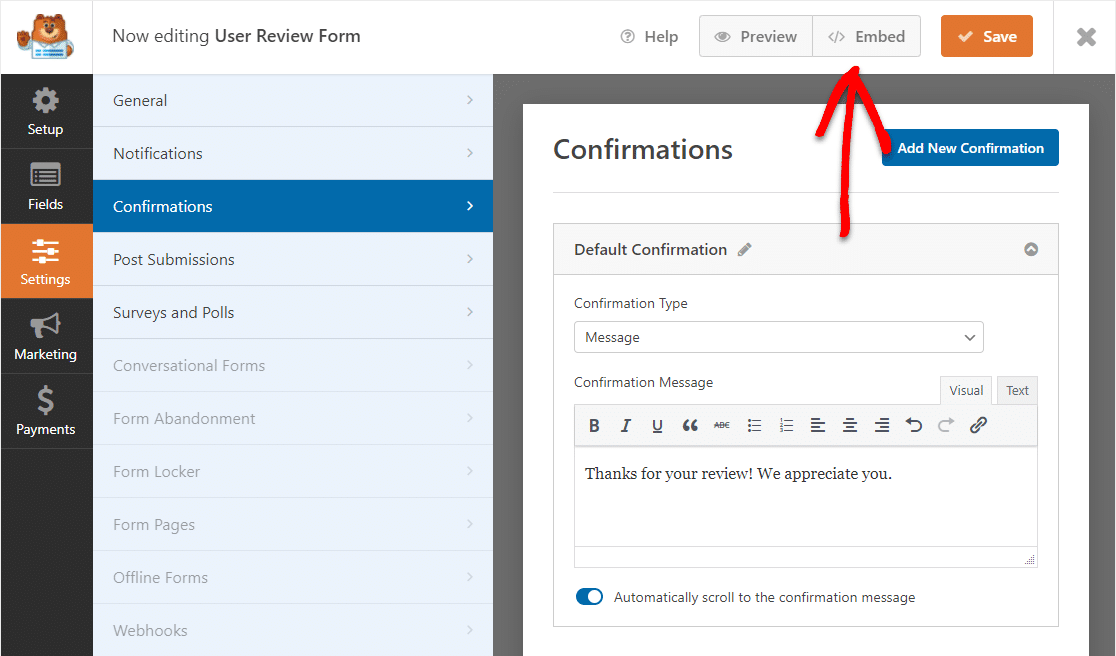
To start, click on the Confirmation tab in the Form Editor under Settings.
Next, select the type of confirmation type you’d like to create. For this example, we’ll select Message.
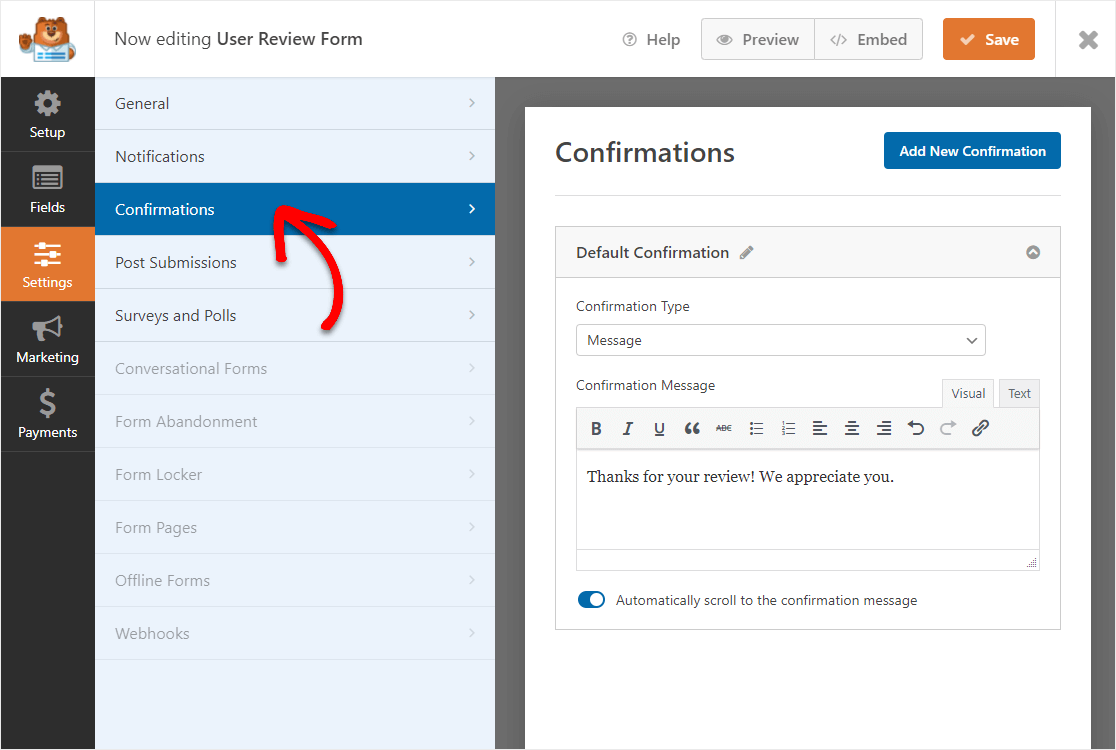
Then, customize the confirmation message to your liking and click Save.
Step 9: Add Your User Review Form to Your Site
Now that your form is built, we’re going to go ahead and publish it to the web.
Start by clicking the Embed button at the top of the form builder.
And then when this notification pops up, go ahead and click Create New Page.
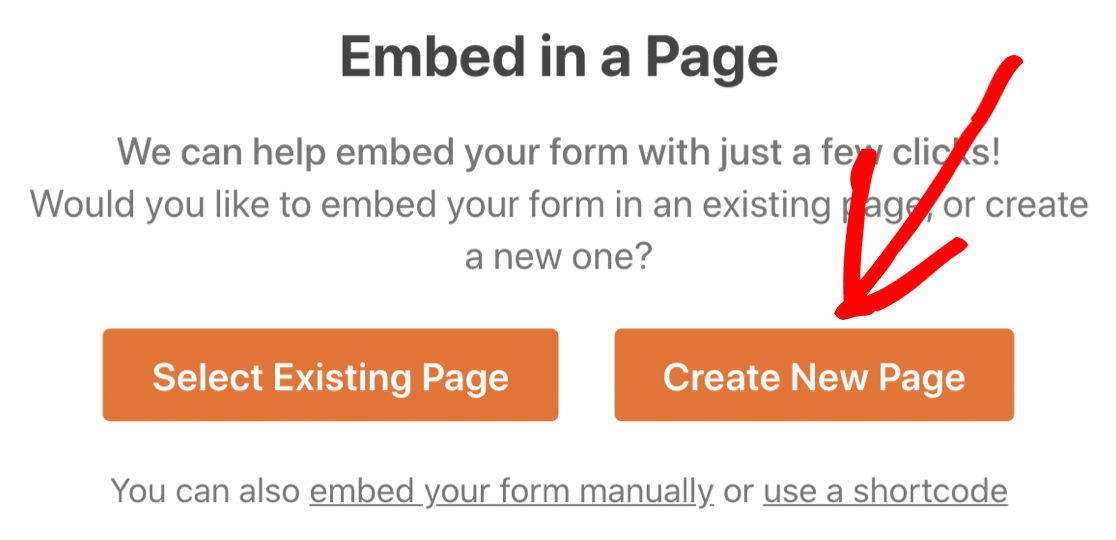
Next, WPForms will ask you to name your page. Type the title for the page into the box and click Let’s Go!
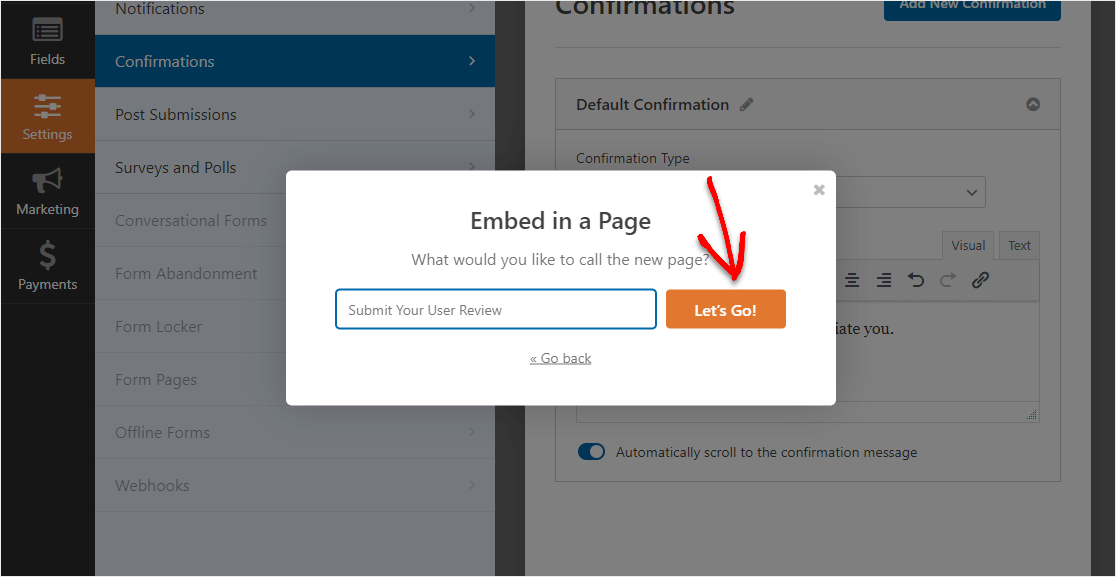
WPForms will open up a new page for your testimonial form.
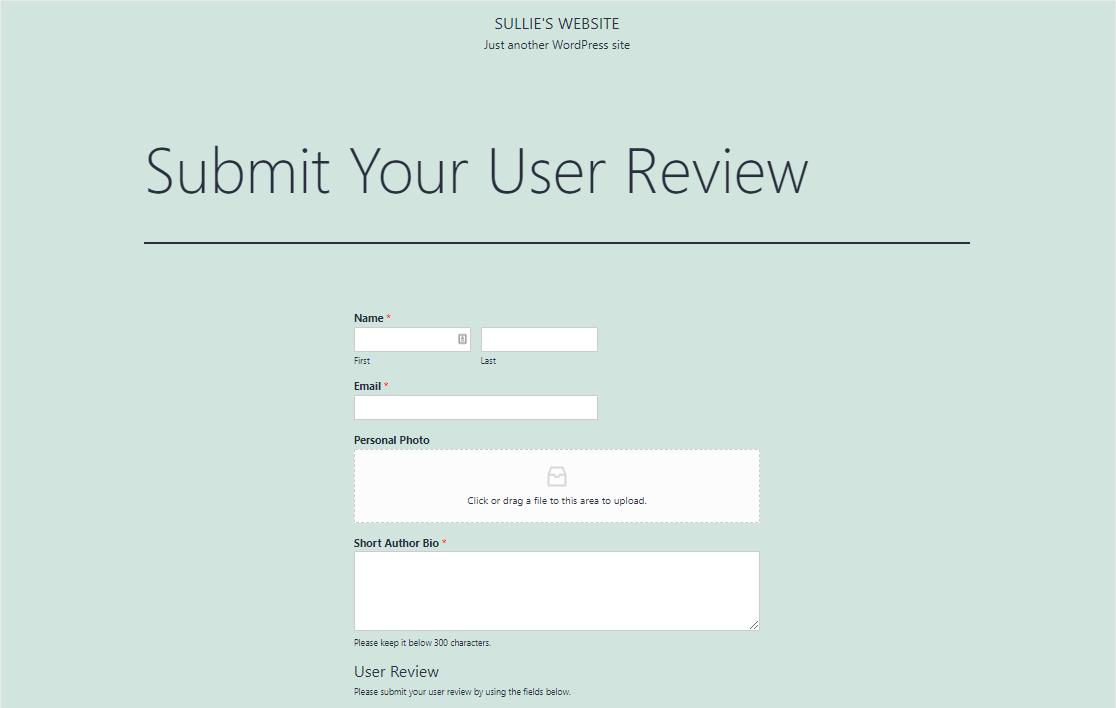
Next, go ahead and click Publish or Update at the top to publish the form on your site.

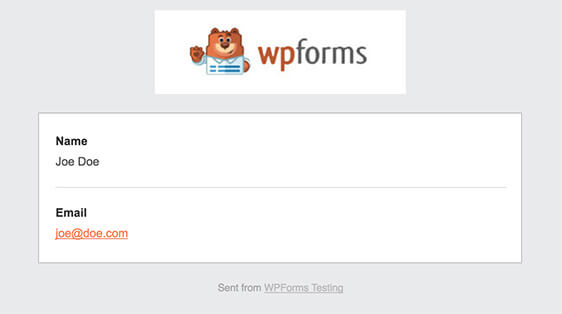
Great job. Your form is live on your site, and here’s what our finished user review form looks like.
Before we finish up, we need to tweak a few quick things to make sure the user reviews publish on your site once submitted.
Step 10: Create a Reviews Post Type
We want the reviews to appear as an item in the navigation menu and have all the features that standard blog posts would have. But, we don’t want to mix the reviews in with our blog. To solve this, we’ll use custom post types.
Custom post types are content types like posts and pages. A post type can be any kind of content.
In our example, we’ve used the plugin Custom Post Type UI to create a post type named Reviews.
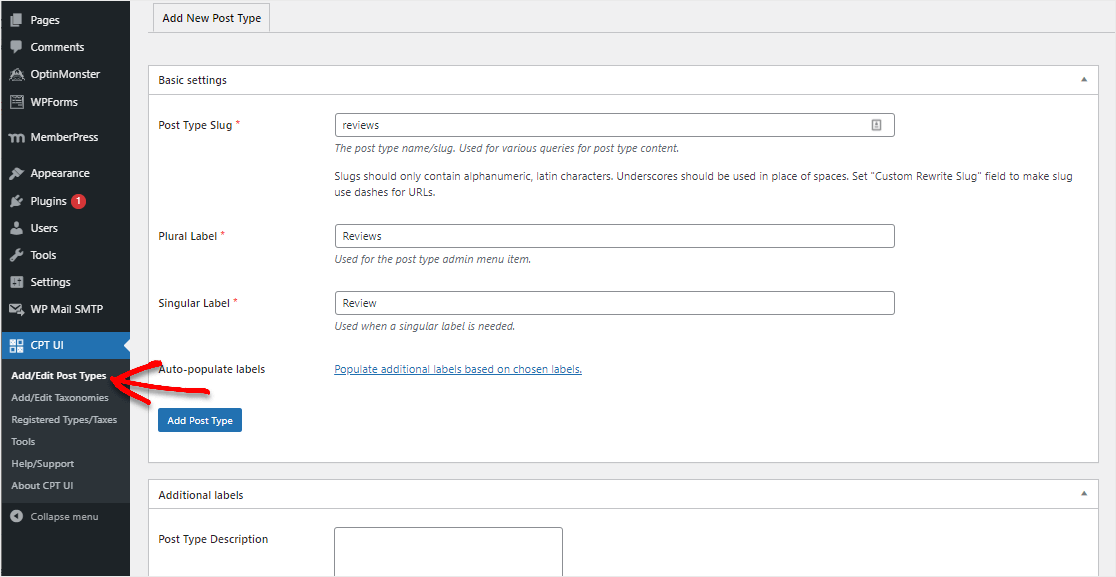
You can see this tutorial to learn more about how to set up custom post types.
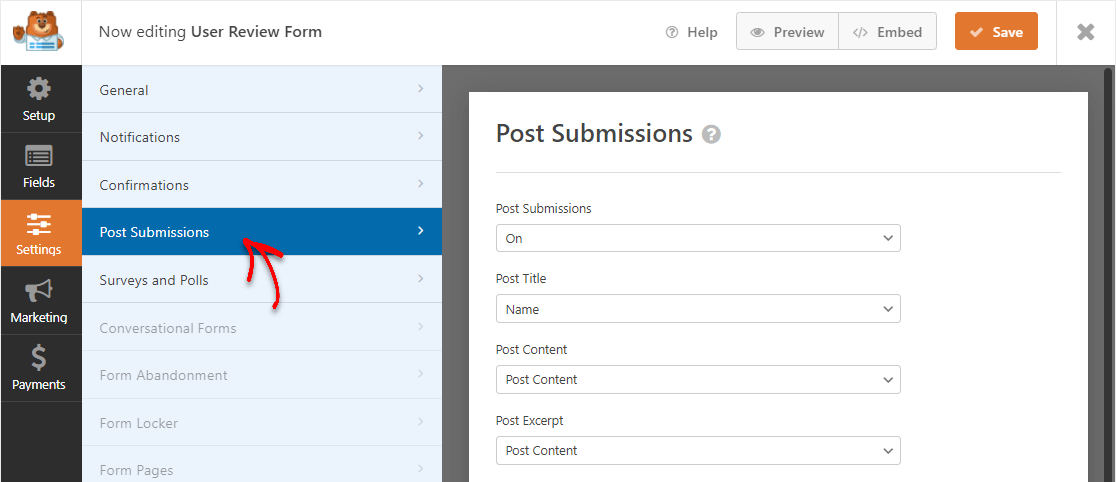
Step 11: Connect Your Form to Posts
You’re nearly there. Now it’s time to make sure that each form submitted is connected to the Reviews custom post type.
To do this, go to your form and head to Settings » Post Submissions.
- Turn on Post Submissions
- Use the person’s name as the Post Title
- We renamed the Post Content paragraph field previously.
- You may or may not want to display Post Excerpts based upon your theme. For now, we used the same information as Post Content.
- Post Featured Images are usually displayed as the post thumbnail or image at the top of an article, depending on your theme. We’ll use the user’s profile that they upload.
- In the Post Type we can choose the Reviews custom post type that we created.
- The Post Status determines if submitted reviews will require approval before they are published.
- If your theme displays the author of the post, you might want to specify that information in Post Author.
- We’ll skip the Custom Post Meta for this example, but feel free to use it if you’re an advanced user and know what you’d like to add.
Make sure to hit save when you’re ready.

Step 12: Test Your WordPress User Review Form
We have everything set up to accept testimonials and reviews. Now we just need to fill the form out and check our results.
Go ahead and fill the form out as a test entry. After that, you can click on the Reviews custom post type you’ve created to view your test user review entry.

Wonderful job! Now, let’s get these great reviews displayed on your website!
Step 11: Display Your Customer Reviews
Finally, to display your testimonials on your site from your user review form, there are just a few settings to adjust. Go to CPT UI » Add/Edit Post Types.
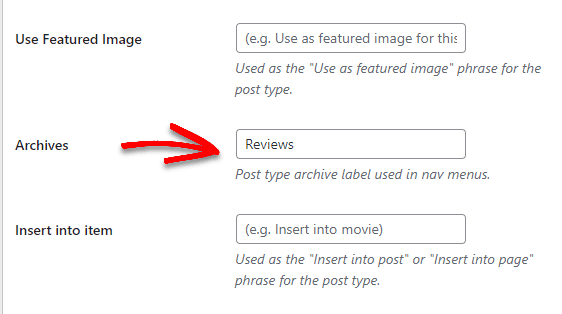
Scroll down to the Additional Labels options and name the Archives field ‘Reviews’.
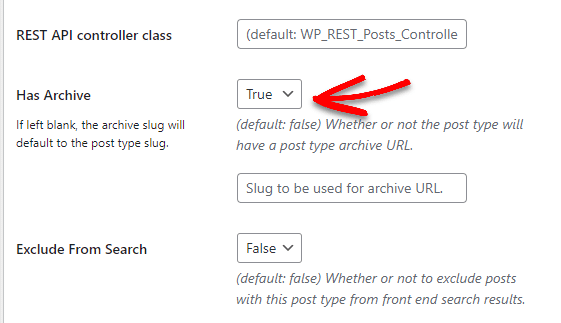
Then, scroll far down to the Settings section near the bottom of the page and change the Has Archive dropdown to True.
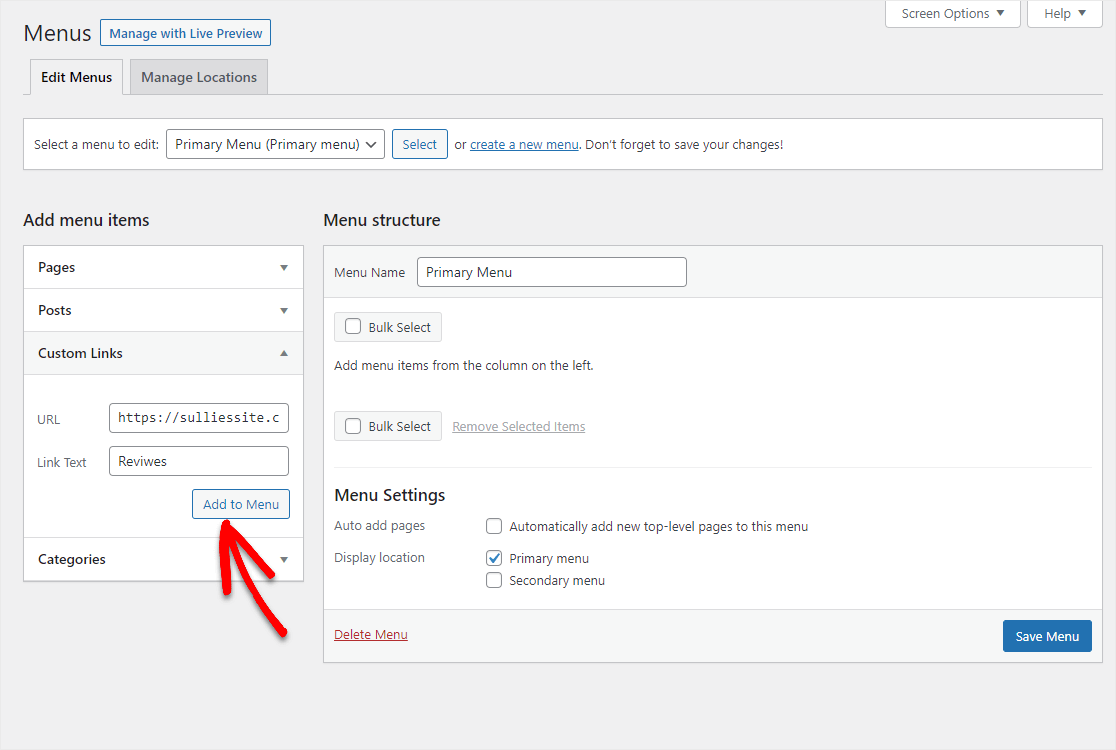
Then from the WordPress dashboard, go to Appearances » Menus and expand the Custom Links tab. Once you add a link to your reviews, visitors will be able to navigate to them on your website. Click Add to Menu then Save Menu to complete this step.
Lastly, go to your site to view the reviews. In our example, the link is https://ift.tt/3sflBHF.

And there you have it! You now know how to add user reviews to your website with a form in WordPress.
For more advanced ways to display these reviews on your site, check out these resources:
- 12 Most Useful WordPress Custom Post Types Tutorials
- How to Style Contact Forms in WordPress
- How to Customize WPForms with CSS Hero
Create Your User Review Form Now
Add Your Own User Review Form to Your Site
You can add a user review form to your WordPress website just like this one using WPForms Pro.
WPForms Pro is the best way to get professional forms on your WordPress website without needing to pay a web designer to do it for you. You can build and manage all your forms on your own, even if you’re a beginner.
Not only does it come with the ability to add user reviews to your site through a form, but it also has a ton of other amazing features you can use to start getting more revenue from your website.
- It’s the most beginner-friendly WordPress contact form plugin and uses a drag and drop builder to create any form you’ll need
- Accept Stripe and PayPal through your forms to sell products and services online
- It lets you create a multi-page form to break the form into multiple pages and enhance the user experience
- You can use a file upload form field to collect photos from people to add to their reviews
- Integrates with the most popular email marketing services
- It’s fully responsive and forms will look great on all devices
- Use features like Conversational forms to make your forms convert even better
- Conditional logic helps you keep your forms clutter-free to keep visitors focused on completing the form
- You get access to priority support from a friendly and knowledgeable team.
Ready to build your user review form? Get started today with the world’s best WordPress form builder plugin. WPForms Pro offers a 14-day money-back guarantee, so there’s nothing to lose.
If you’re interested in selling your products and services online, check out our post on how to create a simple order form in WordPress.
And don’t forget to check out the best hosting providers list to make sure you’re using the one that’s right for your website.
So, what are you waiting for? Get started with the most powerful WordPress form plugin today.
And don’t forget, if you like this article, then please follow us on Facebook and Twitter.
The post How to Make a User Review Form to Add to Your WordPress Website appeared first on WPForms.
source https://wpforms.com/how-to-allow-users-to-leave-a-review-on-your-wordpress-site/
