
If you use Excel often at your workplace or for personal use, then you probably have some daily tasks that are quite tedious and repetitive.
Whether it’s importing and cleaning up data or exporting and organizing to match your client’s needs, there are a lot of times when you have to click on the same buttons and type the same information over and over again.
The good thing is, most, if not everything, that you can do using the mouse and keyboard in Excel can be replicated by Excel itself using Macros.
In this article, I am going to show you on how to create a simple Macro to start automating the repetitive task that you may have.
Record a Macro in Excel
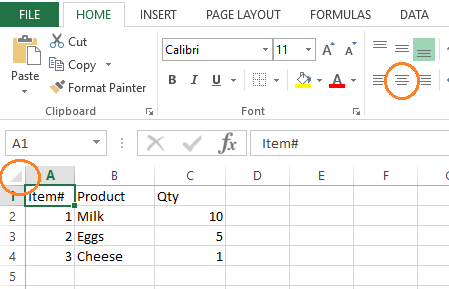
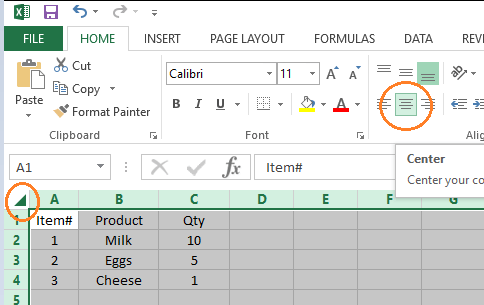
Imagine you get a data extract from a client where the fields are not centered. As part of your daily work, you are required to center the fields by clicking the cells on the top left corner and setting the text alignment to center.
Using a macro, you can record the activity once, and let the macro repeat the same set of commands for you. Here are the steps:
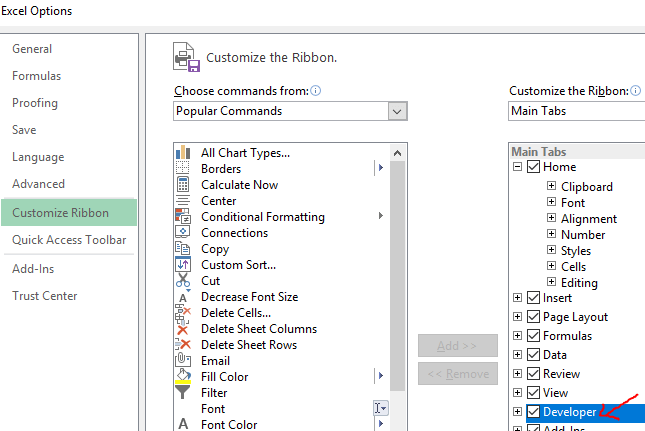
First, enable the Developer tab in excel by clicking File -> Options -> Customize Ribbon -> Tick Developer and click OK.
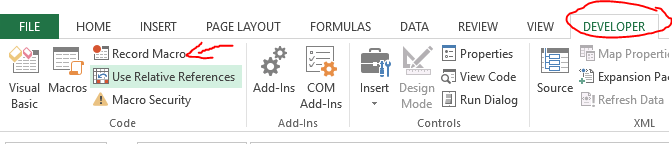
Once it is enabled, go to Developer -> click Record Macro.
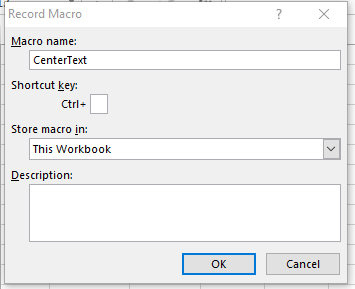
You can name your macro anything (in this example I named it “CenterText”) and click OK.
Also, you’ll have the option to give the macro a keyboard shortcut, which makes it much easier to run over and over again without having to go to the Developer tab.
In addition, the Store macro in option is really useful if you want to create a generic macro that will work across any Excel workbook. Instead of choosing the default This Workbook, you can also choose Personal Macro Workbook, which will allow you to use the new macro with any future workbook that you open or create in Excel.
 Next, start your activity by going clicking the cells and center the fields using your mouse. The Macro will record your clicks and the exact cell/icon that you click within the Excel window and translate that into a special code called VBA.
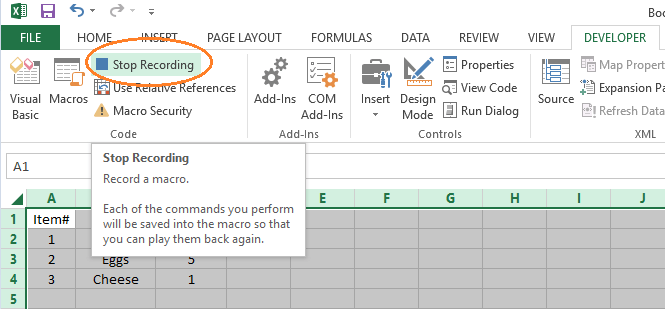
Once done, go back to Developer tab and click Stop Recording.
Congratulations! You have recorded your first macro. The next time you have a new data extract that was not centered, you just need to go to Developer -> Macros -> Select the macro name -> click Run .
The macro will repeat actions that you have recorded (e.g. centering text for all cells in this exercise).

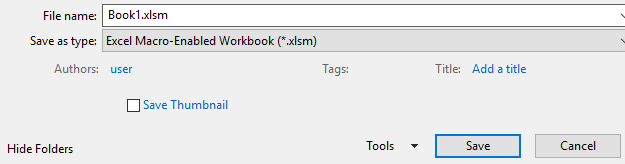
The last step is to save the file as .xlsm extension (not the standard .xlsx), so that your excel file will retain the macros that you have recorded to be used in the future. Remember, you don’t have to do this if you chose Personal Macro Workbook when creating the macro.
One you get a hang of it, several hours of manual editing in Excel can be completed in a much shorter time window with macros. By understanding that Excel has the capability to record repetitive actions and replay them, the possibility of automation that you can create is as big as your imagination.
The rule of thumb is, anything that you can complete using mouse and keyboard can be repeated/automated many times quicker using a macro. Enjoy!
The post How to Record Your First Excel Macro appeared first on Online Tech Tips.
