Do you want to create a camp registration form in WordPress? With a camp registration form, you’ll register more campers, collect payments immediately, and eliminate waiting on registrations to arrive by mail.
So in this tutorial, we’ll show you how to create an online camp registration form for your WordPress website.
Click Here to Make Your Camp Registration Form in WordPress Now
Why Use a Camp Registration Form in WordPress?
Campers see camp as a time to slow down, eliminate stress, and clear their minds. But if you’re a camp administrator, this is the most hectic and stressful time of the year.
Also, campers don’t want to fill out lengthy paper forms and then send a check by mail. And, camp administrators don’t enjoy dealing with all that paperwork either. So you can waste hours sorting through mail, trying to decipher people’s handwriting, and dealing with paper checks.
What Makes a Good Design for a Camp Form?
A well-designed camp registration form should serve 2 purposes: produce a great user experience and give camp administrators better information.
So, your camp registration form should take campers less than a couple of minutes to fill out while still providing you with what you need to get them signed up.
And we all know that people aren’t always using a desktop computer. So, you’ll want to make sure that they can register using their smartphones, tablets, and laptops. This means you’ll need a “mobile-friendly” registration form that looks great on all these devices.
So why not try an online camp registration form? Taking registrations online is better for many reasons.
For example:
- More Registrations: Since they can register from anywhere, people are more likely to complete the registration process.
- Better Information: No more trying to interpret poor handwriting, and you’ll get correct and readable details.
- Immediate Payment: As soon as they register for your camp, you’ll have their registration fees.
- Easier Organization: Keep all your camper’s information in one place for easy access.
So now that you know why to have a camp registration form on your WordPress website let’s jump into how you can easily create your own.
How to Create a Camp Registration Form
Here’s our easy step-by-step tutorial that shows you how to build your own camp registration form online.
Step 1: Create an Online Camp Registration Form in WordPress
WPForms is the easiest way to create an online camp registration form. WPForms Pro has a massive collection of pre-made templates for every niche and organization, including many online registration form templates.
Getting started is super easy. Just install and activate the WPForms plugin. If you need some help, that’s okay, just check out this step-by-step guide on how to install a plugin in WordPress.
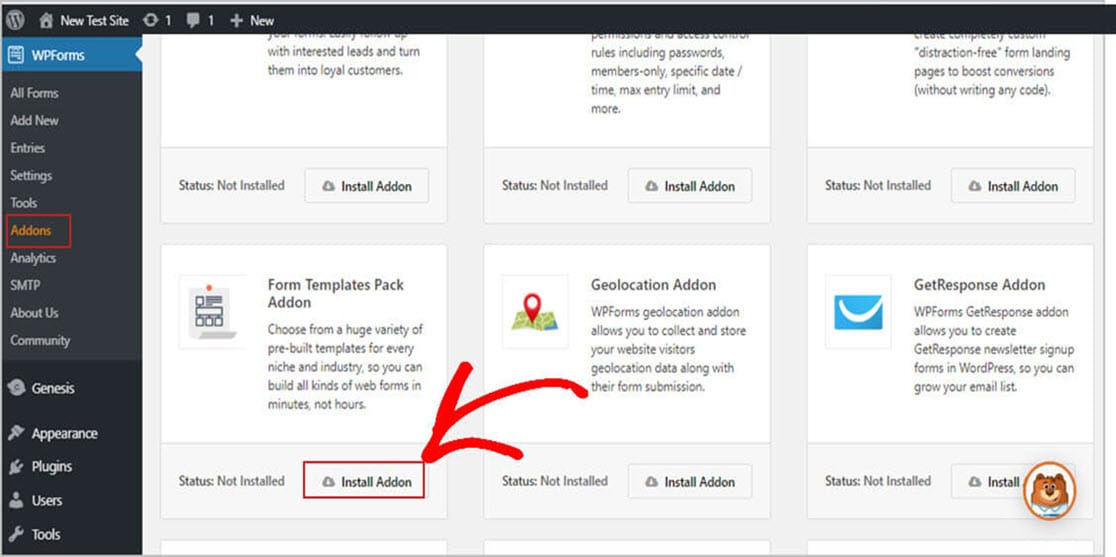
First, you must install and activate the Form Templates Pack addon.
To do this, go to WPForms » Addon and find the one labeled Form Templates Pack addon.
Next, click on Install Addon.
Alright, now that you’ve activated the plugin, you can begin creating your new form.
Next, head over to WPForms » Add New and type in a name for your camp registration form. Don’t get hung up here. We’ll show you how to rename it in just a minute.
Once you’re done, scroll down to the area labeled Additional Templates and type “Camp” in the search bar. Then select the Create a Camp Registration Form.
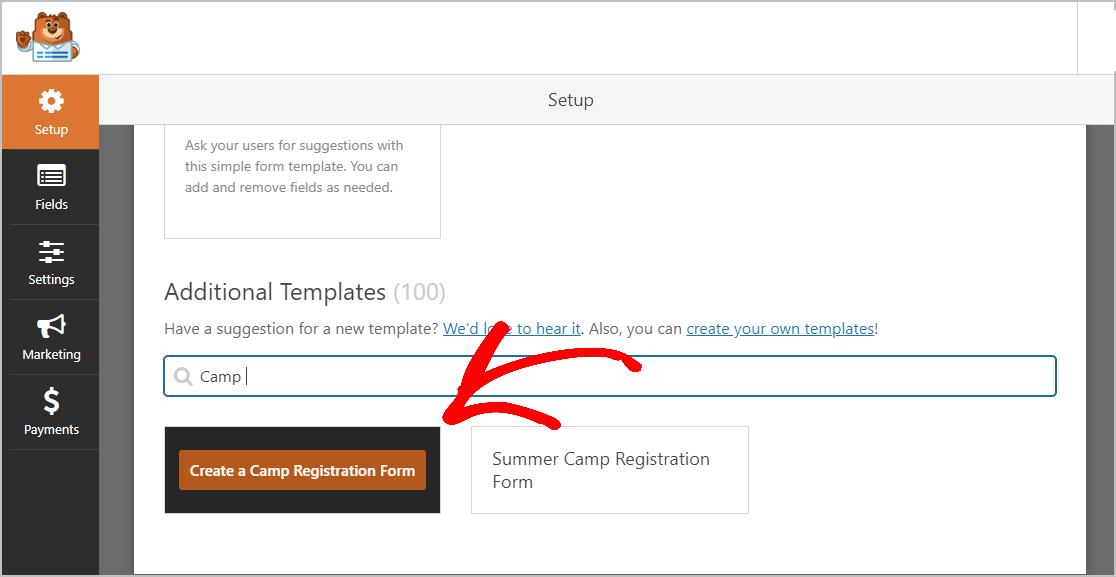
Once your form template loads, you’ll see that most of the fields you’ll need are already there. Don’t worry. You can add, delete, arrange, and edit these fields any way you want.
Here is a list of the default fields included on the camp registration form:
- Name
- Age Group
- Desired Cabin
- Does the camper have any known allergies?
- Has the camper been camping before?
- Emergency Contact Information
- Relationship Information
One thing many camp administrators deal with is getting forms filled out and sent back on time. Here’s a pro tip on how you can easily overcome this problem.
Don’t ask for too much information on your camp registration form. Campers will feel overwhelmed and click away from your site.
So, what do you do instead?
We’ve got some great options for you.
You can:
- Automatically send a confirmation email containing a link to online forms on your camp website
- Redirect them to a special “Thank You for Signing Up” page that includes a link to your forms page
- Send them to a different site to complete the forms there
Keep reading to learn how.
One of WPForms most significant features is that you can add additional fields to your form using the drag and drop functionality.
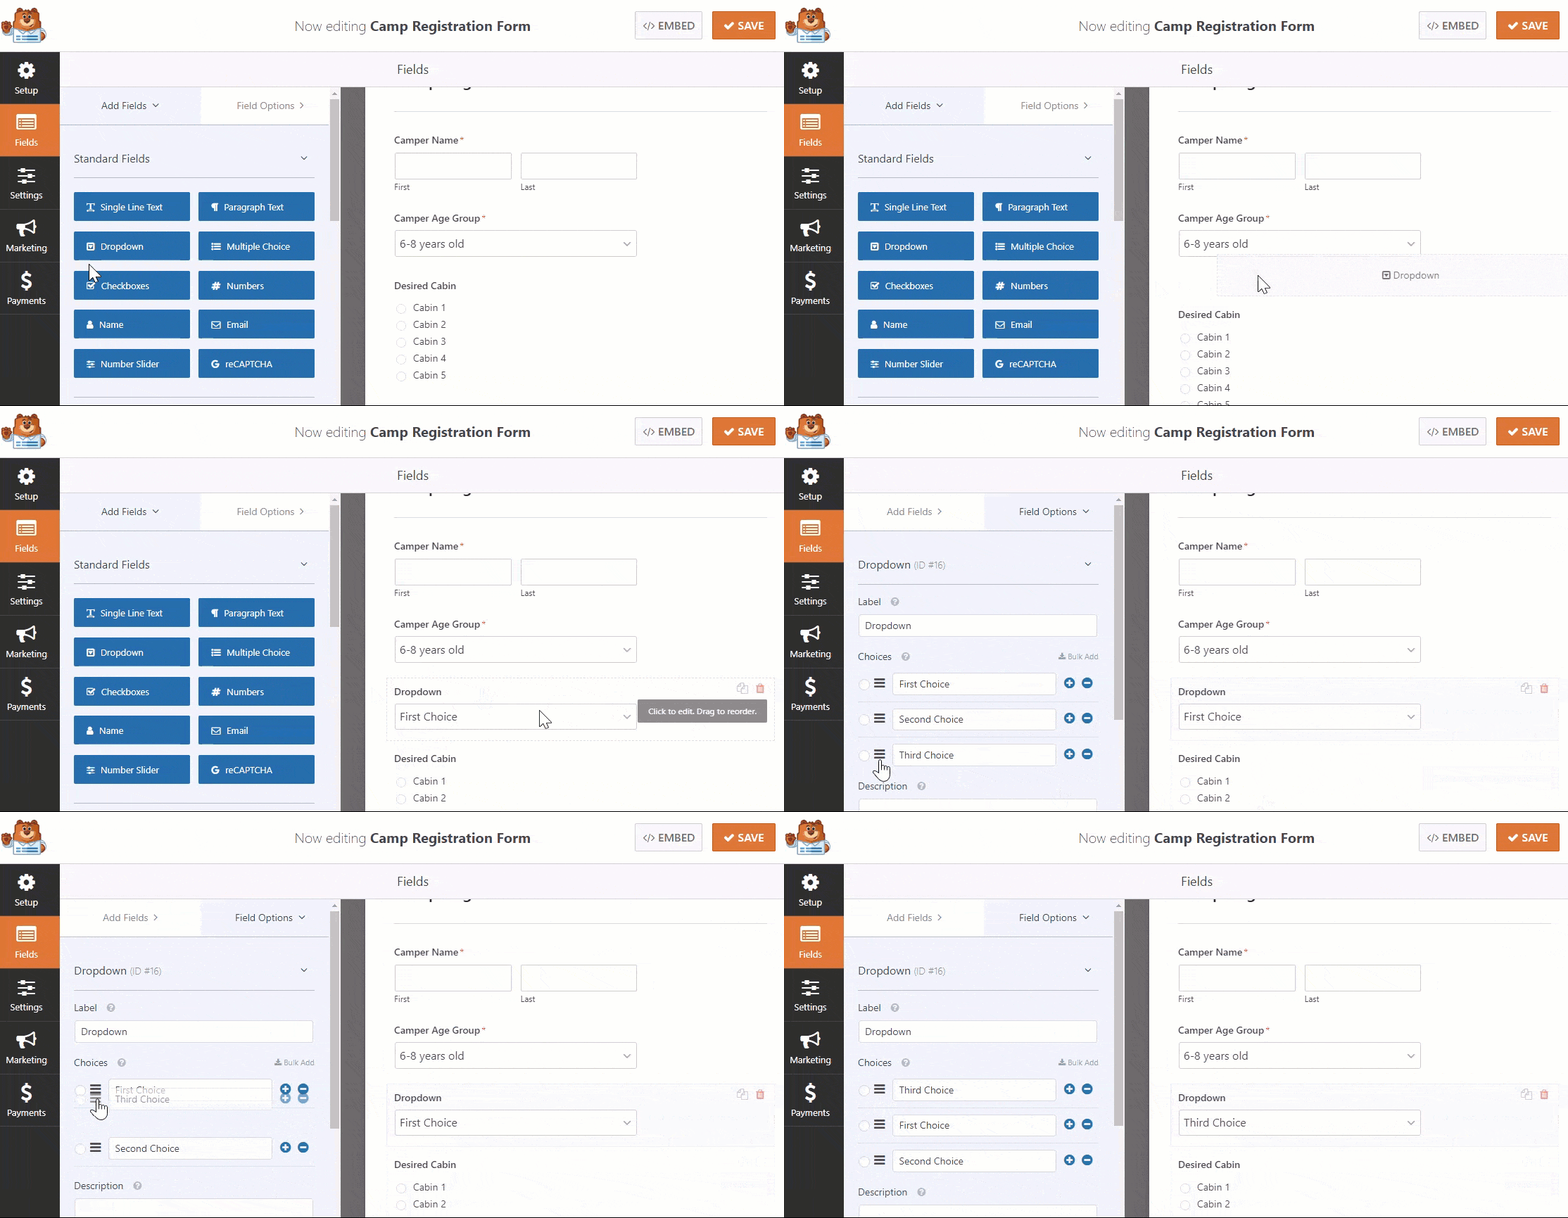
Next, click on the field to make any changes. You can also click on a field and drag it to reposition the order on your camp registration form.
In these times, people prefer to pay with a debit or credit card. Sadly, many camps only take checks. So, why not speed up your registration process by placing an online payment option right on your form?
You’ll have more people register since it’s so convenient. Plus, you’ll get instant cash to get your camp ready before they roll in. And if you want to boost sign-ups, offer an early bird special with a coupon code field, and watch your registration numbers climb.
Curious which payment service to use? Read our guide on Stripe vs PayPal.
WPForms makes it easy to accept payments right on your online camp registration form too. You can take payments using either Stripe or PayPal. If you need some help with this, we have some excellent documentation on how to allow users to choose a payment method.
Also, if you want to use just Stripe on your form, check out how to accept payments with Stripe.
So once you’re finished and your form looks the way you want it to, click Save.
Step 2: Configure Your Form Settings
Now, let’s configure some settings. To start, go to Settings » General.
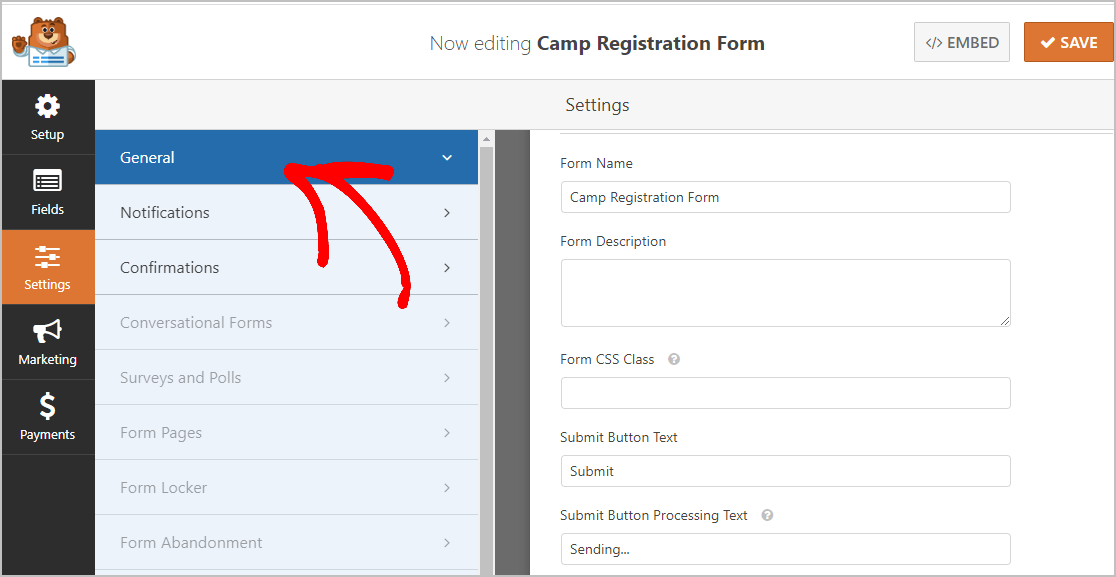 Here you can configure the following:
- Form Name — Change the name of your form here if you’d like.
- Form Description — Give your form a description.
- Submit Button Text — Customize the copy on the submit button.
- Spam Prevention — Stop contact form spam with the honeypot feature or Google reCAPTCHA. The honeypot feature is automatically enabled on all WordPress forms so if you decide to use another form of spam prevention, unclick this option.
- AJAX Forms — Enable AJAX settings with no page reload.
- GDPR Enhancements — You can disable the storing of entry information and user details, such as IP addresses and user agents, in an effort to comply with GDPR requirements. In addition, check out our step-by-step instructions on how to add a GDPR agreement field to your simple contact form.
When you’re done, click Save.
You’re making great progress!
Step 3: Configure Your Form Notifications
Notifications let you know when someone has submitted a camp registration form on your website.
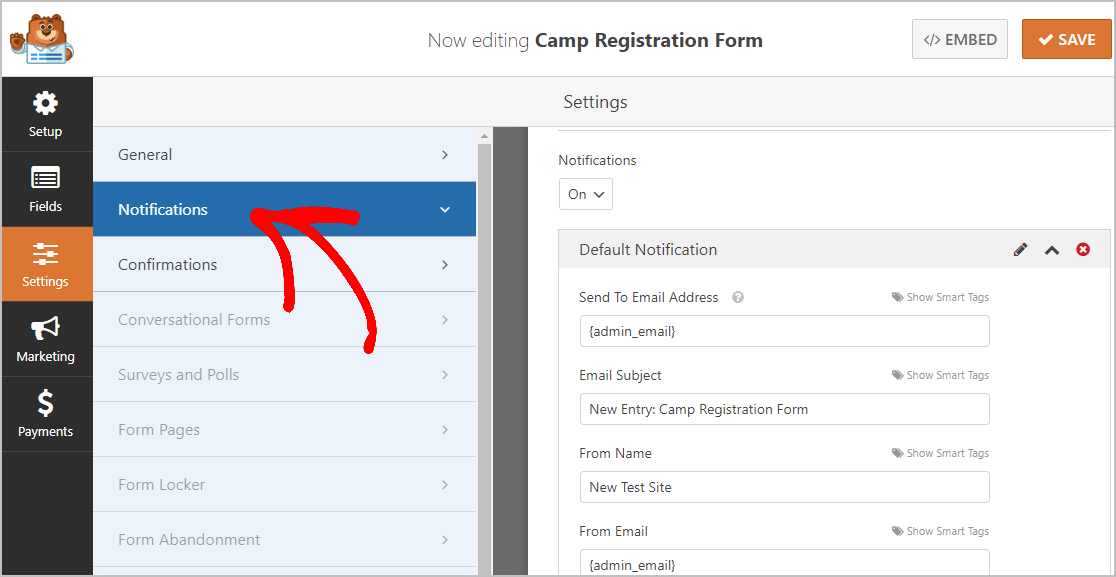
And you don’t even need to enable this because it’s on by default.
If you use the Smart Tags feature, you can also email notifications to the rest of your team when you receive a new sign up.
However, if you need some guidance with this step, then you can check out our handy documentation on how to set up form notifications in WordPress.
And you can also notify more than just one person when a camp registration is submitted.
So for example, you can send a notification to:
- Yourself
- The person who registered
- Your camp coordinator
- And others
For help, just see our easy step-by-step tutorial on how to send multiple form notifications in WordPress.
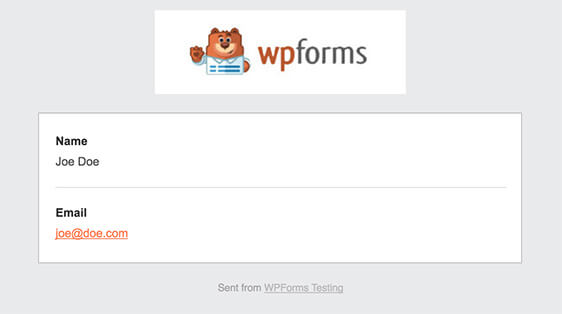
And if branding is essential to your camp, you can include your logo, so all your email correspondence looks consistent. For help with this, check out this guide on adding a custom header to your email template.
Step 4: Configure Your Form Confirmations
A confirmation message is what those who register for your camp will see once they’ve completed the sign-up. Confirmations let people know that you have received the submission and allows you to tell them what step they need to take next.
There are 3 confirmation types in WPForms:
- Message: This is the default type of confirmation used in WPForms. It’s just a simple customized message letting visitors know their registration is being processed. You can reword this however you want to. If you’re unsure where to begin, look at some of these great success messages that show appreciation for sign-ups.
- Show Page: This option will take your registered campers to a specific page on your site that you’ve created to thank them for registering for your camp. Check out our tutorial on redirecting your visitor to a thank you page if you need some help. Also, you’ll also want to head over to our article on creating effective Thank You pages.
- Go to URL (Redirect): This confirmation option sends those who have registered to a page on an entirely different website.
Okay, now we’ll set up a customized message that your guests will see when they register for your camp.
To begin, click on the Confirmation tab in the Form Editor just under Settings.
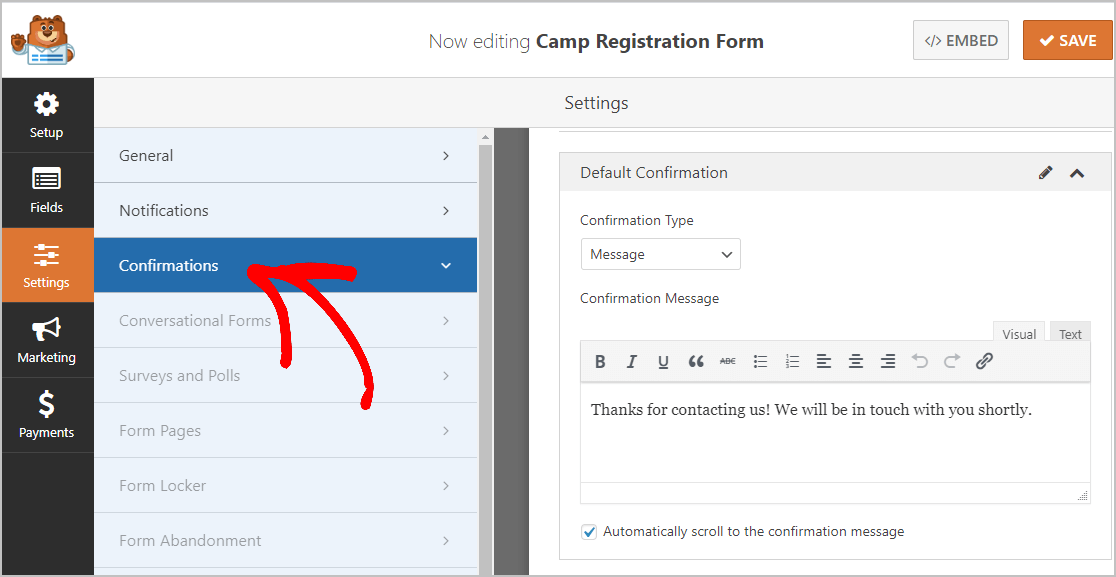
Then, customize your confirmation message. Once you’re done, be sure to click Save.
For help with other confirmation types, see our documentation on setting up form confirmations.
Now here’s the last step.
Step 5: Add Your Camp Registration Form to Your WordPress Site
Now that you’ve finished creating your camp registration form, you just need to add it to your WordPress website. Don’t worry. This is the easiest part.
WPForms lets you place your forms on blog posts, pages, and sidebar widgets.
To get started, create a new page or post in WordPress, or you can just update an existing one if you like.
Next, click inside the first block, that’s the blank area right underneath the page title, once it’s opened up type in WPForms, then click on the Add WPForms icon.
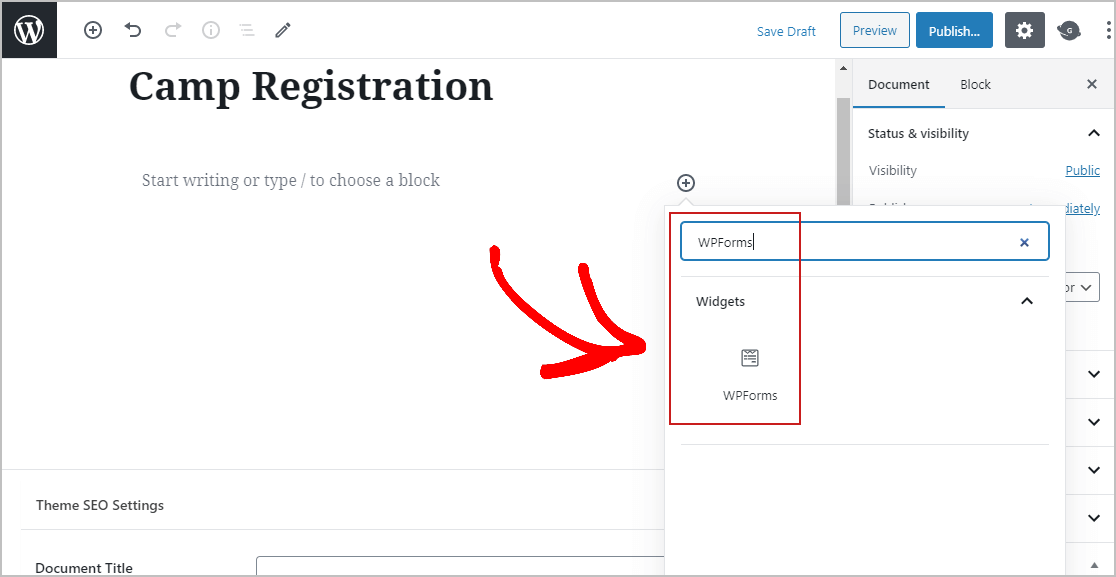
The little WPForms widget will appear inside of your block. Now, click on the WPForms drop-down menu and select the form you just created.
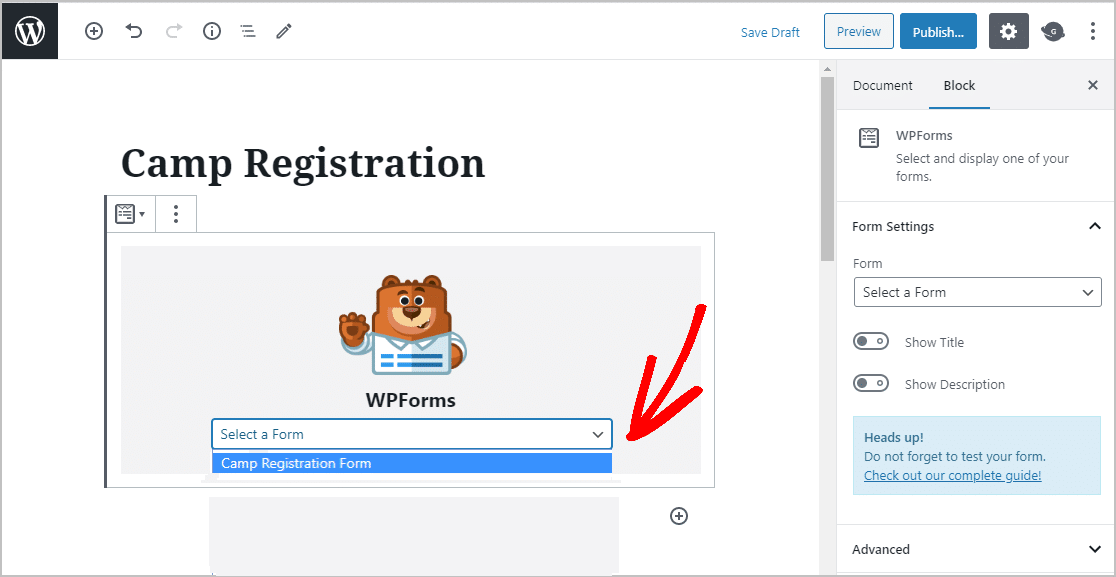
Next, click Preview, and you can view your camp registration form just like it will appear on your website.
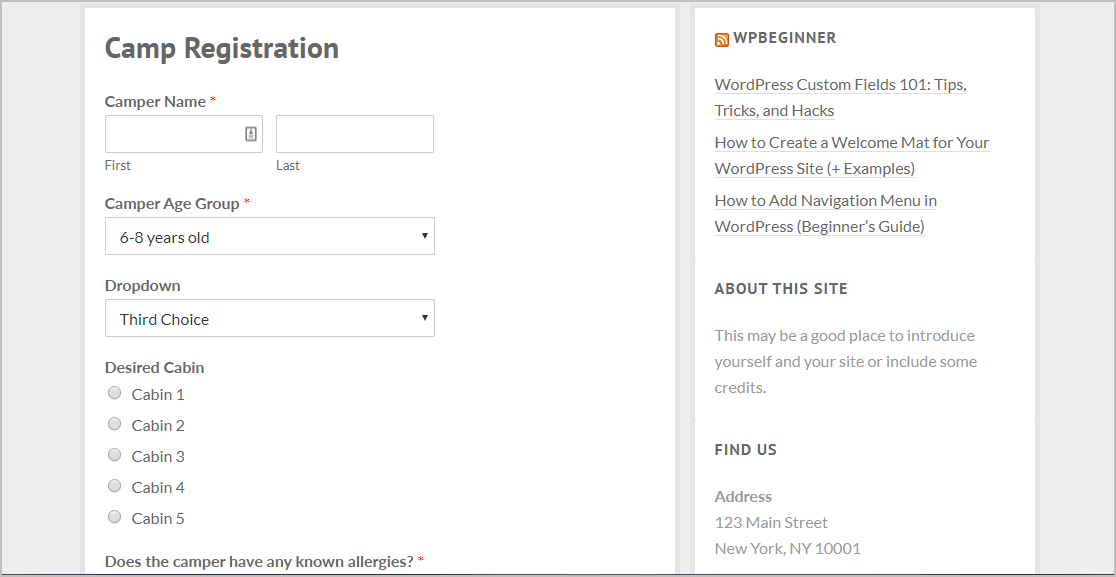
So once you’re satisfied with how it looks, hit that Publish button, and your camp registration form will go live on the Internet.
And you can easily view your registration form entries too. Just check out our complete guide to form entries. WPForms makes it easy to see, search for, filter, print, and delete registration forms, and makes planning so much easier.
Click Here to Make Your Camp Registration Form in WordPress Now
Final Thoughts
You did it! Now you know exactly how to create a camp registration form in WordPress. You’ll also want to read our post on the best WordPress pop-up plugins.
Keeping things as simple as possible on your form is a powerful way to get more people to register for your camp this year.
So what are you waiting for? Get started with the most powerful WordPress forms plugin today. WPForms Pro includes a free online camp registration form for WordPress and offers a 14-day money-back guarantee.
And if you enjoyed this post, follow us on Facebook and Twitter for more free WordPress tutorials.
The post How to Create a Camp Registration Form in WordPress appeared first on WPForms.
source https://wpforms.com/camp-registration-form/

