
Want to build an incident report form online for your business using WordPress? Using an online incident report form for your business, you can discover the causes of things faster, and prevent incidents from happening again.
Here’s a quick tutorial on how to build an incident report form in WordPress.
Click Here to Start Building an Incident Report Form Online Now
Incident reports are used to track workplace injuries, property damage, health issues, security breaches, and misconduct. By using an online incident form you’ll encourage workplace safety.
Online forms make it easy to keep up with your accident or injury reports so you can take action faster and streamline filing insurance and workman’s compensation claims.
You’ll be able to share reports with your Human Resources department, plus notify supervisors and the rest of your management team. And, since it’s digital, you can print as many copies as you need for those important safety management meetings.
For all these reasons, your business, healthcare, or industrial facility should consider having an online incident report form on your site.
In this tutorial, we’ll show you how to create an online incident report form in WordPress.
Why Use an Online Incident Report Form?
Even in the best workplaces, things can sometimes go wrong. But thankfully, most businesses have safety officers and systems in place to deal with them. A workplace incident is usually an event, situation, or condition which:
- Causes disruption or delays business operations
- Creates a hazard to individuals within the organization
- Affects the operational systems of the business
- Creates negative media attention or hurts reputation
Using an online incident report form your business can help with your organization’s ability to do investigations, create action plans, and prevent similar issues from happening again.

When Should You Fill Out an Incident Report?
You should fill out an incident report immediately after an incident occurs. So, employees or members of your management team should file a report as soon as possible. They should submit incident reports whenever:
- Injuries and accidents occur
- Near misses incidents take place
- Property and equipment damage happens
- Health or safety issues come up
- Security breaches take place
- Instances of misconduct occur
Keep in mind that even if there’s no property damage or personal injury the Occupational Safety and Health Administration (OSHA) requires a “near-miss” form to be filed. A near-miss is a situation that could have resulted in property damage or personal injury if there’d been a slight shift in time or a physical position.
How Do You Write an Incident Statement?
Often people will ask, “how do you write an incident statement”? Writing an incident report can be a time-consuming task. However, if you’re using a form that provides all the fields, you’ll quickly have all the information you need about the incident.
Having an online incident form means it’s always available, so employees won’t need to request a form to fill out. And, because it’s so handy, they can complete forms quickly while the incident is still fresh in everyone’s memory. This makes it so all the info is as accurate as possible, and everything is included in the report.

So, your online incident report form should include these kind of details about the incident:
- Names of the parties involved: Names and role of the people involved in the incident
- Witnesses: Names of any witnesses to the incident
- Exact time: The date and time it happened
- Type of incident: Clear description giving specific information of both where and when the incident happened
- Damage description: Give a detailed description of injuries, near miss, property damage, health issues, security breach, or misconduct
Why You Should Stop Using Paper Incident Forms
If your business is like a lot of others, it’s sometimes hard to get employees to fill out an incident report. And, even if they’re submitted, they aren’t filled out quickly, or they lack important information. This makes it challenging to investigate the incident, take action, and file the appropriate forms.
Receiving incident reports in this way creates a headache for your safety officer or other occupational health and safety specialists. It’s difficult enough for your Environmental Health and Safety (EHS) personnel to keep up with:
- Enforcing Safety Policies
- Conducting Safety Audits and Inspections
- Investigating Incidents
- Ensuring OSHA Compliance
- Training Employees
While the old standard paper forms served their purpose over the years, they’ve become outdated in our digital age where we need instant communication. But, having an incident report form on your WordPress site makes it easy to receive incident reports and helps you eliminate the common issues with paper forms like:
- Poor handwriting
- Incomplete information and errors
- Being lost or damaged
- Require manually scanning
- Take too much time to process

So why not try using an online incident report form on your WordPress website?
Here are just a few reasons you should ditch the paper forms and switch to an online incident form for your business or other organization. You or your EHS officer can:
- Collect Data Quickly: Real-time incident reporting allows you to collect data faster and respond quicker.
- Organize More Efficiently: No more misplacing, sorting, or manually copying forms.
- Access Forms and Data Easily: Use a desktop computer, smartphone, or other device to file and retrieve forms.
- Share Information Rapidly: Send to the management team, Human Resources, or others with just the click of a mouse.
Okay, so we’ve looked at why you need to use an online incident report form. Now we’ll show you how to create one.
How to Build an Incident Report Form Online
Are you asking yourself how to build an online incident report form for your WordPress website? Here’s an easy step-by-step tutorial showing you how.
Step 1: Create an Online Incident Report Form
Using WPForms is the easiest way to build an online incident report form for your healthcare facility, business, or industry. You should take a look at our employee incident report demo to get an idea of what you can do.
WPForms Pro’s has a large variety of pre-built templates for every business and industry, including tons of other templates you can use in your business.
The first thing you’ll want to do is install and activate the WPForms plugin. For more details, check out this step-by-step guide on how to install a plugin in WordPress.
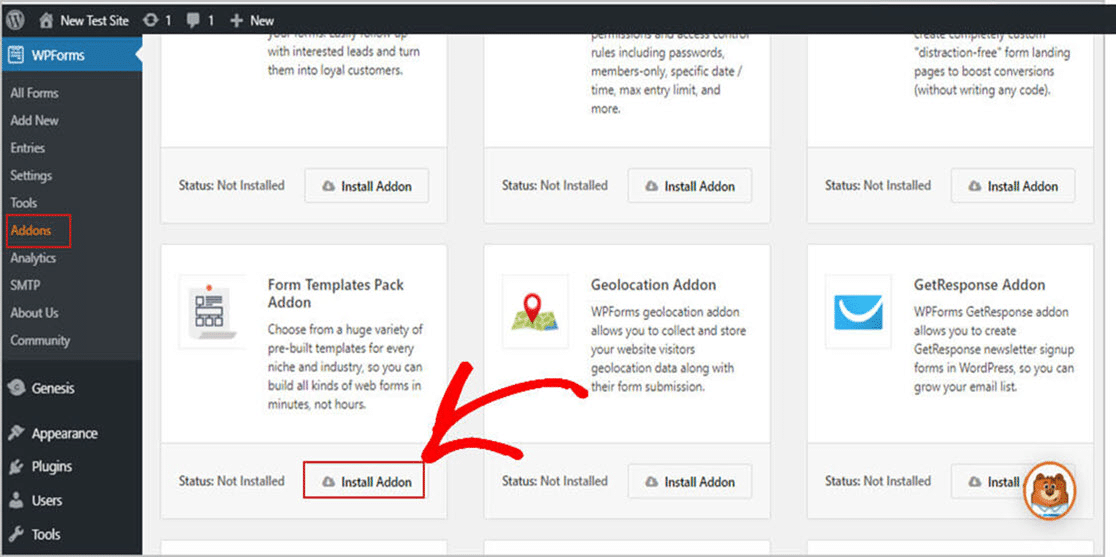
Next, you need to install and activate the Form Templates Pack addon.
To do this, go to WPForms » Addon and find the one labeled Form Templates Pack addon.
Click on Install Addon.
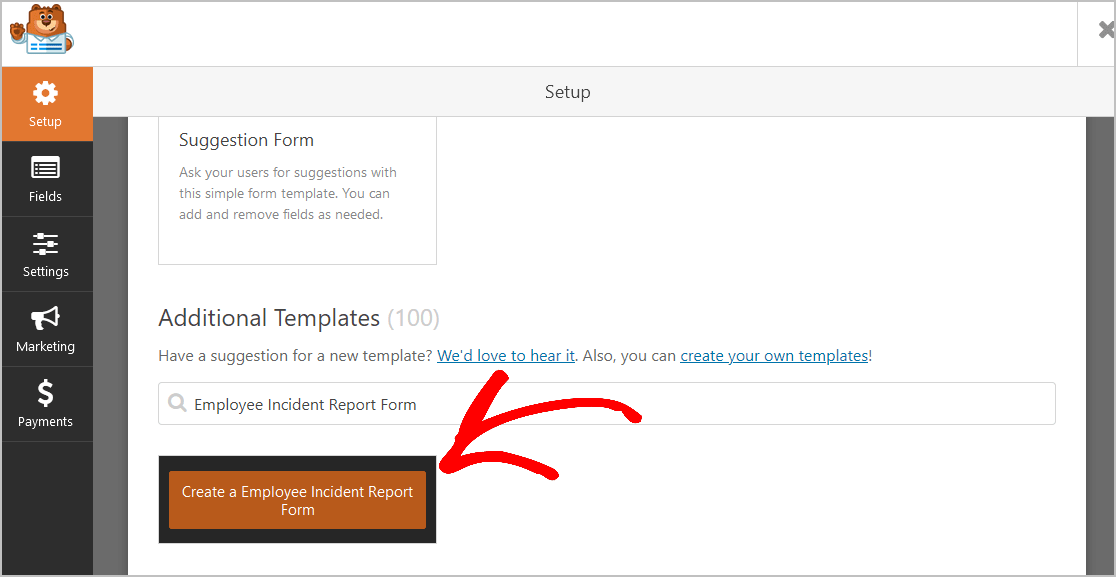
Now that the plugin is active, you can create a new form.
To do this, go to WPForms » Add New and type in the name of your form. Then, scroll down to the section labeled Additional Templates and type “Employee Incident Report Form” in the search bar.
Then, click the “Create an Employee Incident Report Form.
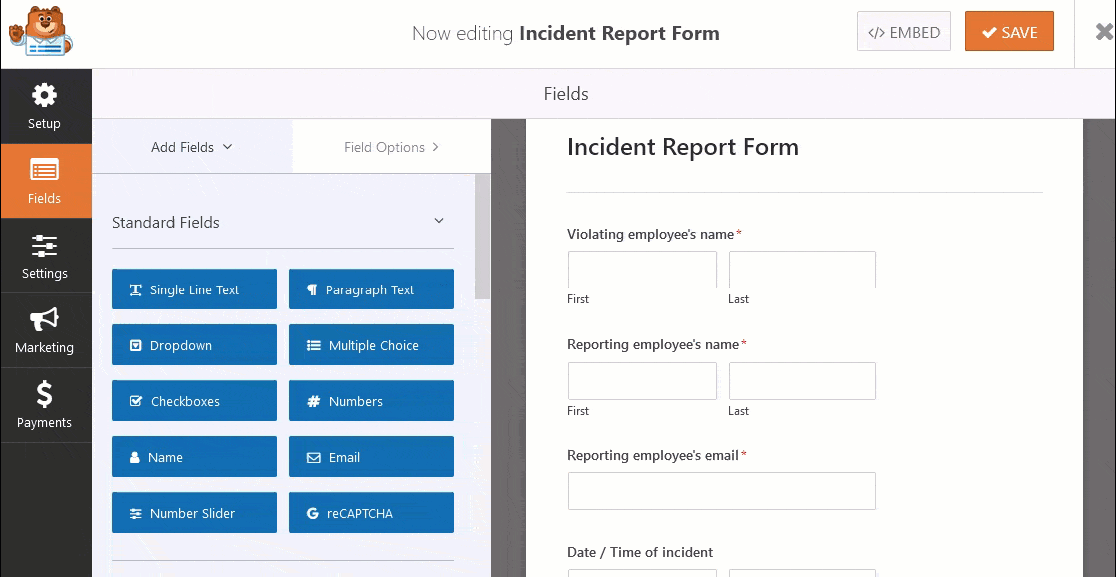
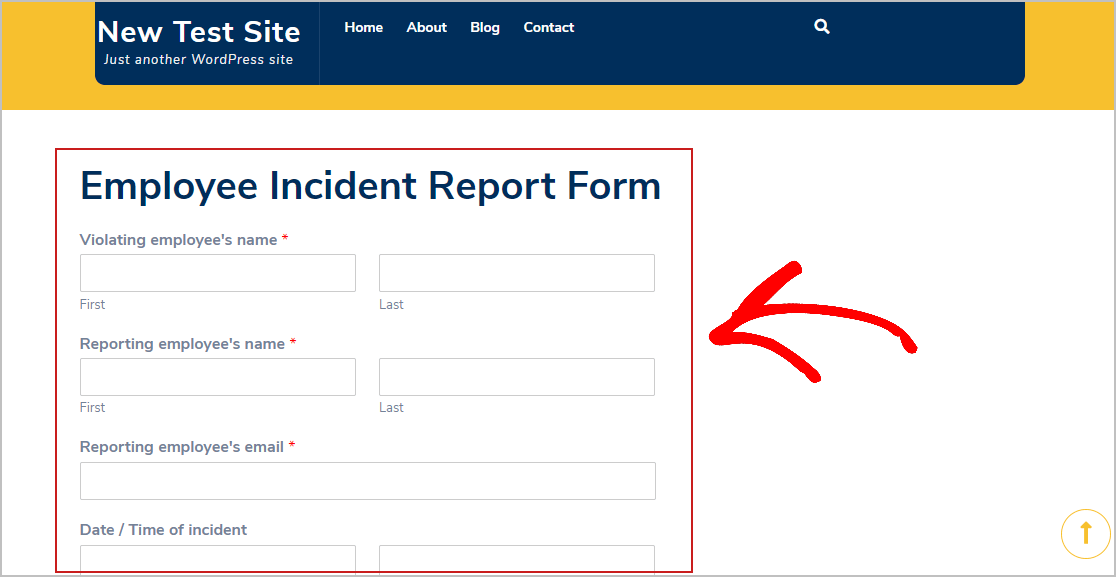
Once the pre-made form template loads, most of the work is already done for you. You’ll find the following fields are already in the form:
- Violating employee’s name
- Reporting employee’s name
- Reporting employee’s email
- Date / Time of incident
- What violation has the employee committed?
- Neglect of Duty
- Failure to Follow Instructions
- Inappropriate Behavior
- Attendance Related
- Damage to Company Property
- Theft
- Harassment
- Poor Work Performance
- Violation of Company Policy
- Please Describe the incident
- Report prepared by
If you’d like, you can add additional fields to your form by dragging them from the left-hand panel to the right-hand panel.
Then, click on the field to make any changes. You can also click on a form field and drag it to rearrange the order on your incident report form.
You can also use our Accident Report Form. Similar to the Incident Report Form, this form includes the following fields:
- I am report a…
- Loss of time/injury
- First aid incident
- Close call
- Observation
- Person Reporting Incident
- Person Involved in Incident
- Date/Time of Incident
- Please describe the event in detail
- Was damage done to the property?
- Yes
- No
- Was damage done to the property?
- Yes
- No
So regardless of which form you go with, when your form looks the way you want it to, click Save.
Step 2: Configure Your Form Settings
To start, go to Settings » General.
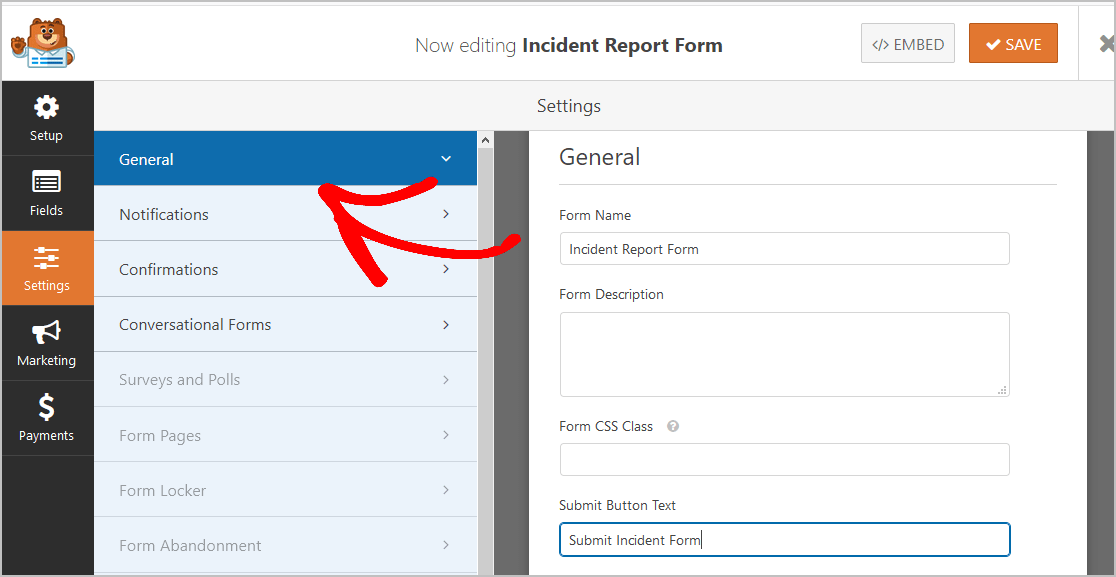
Here you can configure:
- Form Name: Rename your form here if you want to.
- Form Description: Give your form a description.
- Submit Button Text: Customize the copy on the submit button. In our example, we’ll change our submit button to something like “Submit Incident Form”.
- Spam Prevention — Stop contact form spam with the honeypot feature or Google reCAPTCHA. The honeypot feature is automatically enabled on all WordPress forms so if you decide to use another form of spam prevention, unclick this option.
- AJAX Forms — Enable AJAX settings with no page reload.
- GDPR Enhancements — You can disable the storing of entry information and user details, such as IP addresses and user agents, in an effort to comply with GDPR requirements. In addition, check out our step-by-step instructions on how to add a GDPR agreement field to your simple contact form.
When you’re done, click Save.
Step 3: Configure Your Form Notifications
Notifications are an impressive way to email employees once an incident report form is submitted on your website.
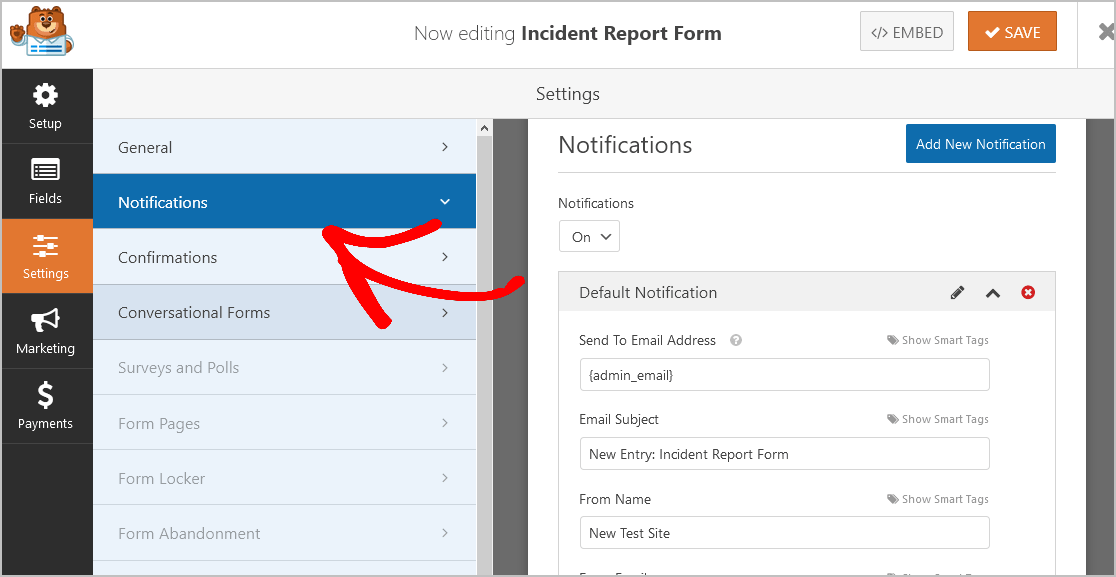
Unless you disable this feature, whenever someone submits an online incident report form on your site, you’ll get a notification about it.
If you use Smart Tags, you can also send a notification to the employee’s email inbox, letting them know you’ve received the submission, and someone from your safety management team will be in contact shortly. This assures employees their form has gone through.
For help with this step, check out our documentation on how to set up form notifications in WordPress.
WPForms also lets you notify more than one person when an incident report form is submitted. For instance, you can send a notification to yourself, the person submitting the request and your:
- Others working in EHS
- Immediate supervisors
- Managers
- Human Resources
Last, if you want to keep the branding of your emails consistent for your business or EHS department, you can check out this guide on adding a custom header to your email template.
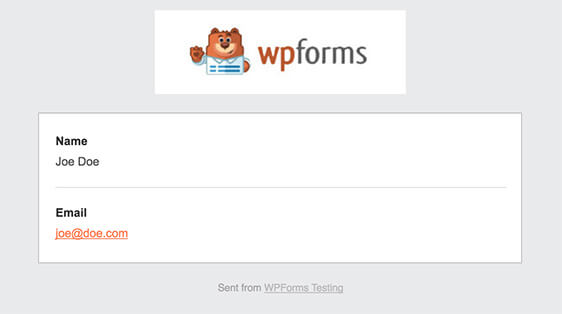
Step 4: Configure Your Form Confirmations
Form confirmations are messages that are displayed to the employee once they submit your incident report form. Confirmations let them know that their form has been processed and offers you the chance to tell them what step they need to take next.
WPForms has 3 confirmation types to choose from:
- Message: This is the default confirmation type in WPForms. When a site visitor submits your form, a simple message will appear, letting them know their incident report form is being processed.
- Show Page: This confirmation type will take your employees to a specific web page on your company’s website thanking them for filling out the incident report and allow you to inform them what they need to do next. For help doing this, check out our tutorial on redirecting customers to a thank you page. Also, be sure to check out our article on creating effective “Thank You” pages.
- Go to URL (Redirect): This option is for when you want to send employees to a specific page containing related information that’s found on a different website.
Let’s see how to set up a simple form confirmation in WPForms so you can customize the message your employees will see when they submit their incident report form.
To start, click on the Confirmation tab in the Form Editor under Settings.

Then, customize the confirmation message to your liking and click Save.
For help with other confirmation types, see our documentation on setting up form confirmations.
Now, you’re ready to add your incident report form to your website.
Step 5: Add Your Online Incident Report Form to Your Website
Now that you’ve built your online incident report form, you can add it to your WordPress website.
WPForms allows you to add your forms to various locations on your website, including your blog posts, pages, and even sidebar widgets.
To begin, create a new page or post in WordPress, or go to the update settings on an existing one.
After that, click inside the first block (the blank area below your page title) and click on the Add WPForms icon.
![]()
The handy WPForms widget will appear inside your block. Click on the WPForms drop-down and pick the form you’ve just created and that you want to insert it into your page.
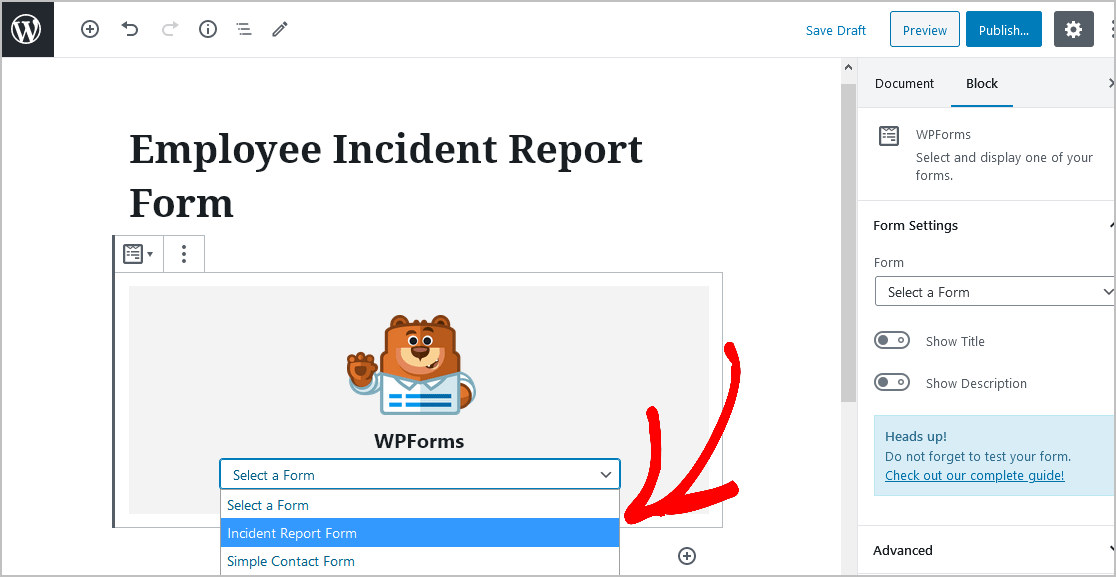
Now, click Preview, and you’ll see your incident report form as it will appear on your website.
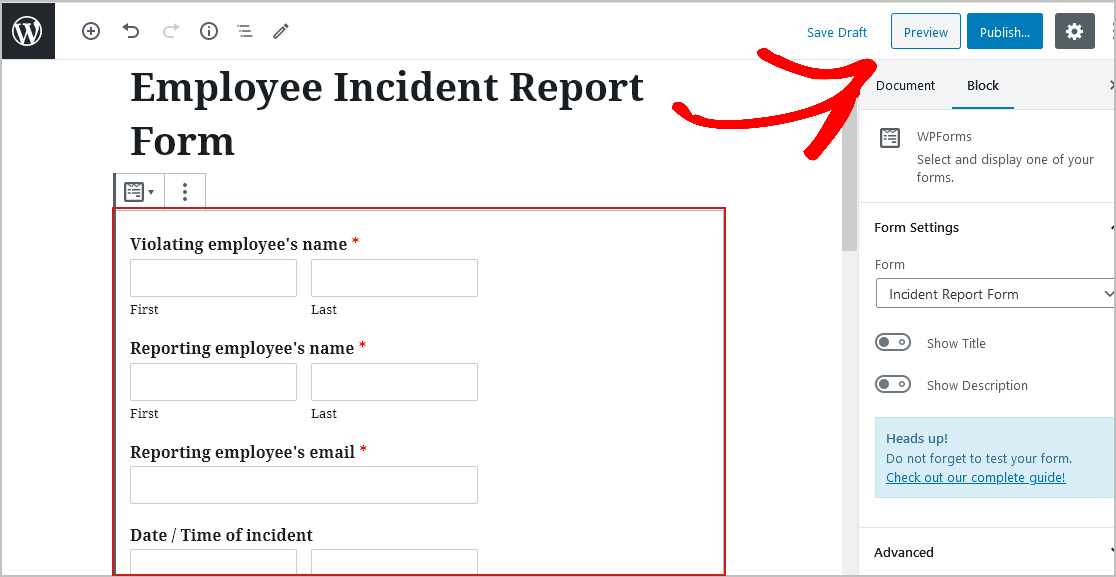
If you’re satisfied with the way your incident report form looks hit Publish and your form will go live on the Internet.
To view your incident report form entries after they’ve been submitted, check out this complete guide to form entries.
For example, you can view, search for, filter, print, and delete any incident report forms, which makes the record-keeping process that much easier.
Click Here to Start Building an Incident Report Form Online Now
Final Thoughts
And there it is! You now know precisely how to build an online incident report form for your WordPress website. Got a big project coming up that may need changes? Check out our post on how to create a change request form in WordPress.
So what are you waiting for? Get started with the most powerful WordPress forms plugin today. WPForms Pro includes a free online incident report template and offers a 14-day money-back guarantee.
And if you enjoyed this post, follow us on Facebook and Twitter for more free WordPress tutorials.
The post How to Build an Incident Report Form Online [TEMPLATE] appeared first on WPForms.
source https://wpforms.com/how-to-build-an-incident-report-form/

