Do you want to stop contact form spam forever?
WPForms makes it super easy to stop all spam from reaching your inbox. That’ll help improve security, and you’ll get better leads from your website.
In this article, we’ll show you all of the anti-spam tools in WPForms so you can quickly stop contact form spam for good.
Why Do Bots Spam Forms?
Since bots are automated, they crawl websites to try and find ways to send messages through WordPress contact forms.
Some bots are looking for ways to exploit your site or email list through a form. They might be trying to hijack your server to spread malware or send even more spam.
This is why you need a contact form plugin that helps you stop form spam, especially if you’re running a small business site. Not only will it cut out the hassle of dealing with spam contact form submissions, but it’ll also reduce the security risk of you (or your customers) receiving phishing emails.
To deal with contact form spam effectively, you need to use WPForms.
WPForms is the best form builder plugin for WordPress. It has tons of different anti-spam tools that will dramatically reduce or even eliminate contact form spam.
Even better, you don’t need to install any extra anti-spam plugins.
Create Your Spam-Free Contact Form Now
How to Stop Contact Form Spam
There are a few easy ways to stop contact form spam with WPForms. Here are some quick links for you to jump to the different methods.
- Enable the WPForms Anti-Spam Token
- Use Google reCAPTCHA on Your Contact Form
- Add hCaptcha to Your Contact Form
- Use the WPForms Custom CAPTCHA Addon
- Block or Allow Specific Email Addresses on Your Forms
If you’re new to WPForms, you’ll want to install and activate the WPForms plugin and create a simple contact form. With WPForms, it takes less than 5 minutes.
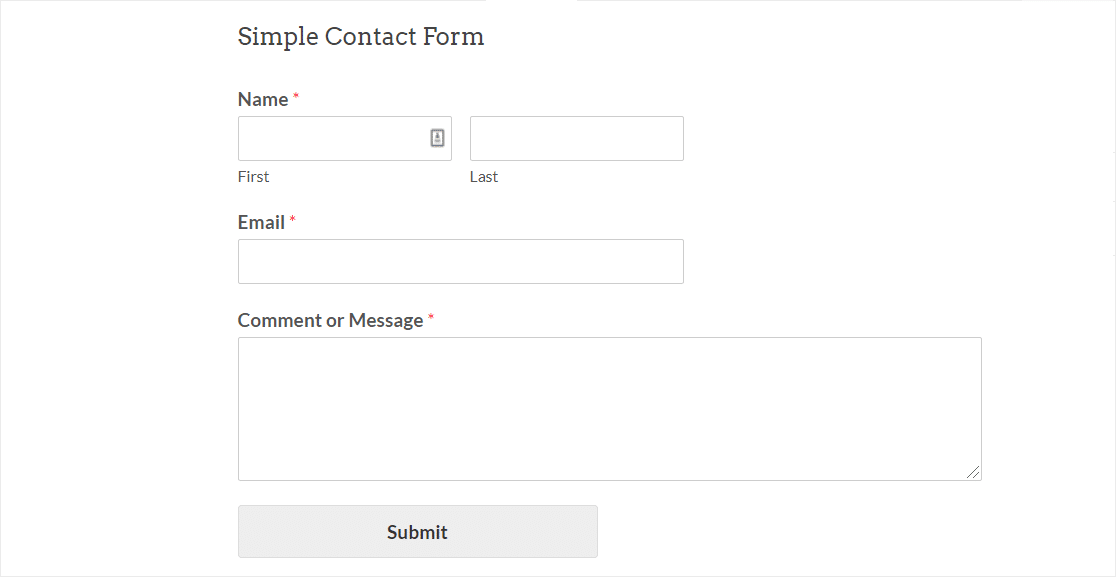
Now you’re ready to set up your favorite spam prevention tool.
First, let’s look at the easiest and fastest anti-spam method.
Method 1: Enable the WPForms Anti-Spam Token
If you want a super easy spam prevention method, the WPForms anti-spam token will be the perfect anti-spam solution for you.
The anti-spam token is great because the user doesn’t need to do anything to get past the spam check.
Behind the scenes, we add a secret token that’s unique to each submission. Spambots can’t detect the token. And without it, they get stuck and can’t submit the form.
The WPForms anti-spam token is automatically enabled on each new form you create. On old forms, you might still be using the old WPForms honeypot spam field. You’ll want to enable the new token setting manually to update your spam protection.
How to Add the Anti-Spam Token to Your Forms
To enable the anti-spam token, first edit your form to open it up in the form builder.
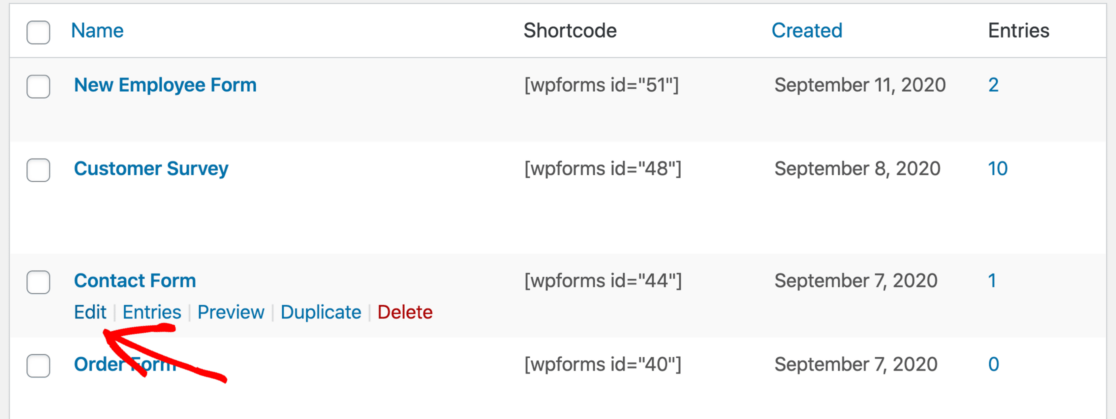
When the form builder opens in your browser, go to Settings » General.
On the right hand side, scroll down to the bottom. Then check the Enable anti-spam protection checkbox.
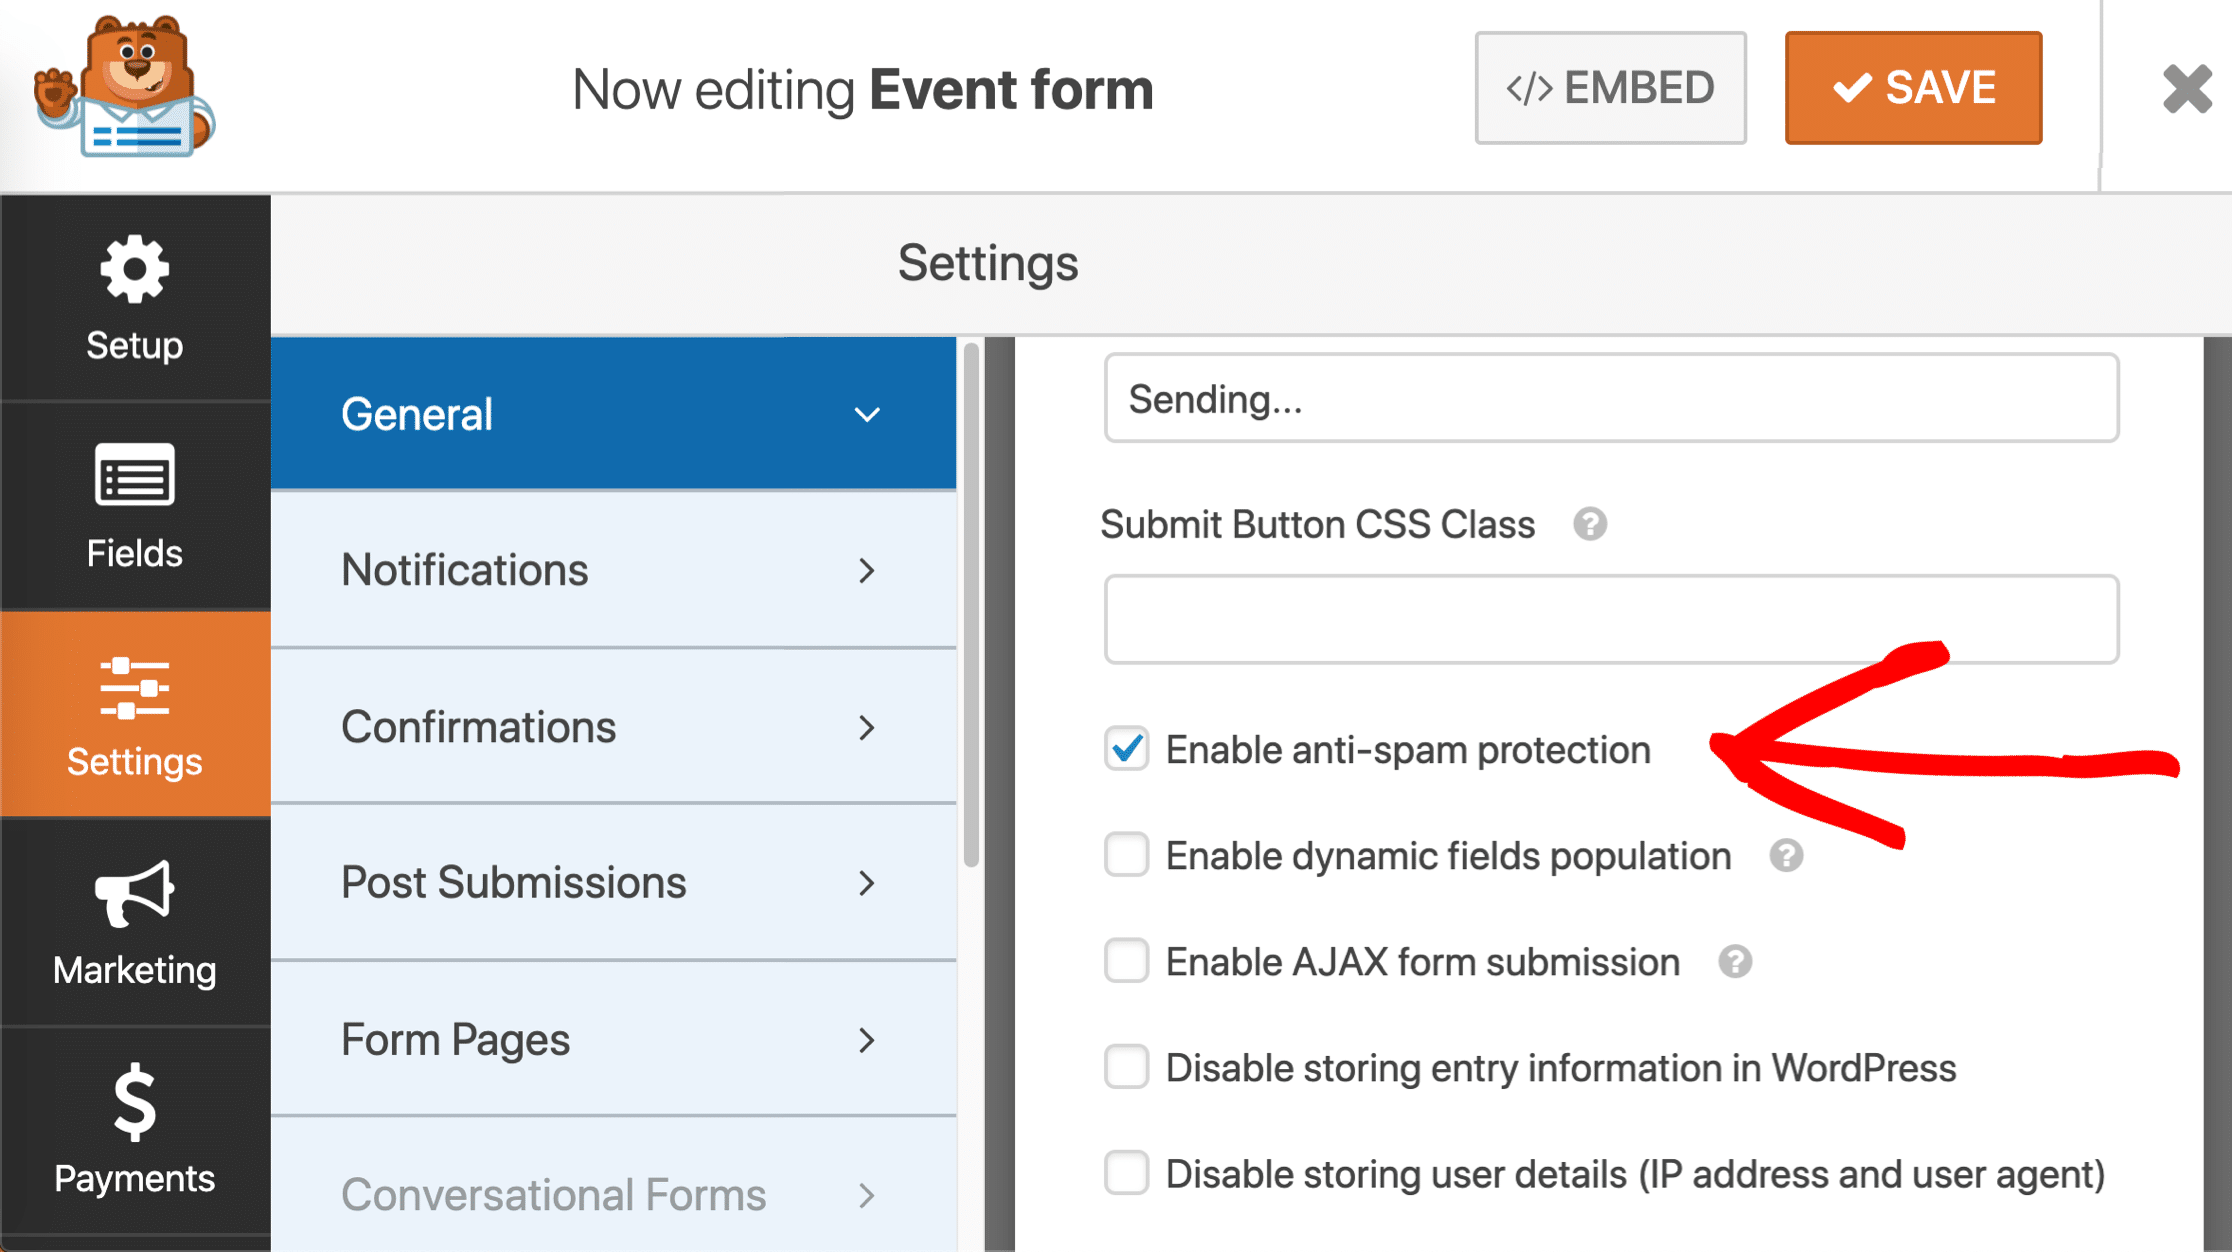
Do you see the old honeypot spam prevention option in the settings as well? You’ll want to check the newer Enable anti-spam protection option next to it.
You can leave the honeypot field checked, or deselect it if you want to. Either way, the old honeypot won’t affect the way the new form token works.
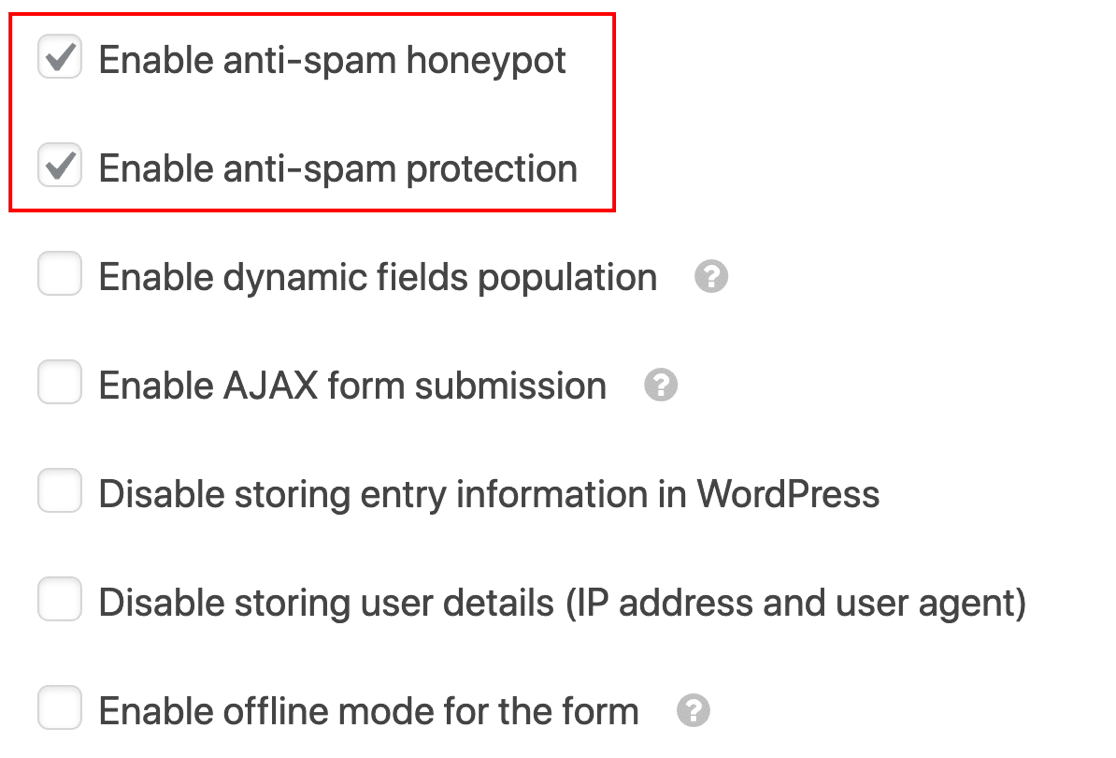
Save your form and you’re done! Your WordPress contact form is now protected against spambots, with zero inconvenience for real visitors.
Do you want to make your form totally bulletproof against spam? It’s perfectly safe to use the Enable anti-spam protection option along with other anti-spam methods and plugins.
Let’s look at how to add Google reCAPTCHA next.
Method 2: Use Google reCAPTCHA on Your Contact Form
Google’s reCAPTCHA is probably the best known CAPTCHA service out there. It automatically detects human visitors using puzzles, or by detecting their behavior while they’re on your site.
By verifying that a human is submitting a form, all automated spam attempts are blocked. The added security of a reCAPTCHA can also make users feel that the form is secure and help reduce form abandonment.
There are 3 versions of Google reCAPTCHA, and you can use any of these in WPForms.
Here’s a basic rundown of the differences between them:
- Checkbox reCAPTCHA v2 lets visitors hover their mouse over a checkbox to submit the form. This is called a ‘challenge’, and it usually displays with the words ‘I am not a robot’ next to it.
- Invisible reCAPTCHA v2 doesn’t show a checkbox. Instead, the reCAPTCHA service detects user activity to decide if the visitor is human. This is a great way to prevent spam without showing a challenge every time.
- reCAPTCHA v3 is an advanced CAPTCHA that uses JavaScript to detect human visitors. It’s ideal for AMP pages, but it can occasionally prevent genuine visitors from submitting your forms. That’s why we recommend it for advanced users who are ready to troubleshoot if they run into any issues.
All of these reCAPTCHA types are free for up to 1 million uses per month.
In the next section of the guide, we’re going to look at setting up reCAPTCHA on your forms.
Step 1: Select a reCAPTCHA Type in WPForms
We’re going to start by selecting the type of Google reCAPTCHA you want to use in the WPForms plugin.
To start, open up your WordPress dashboard and go to WPForms » Settings.
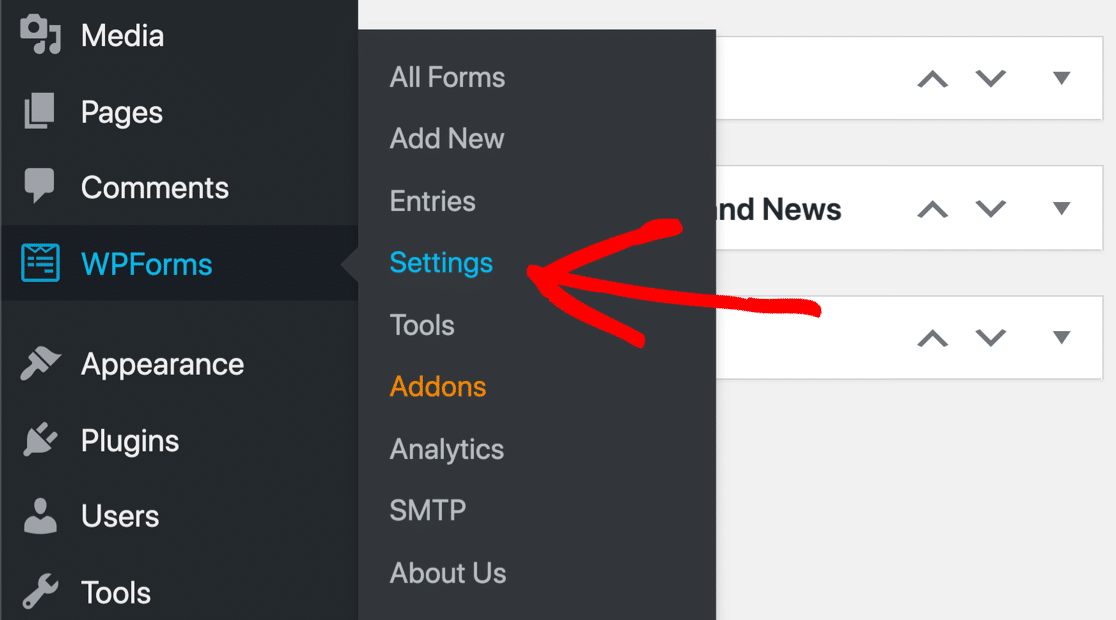
Then, look to the tabs across the top. Click on the CAPTCHA tab.

You’ll see the options for CAPTCHAs on this page.
Click on the reCAPTCHA icon in the center of the page.
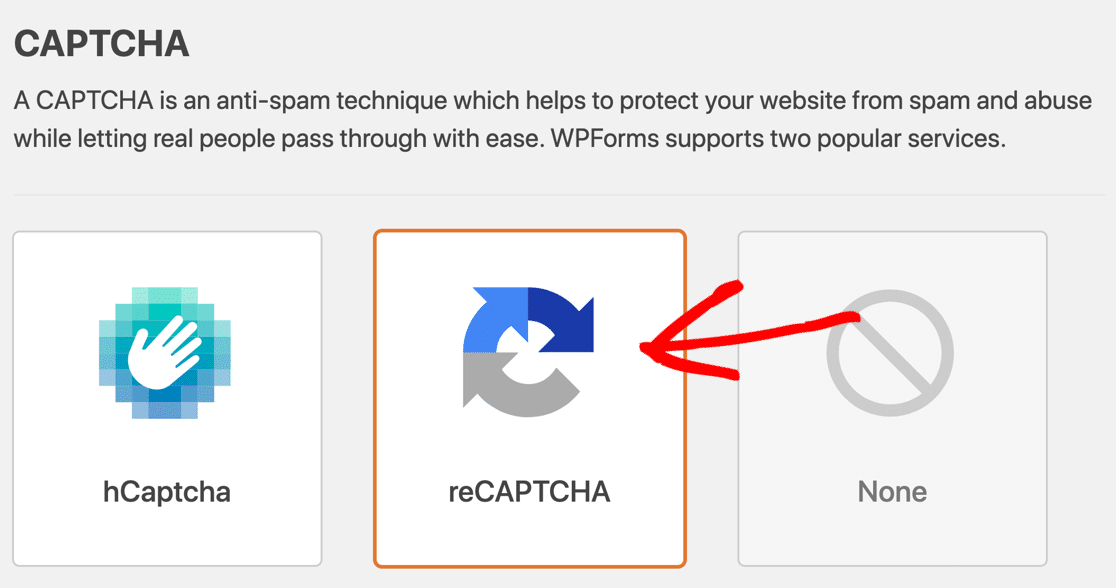
Now you’ll want to scroll down a little more until you see the reCAPTCHA settings. These settings are the same for all of the forms you make on your site, so you only need to do this part once.
First, you’ll see the 3 different reCAPTCHA types that we talked about already:
- Checkbox reCAPTCHA v2
- Invisible reCAPTCHA v2
- reCAPTCHA v3
Select the reCAPTCHA method you want to use using the radio buttons.

Let’s switch over to the reCAPTCHA site and get your keys set up.
Step 2: Set Up Google reCAPTCHA
Next, we’re going to switch over to the reCAPTCHA website to add your site there.
To start, visit Google’s reCAPTCHA site. You’ll want to open this link in a new tab or window so you can easily switch back to WPForms in a few minutes.
Once you’re on the reCAPTCHA homepage, click on the Admin Console button at the top.
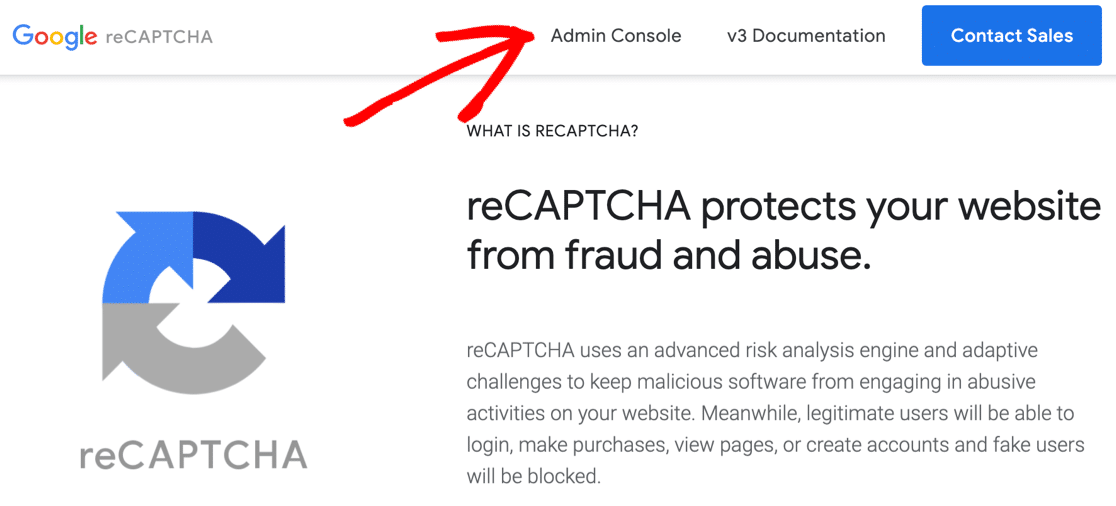
You might need to sign in to your Google account at this point.
After that, you’ll be redirected to a page where you can register your site for reCAPTCHA.
To start, enter the name of your website in the label field. This is for your own use, so you can type in a name or the full domain name – whatever you prefer. The label here will help you identify the keys later.
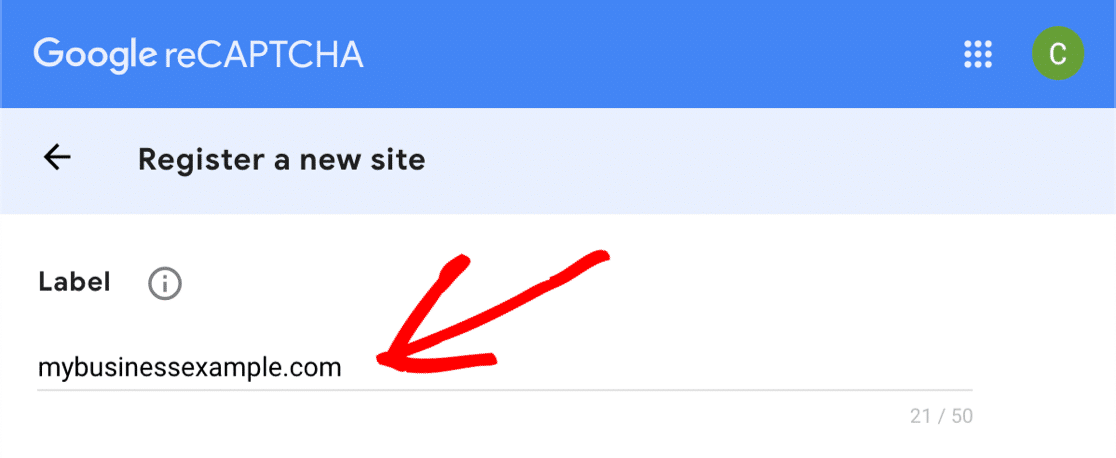
Then, choose the type of reCAPTCHA you want to add to your website.
If you want to use reCAPTCHA v3, you’ll just have to click the top radio button here.

If you decide you want to use reCAPTCHA v2, select that radio button first. Then select either the ‘I am not a robot’ checkbox or the invisible reCAPTCHA.
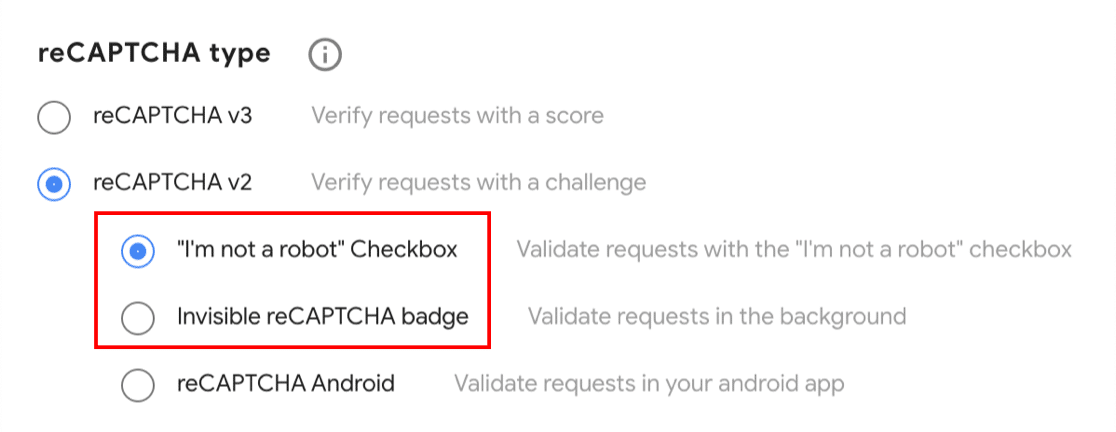
In this example, we’ll use the Checkbox method to show you how the form settings work. If you choose a different reCAPTCHA type, some of the screenshots from this point might look slightly different.
After choosing your reCAPTCHA, you’ll need to add your website’s domain. This time, you’ll want to type in the full domain name without the leading https://

Go ahead and click the Accept checkbox if you’re happy to proceed. You can also receive alerts about your reCAPTCHA by clicking the second checkbox.
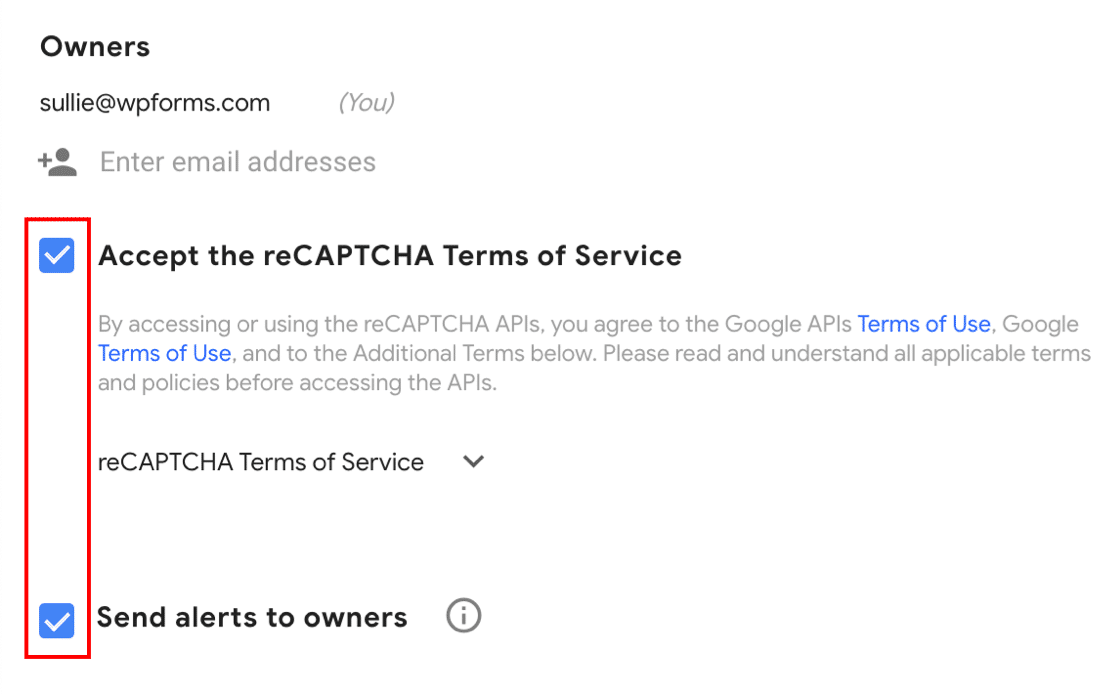
Click Submit to save your progress so far.
Step 3: Grab Your reCAPTCHA Keys
Before we go ahead and copy your reCAPTCHA keys, there’s 1 super important thing to remember.
Each of these reCAPTCHA methods uses different types of keys. So if you start out using a certain type of Google reCAPTCHA, then you decide to switch to a different type, you’ll need to generate new keys to match.
Let’s pick up from the last step. You should see a notice saying your site has been registered with reCAPTCHA. Underneath, you’ll see a site key and secret key for your website.
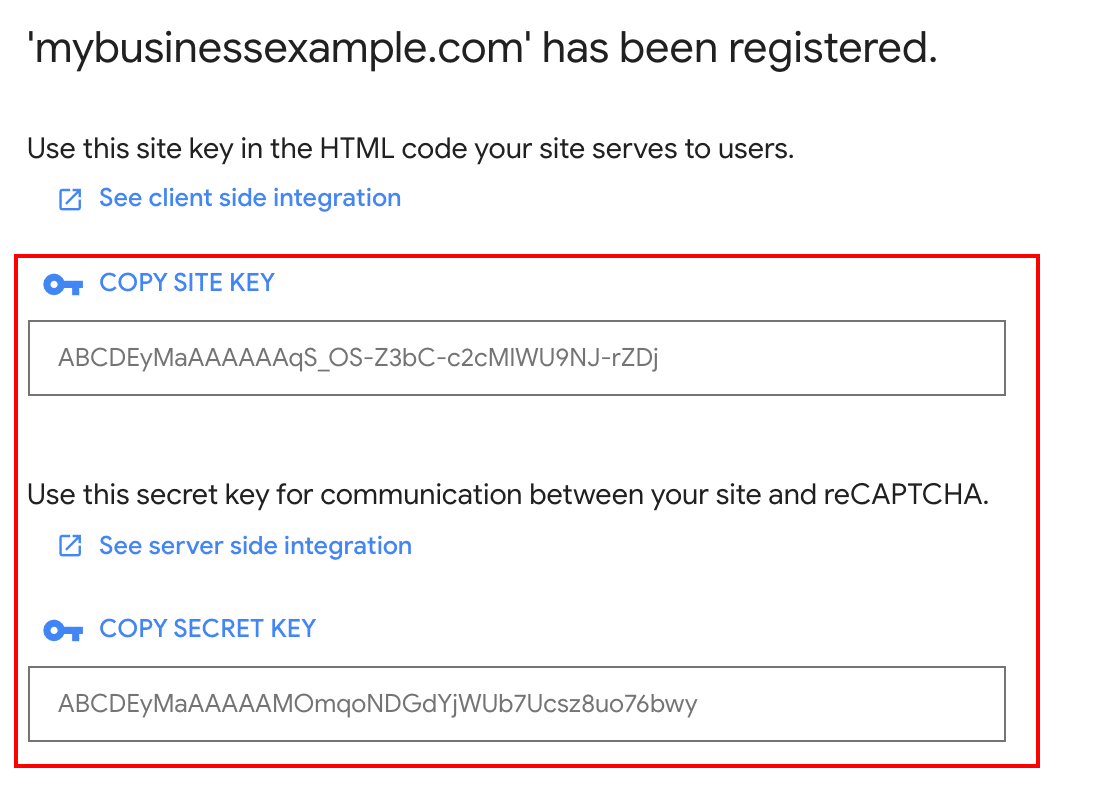
Switch back to the WPForms » Settings page we were looking at in the last step. You can go ahead and paste your site and secret keys under the reCAPTCHA settings.

To finish up, there are a couple of other settings in WPForms. Let’s quickly look at what those mean:
- Fail Message – This field lets you customize the message that appears if reCAPTCHA stops the form from being submitted.
- No-Conflict Mode – Sometimes other plugins can also try to load reCAPTCHA code. If this happens, you might see a message like ‘This field is required’, even though all required fields are filled in. To avoid this problem, you should deactivate reCAPTCHA in all of your other plugins. But if the problem persists, you can check the No-Conflict Mode checkbox to force disable other reCAPTCHAs.
All set? Click on the Save Settings button to store your changes.
Now you’re ready to add the reCAPTCHA to your contact form to stop spam.
Step 4: Add the reCAPTCHA to Your Form
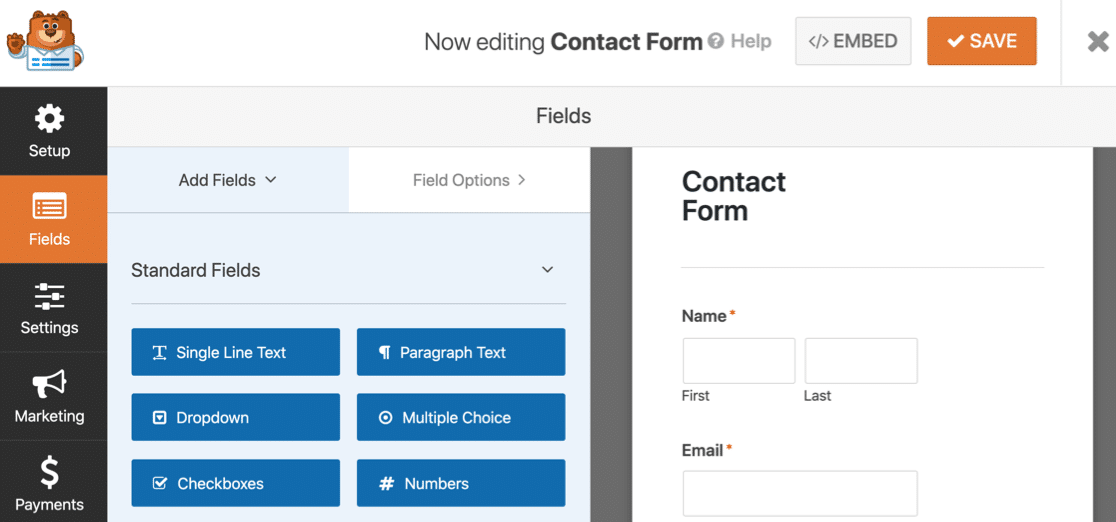
Now we need to switch back to the form builder so we can enable reCAPTCHA on your form.
First, open up your form in the form builder.
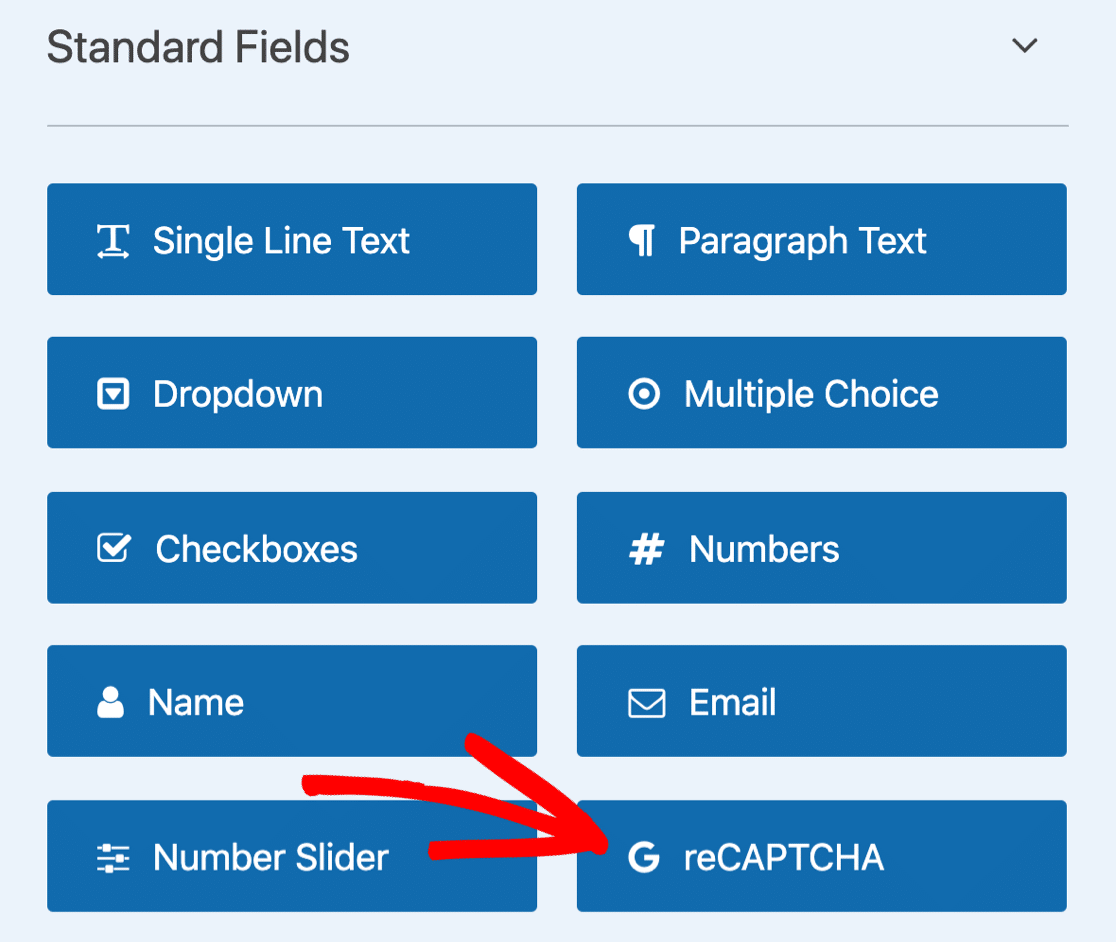
Look to the Standard Fields on the left and click on the reCAPTCHA field.
In case you’re wondering how this works, you don’t need to drag the reCAPTCHA onto your form. You can just click on the field once to activate the reCAPTCHA.
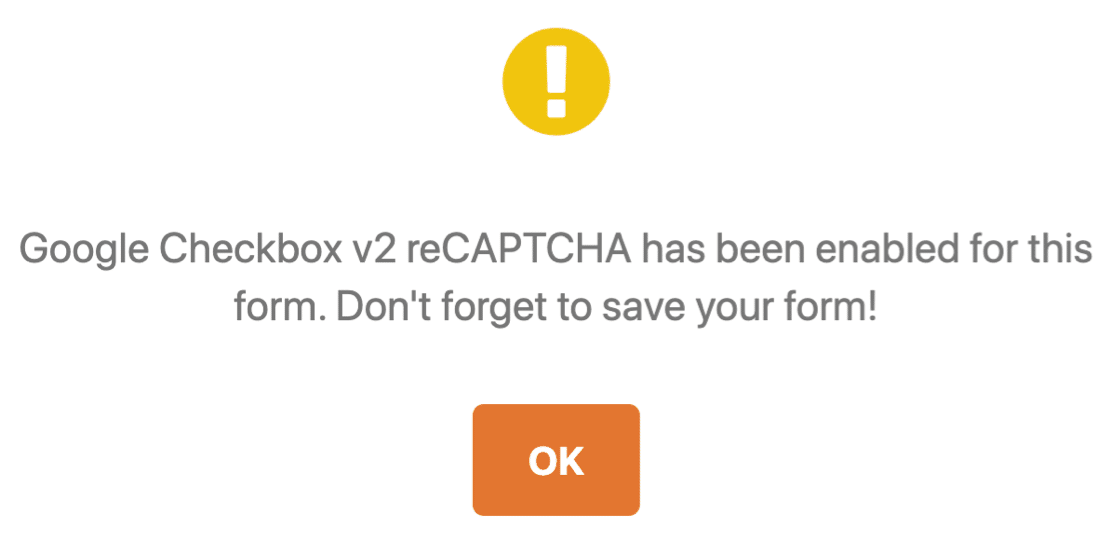
A message will pop up to confirm that reCAPTCHA is enabled on your form. Click OK.
Great! You’ll see the reCAPTCHA badge in the form builder to show that reCAPTCHA is active on this form.
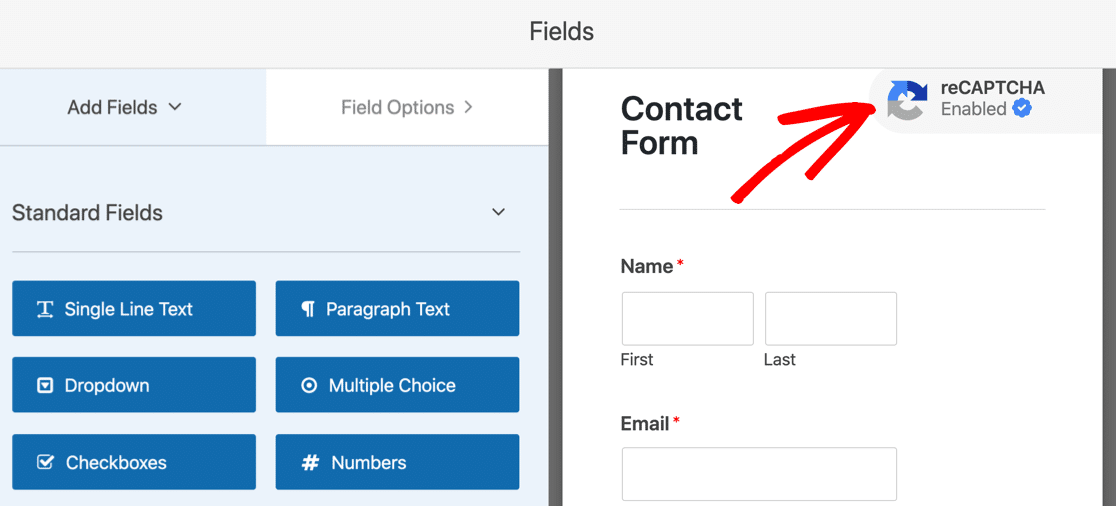
This badge won’t show on your finished form when you publish it. Don’t forget to save your form now.
And that’s it! Now you know how to add a v2 or v3 Google reCAPTCHA to stop contact form spam. If you ever want to disable reCAPTCHA on your form, just edit the form and click the reCAPTCHA field again to turn it off.
Next up, we’ll show you how to use hCaptcha. This is an awesome alternative to reCAPTCHA if you’re looking for a different way to show a challenge.
Method 3: Add hCaptcha to Your Contact Form
With WPForms, you can easily use hCaptcha to stop contact form spam.
The hCaptcha service is a great way to stop spam bots in their tracks by showing your visitors a challenge. If the challenge isn’t completed, the form won’t submit and the spambot will get stuck.

Wondering about the difference between Google reCAPTCHA and hCaptcha? There are 3 main reasons why hCaptcha might be a good fit for your site:
- Improve privacy on your website – Some site owners use hCaptcha because of privacy concerns about reCAPTCHA. If you’re worried that Google might retarget ads to your visitors, hCaptcha will be a better choice for you because it collects less data about them.
- Get paid for CAPTCHAs – When your visitors solve challenges on your forms, hCaptcha will pay you a small reward each time. This might be helpful if you have a busy site with lots of form submissions.
- Support charities – If you want, you can donate the earnings from your hCaptcha account to charity automatically.
Just like reCAPTCHA, hCaptcha is free for basic use. The main downside of the free version is that there’s no invisible CAPTCHA option. But there’s an Easy mode that you can use if you want to minimize the number of CAPTCHAs your visitors see.
It’s super easy to use hCaptcha in WPForms. The steps are very similar to the Google reCAPTCHA settings we already showed you.
Let’s dive in and set it up.
Step 1: Set Up hCaptcha in WPForms
Have you installed the WPForms plugin and created a simple contact form?
Great! You’re ready to add hCaptcha.
We’ll start in your WordPress dashboard. On the left, go to WPForms » Settings.

From the tabs across the top, click CAPTCHA.

Now click on the hCaptcha icon.
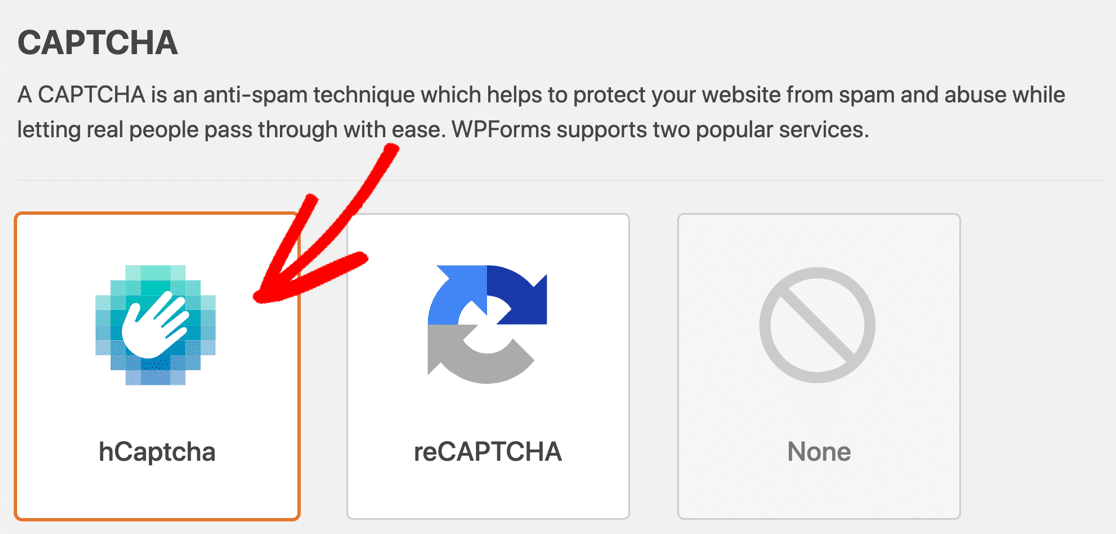
You’ll see the settings for hCaptcha displayed underneath. Let’s go ahead and set up your keys in the next step.
Step 2: Generate hCaptcha Keys
In this step, we’re going to sign up for hCaptcha and grab your site keys. Keep WPForms open in another tab so we can easily switch back to it in a minute.
Start by opening up the hCaptcha site in a new tab. Then click the Sign Up button at the top.
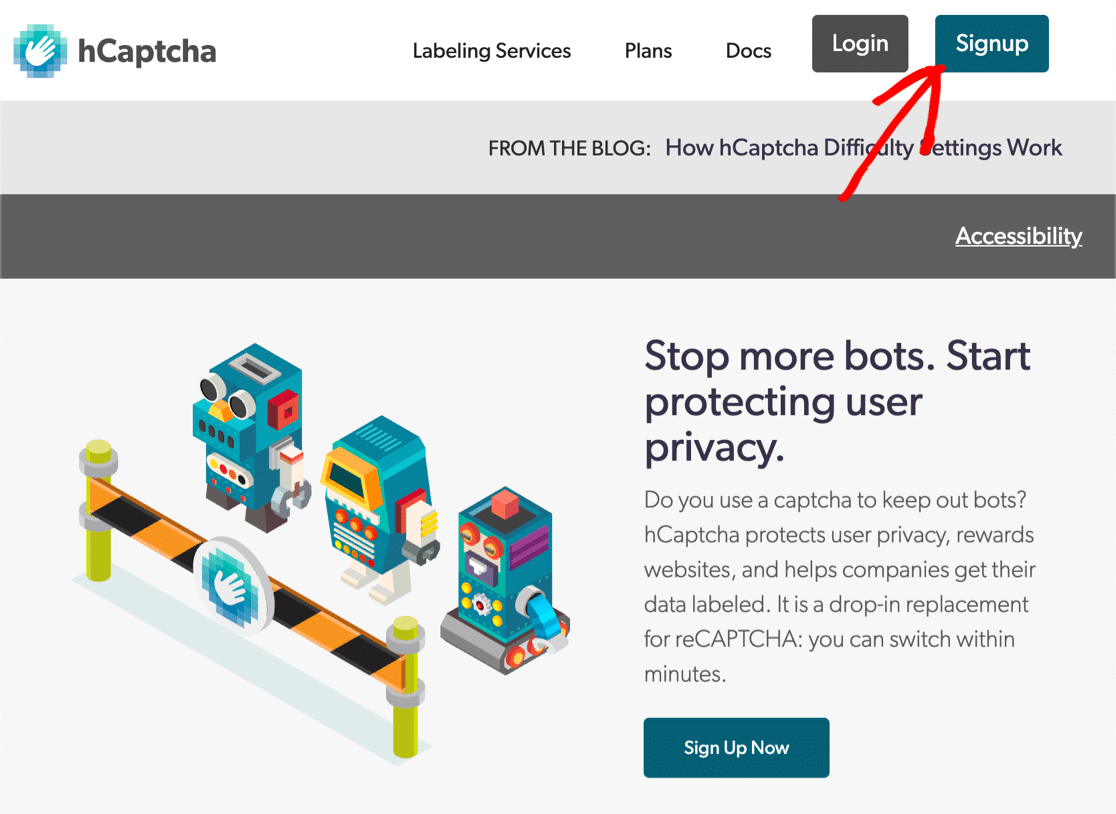
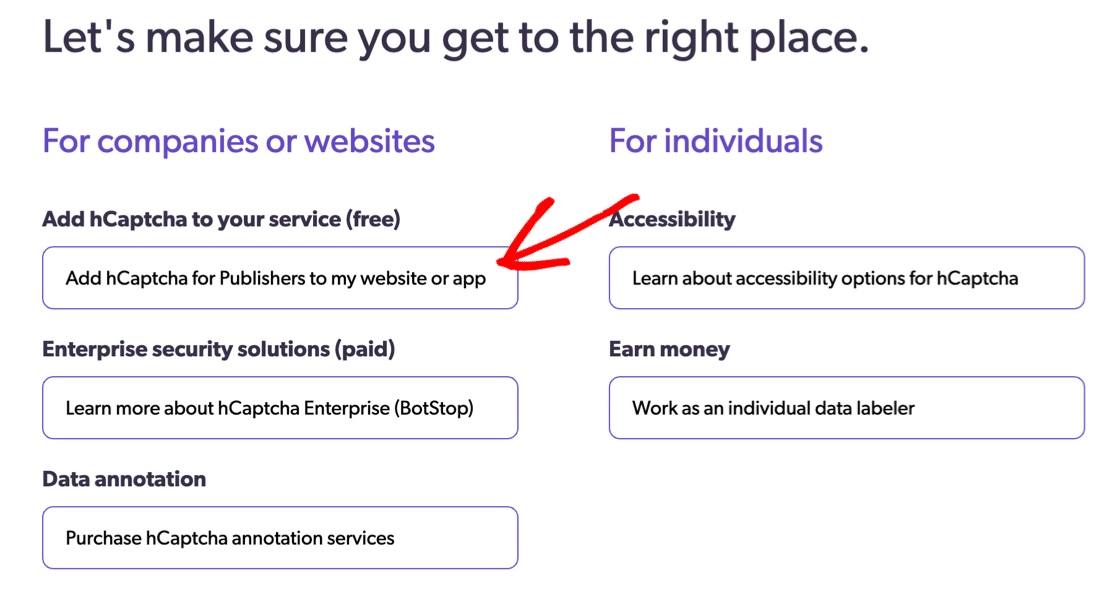
To select the free plan, click the button under Add hCaptcha to your service (free).
Set up your login and sign in now. Then, at the top right, click the New Site button.
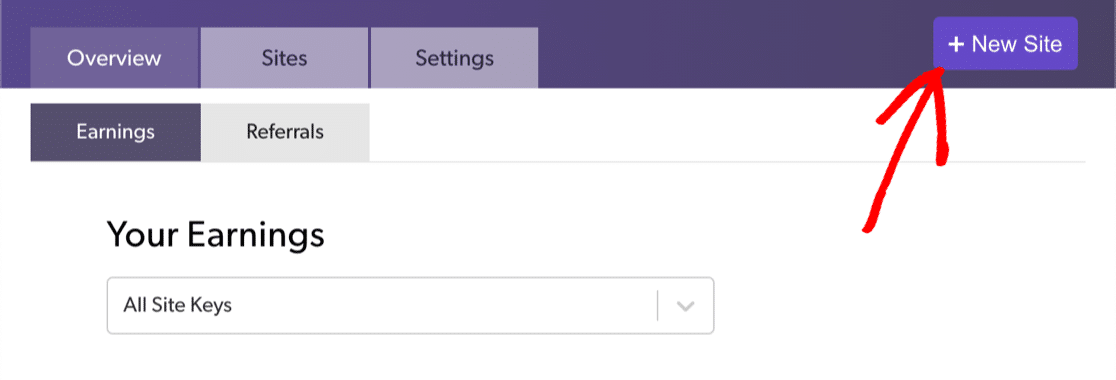
Start by typing in your site name at the top. After typing the name, you’ll need to press the enter key to save the name before you can move on. You can click the pencil icon to make changes.

In the next field, type in your site domain and click Add new domain.

The slider underneath lets you choose the difficulty of the CAPTCHA. Here’s some information to help you decide what to pick here:
- Easy mode tries to validate the user without showing a challenge. And if a challenge is shown, it’ll be the easiest type and will take a few seconds to solve. This is as close to an ‘invisible’ CAPTCHA as you can get with hCaptcha.
- Moderate is similar to Easy but a little less lenient when detecting activity. Your visitors will likely see more challenges with this setting, but it’s a little more secure.
- Difficult will almost always show a challenge. The challenge will also take a little longer to solve than the Easy or Moderate setting.
- Always On will force every visitor to solve a ‘difficult’ CAPTCHA before submitting your form to stop contact form spam. This might affect the user experience, but it’s the most secure method.
If you’re not sure what to pick, we’d recommend starting with the Easy or Moderate setting. This helps to make your CAPTCHA easy to solve while still offering bot protection.
If you find you’re still getting spam, you can go back and increase the difficulty.

The next section lets you choose the kind of CAPTCHAs that your visitors will see. You can choose themes that are similar to the topics on your site.
This is a neat way to make the puzzles a little easier. You don’t have to use this section if you don’t want to, so just skip over it nothing fits.

And that’s it! Now you’ll want to scroll back up to the top and click Save.

Now it’s time to copy your keys into WordPress.
Step 3: Grab Your hCaptcha Keys
Remember the WPForms tab we kept open? In this step, we’re going to grab the keys from hCaptcha and paste them into WPForms.
In hCaptcha, you’ll see the site you just added under Active Sites. On the right, click Settings.

Now copy the site key and paste it into the Site Key field in WPForms.

The Secret Key is located in the settings tab, so we’ll need to leave this screen.
Back in hCaptcha, click cancel to go back to the previous page.
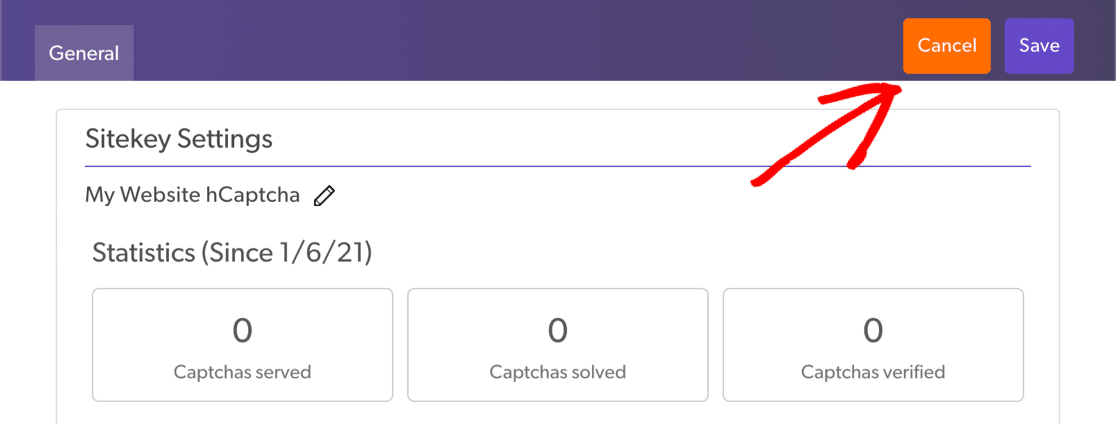
And now click the Settings tab.
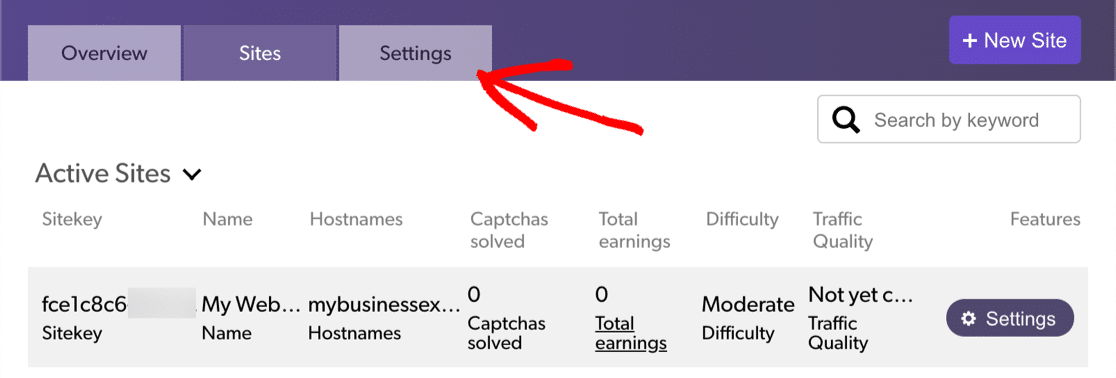
You’ll see your Secret Key at the top. Go ahead and copy it, then paste it into WPForms.

In WPForms, you should now have your hCaptcha Site Key and Secret Key ready to go.
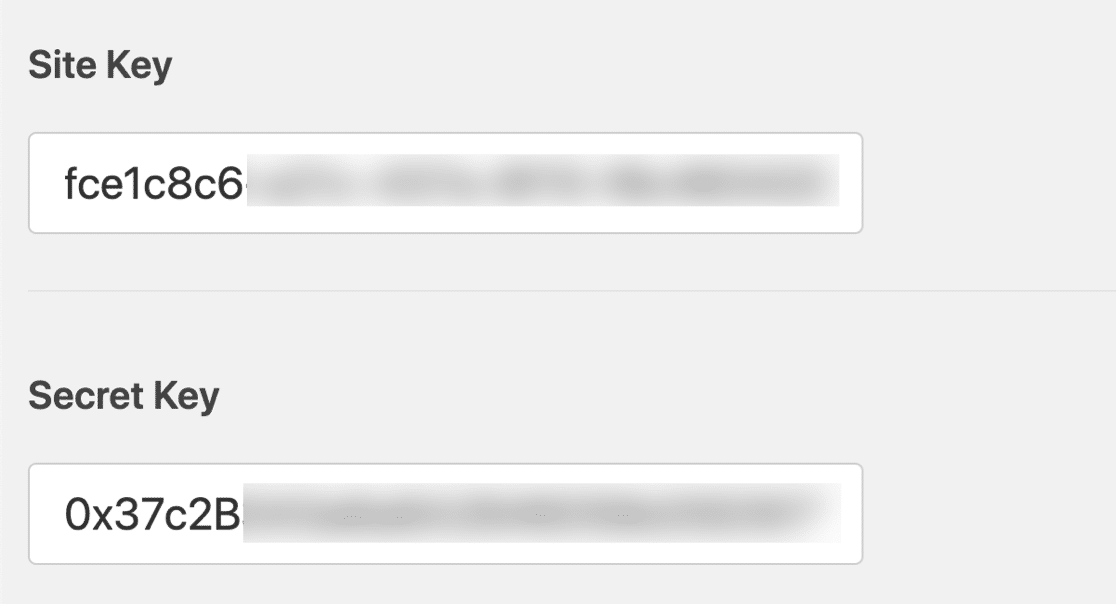
There are 2 more settings underneath that you might want to use:
- Fail Message – Customize the message that appears if hCaptcha stops the form being submitted.
- No-Conflict Mode – Sometimes other plugins can also try to load CAPTCHA code. If this happens, you might see an error. To avoid this problem, you should deactivate hCaptcha in all of your other plugins. But if the problem persists, you can check the No-Conflict Mode checkbox to force disable any conflicting hCaptcha code.
Click Save to save your hCaptcha keys.
Now we’re done with the settings, let’s enable hCaptcha on your form.
Step 3: Add the hCaptcha to Your Form
Now you can turn on hCaptcha for your form. Start by opening WPForms in the WordPress dashboard and clicking Edit under the form name.
The form will open up in a fullscreen window.

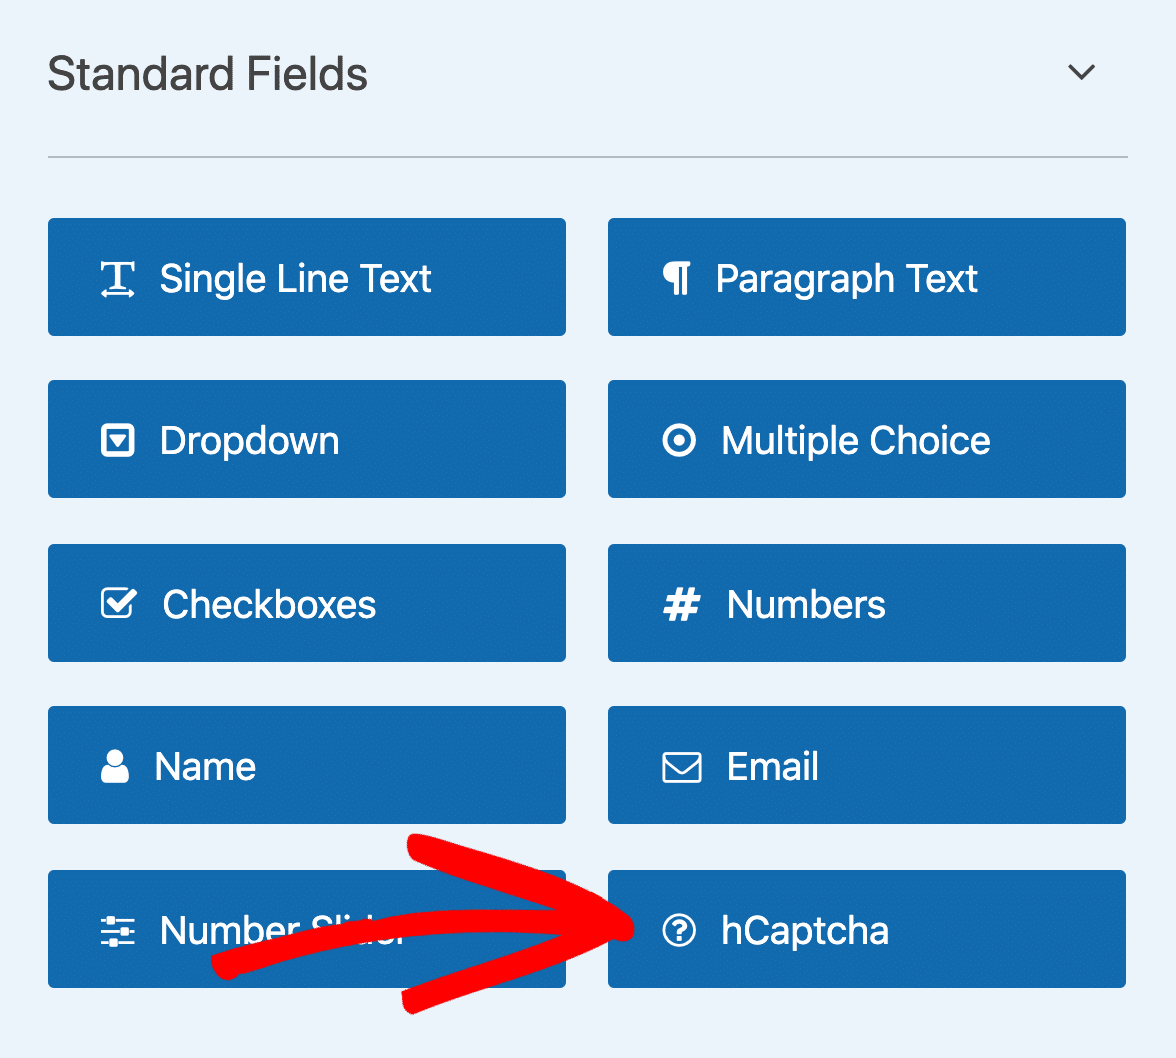
Look to the Standard Fields on the left and click on the hCaptcha field.
In case you’re wondering how this works, you don’t need to drag the field onto your form. You’ll just need to click on the field once to turn on hCaptcha.
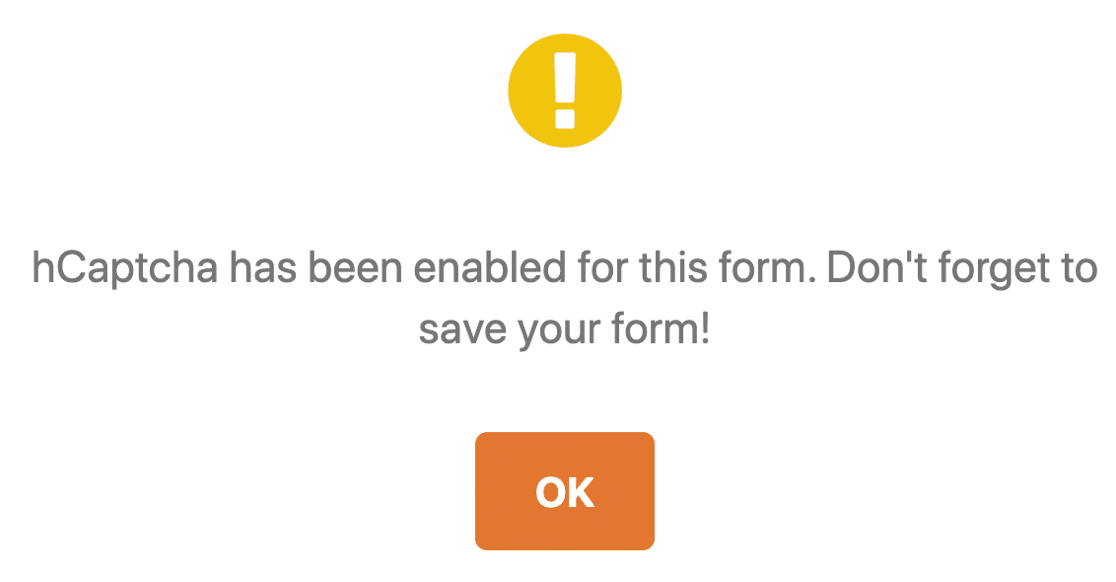
A message will pop up to confirm that you’ve turned on hCaptcha for this form. Click OK.
Great! Now you’ll see the hCaptcha logo to confirm that everything’s working.
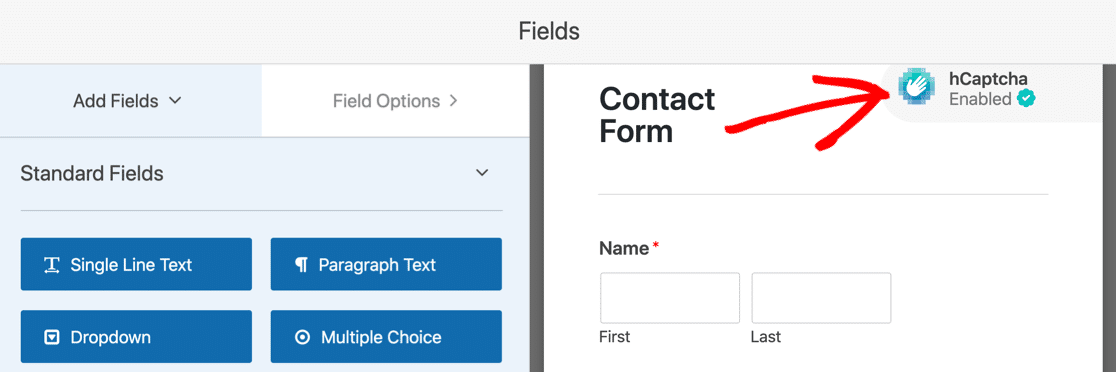
The hCaptcha logo won’t show up on your published form. It only shows in the form builder as a reminder that hCaptcha is active.
And that’s it! Now you know how to add hCaptcha easily to stop contact form spam. If you ever want to disable it on your form, just edit the form and click the hCaptcha field.
Next up, we’ll show you how to make your own CAPTCHA with WPForms.
Method 4: Add the WPForms Custom CAPTCHA Addon
If you don’t want to use a 3rd party service to stop contact form spam, you can use the WPForms Custom CAPTCHA addon to create your own challenge.
With this addon, you can set up custom questions or use random math puzzles as a CAPTCHA to fight spam form submissions.
This method is easy and quick to set up and doesn’t need any site keys.
Step 1: Add a Custom CAPTCHA Field in WPForms
First, open up your form in the form builder.
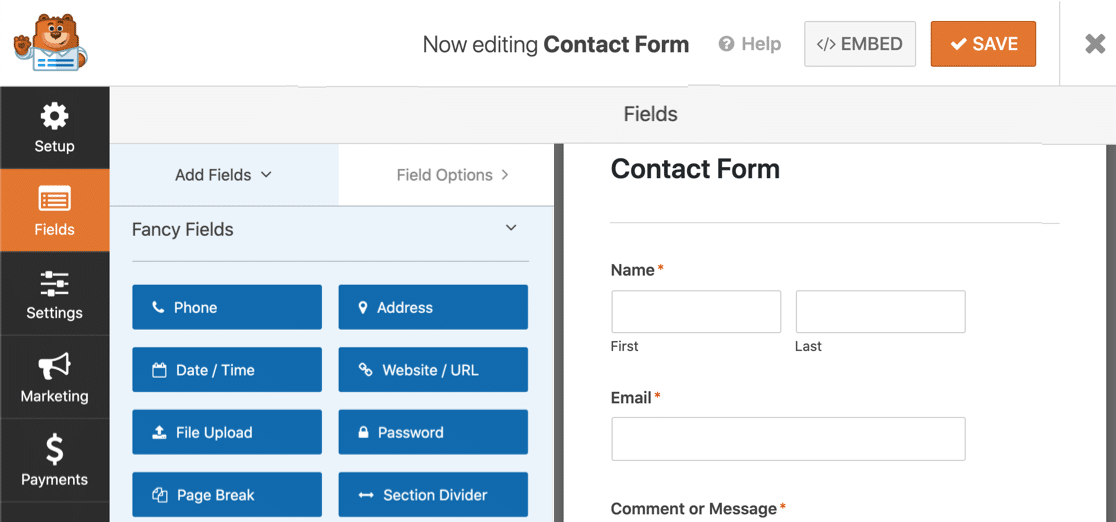
Now, scroll down to the Fancy Fields section. If you haven’t used Custom CAPTCHA before, you’ll notice that the field is grayed out.
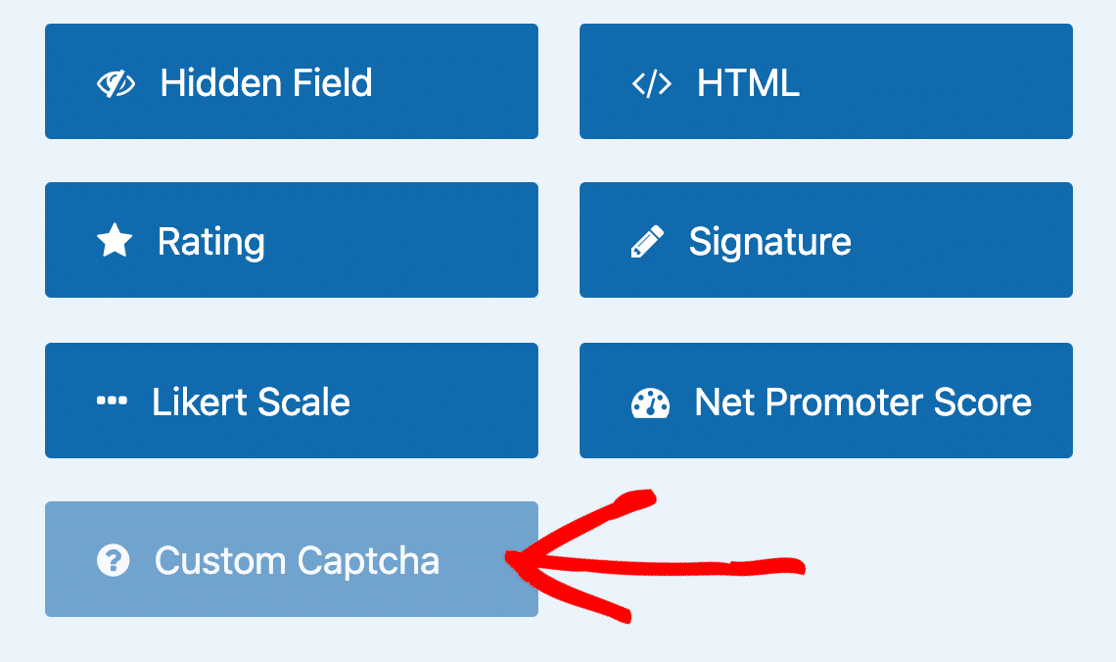
Click on the Custom CAPTCHA button once.
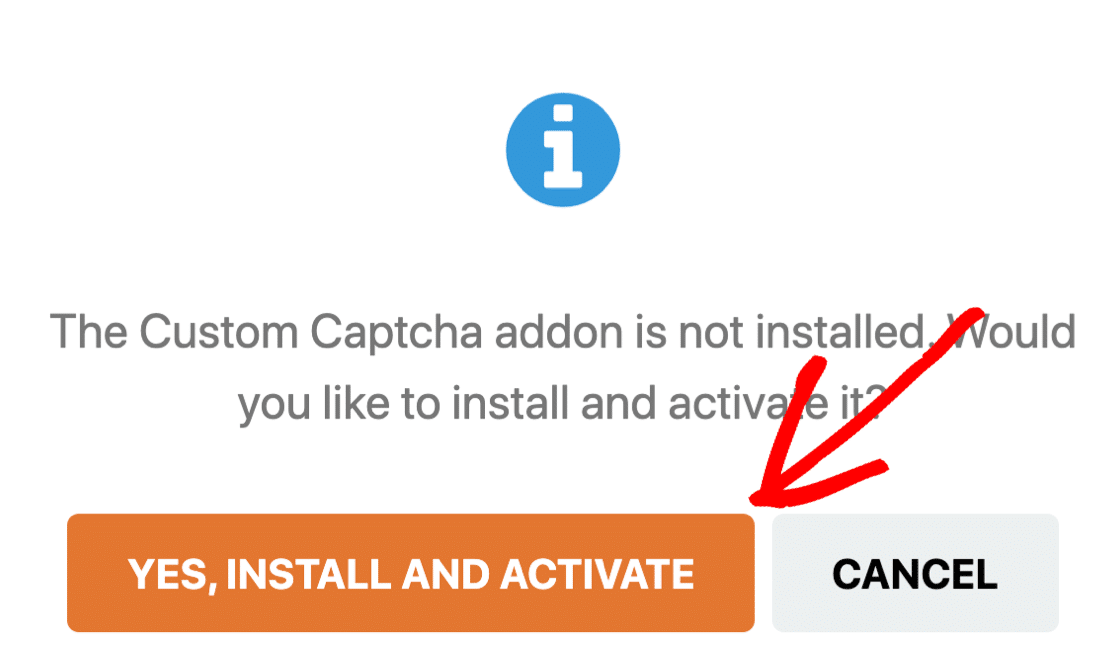
You’ll see a popup asking you to install the addon. Click Yes, Install and Activate.
After the installation is complete, click Yes, Save and Refresh.
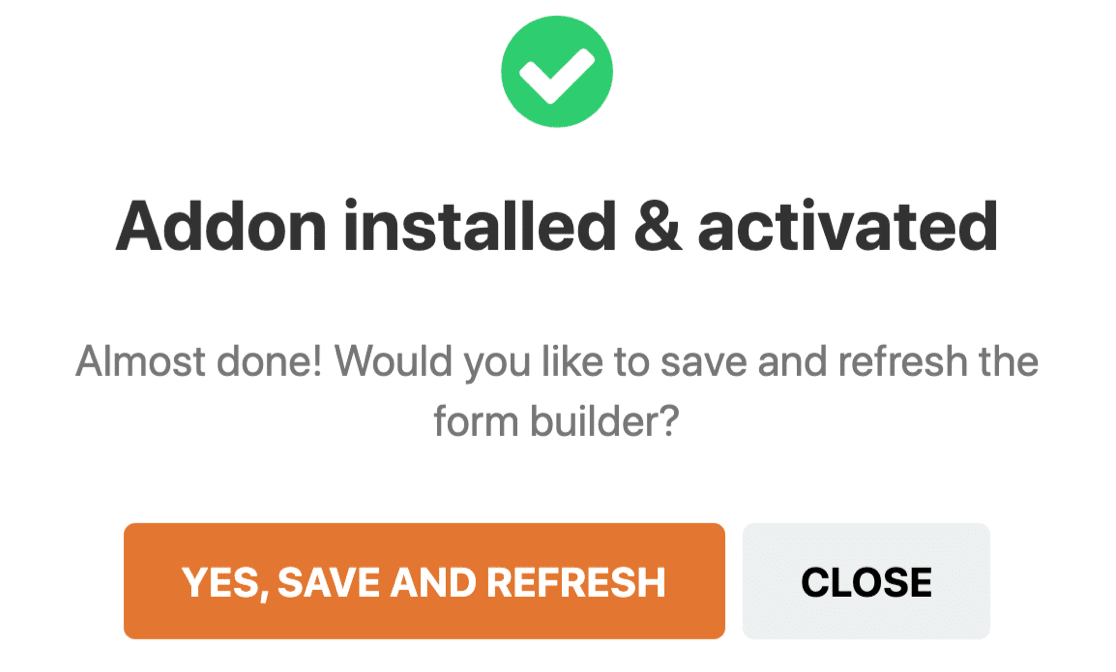
Your Custom CAPTCHA addon is now active and ready to be added to your form.
Step 2: Set Up Your Custom CAPTCHA Questions
Once you’ve created a contact form, stay in the form builder to add your custom CAPTCHA questions.
First, drag the Custom CAPTCHA field from the left hand panel to the right hand panel to add it to your form. When you click on the field, you’ll see the settings open up on the left.
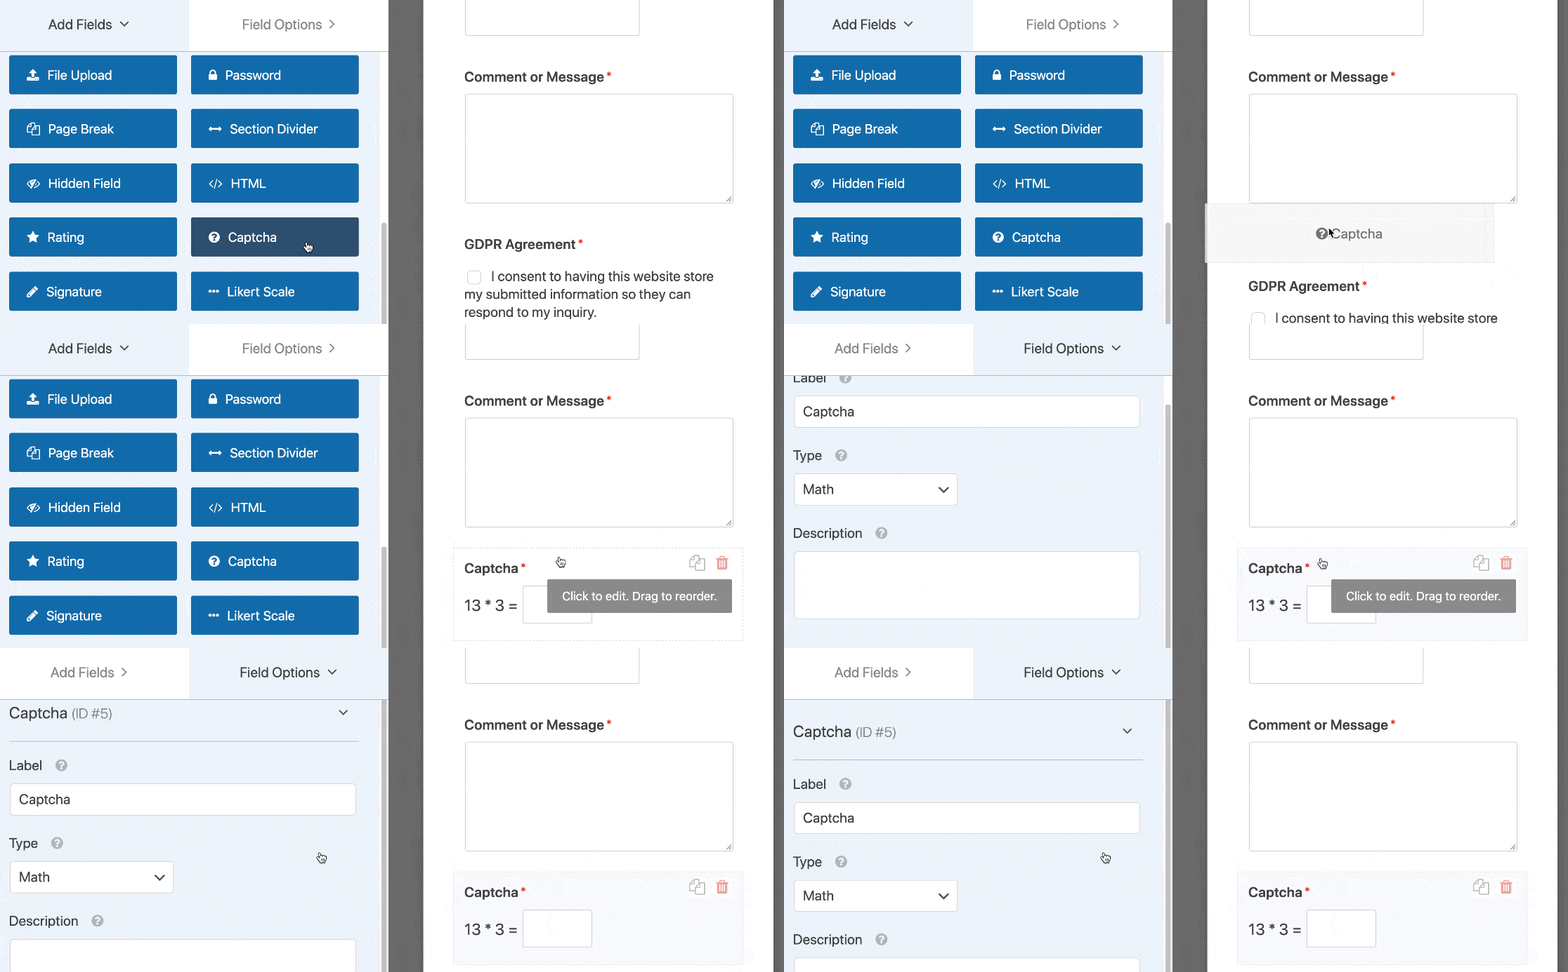
The form field will automatically display a random math question for site visitors to answer before they can submit their form on your site. A new math problem (addition, subtraction, or multiplication) will appear every time the page loads or refreshes.
If you’d like to know how to customize the questions, check out our documentation on how to change the math CAPTCHA.
If you prefer to use a custom question and answer instead of the math CAPTCHA, change the type to Question and Answer in the Field Options section.
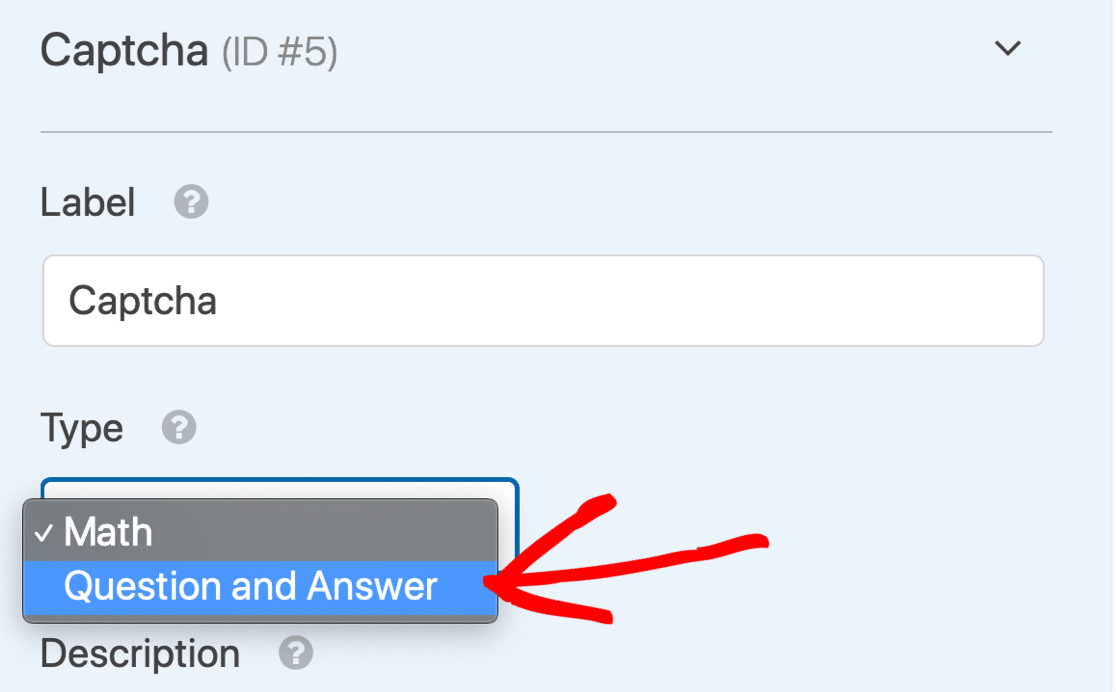
There, you can also change the question and answer that site visitors have to type out a response to in order to submit their form on your site.
If you want to display random questions and answers every time your page loads or refreshes, click on the (+) button to add another question and answer.
Click Save when you’ve customized your custom CAPTCHA to your liking.
CAPTCHAs are great at stopping automated scripts and spam bots. But what if you have a persistent human spammer using your forms?
Let’s look at a way to block those users.
Method 5: Block or Allow Specific Email Addresses on Your Forms
Sometimes we all get spam submissions from human visitors. Sales teams and scammers can visit your forms over and over again, manually sending you tons of spam emails.
CAPTCHAs don’t stop these spam messages because the spammers are real visitors.
In WPForms, you can easily block or allow a list of email addresses so that these visitors can’t submit new entries anymore.

Each form has its own allowlist and denylist, and you can have custom settings for each one.
Let’s take a look at stopping contact form spam with a blocklist in WPForms.
Step 1: Edit Your Form
Start in the WordPress dashboard.
In WPForms, find the form you want to add a denylist to. Then click Edit under the name of the form.
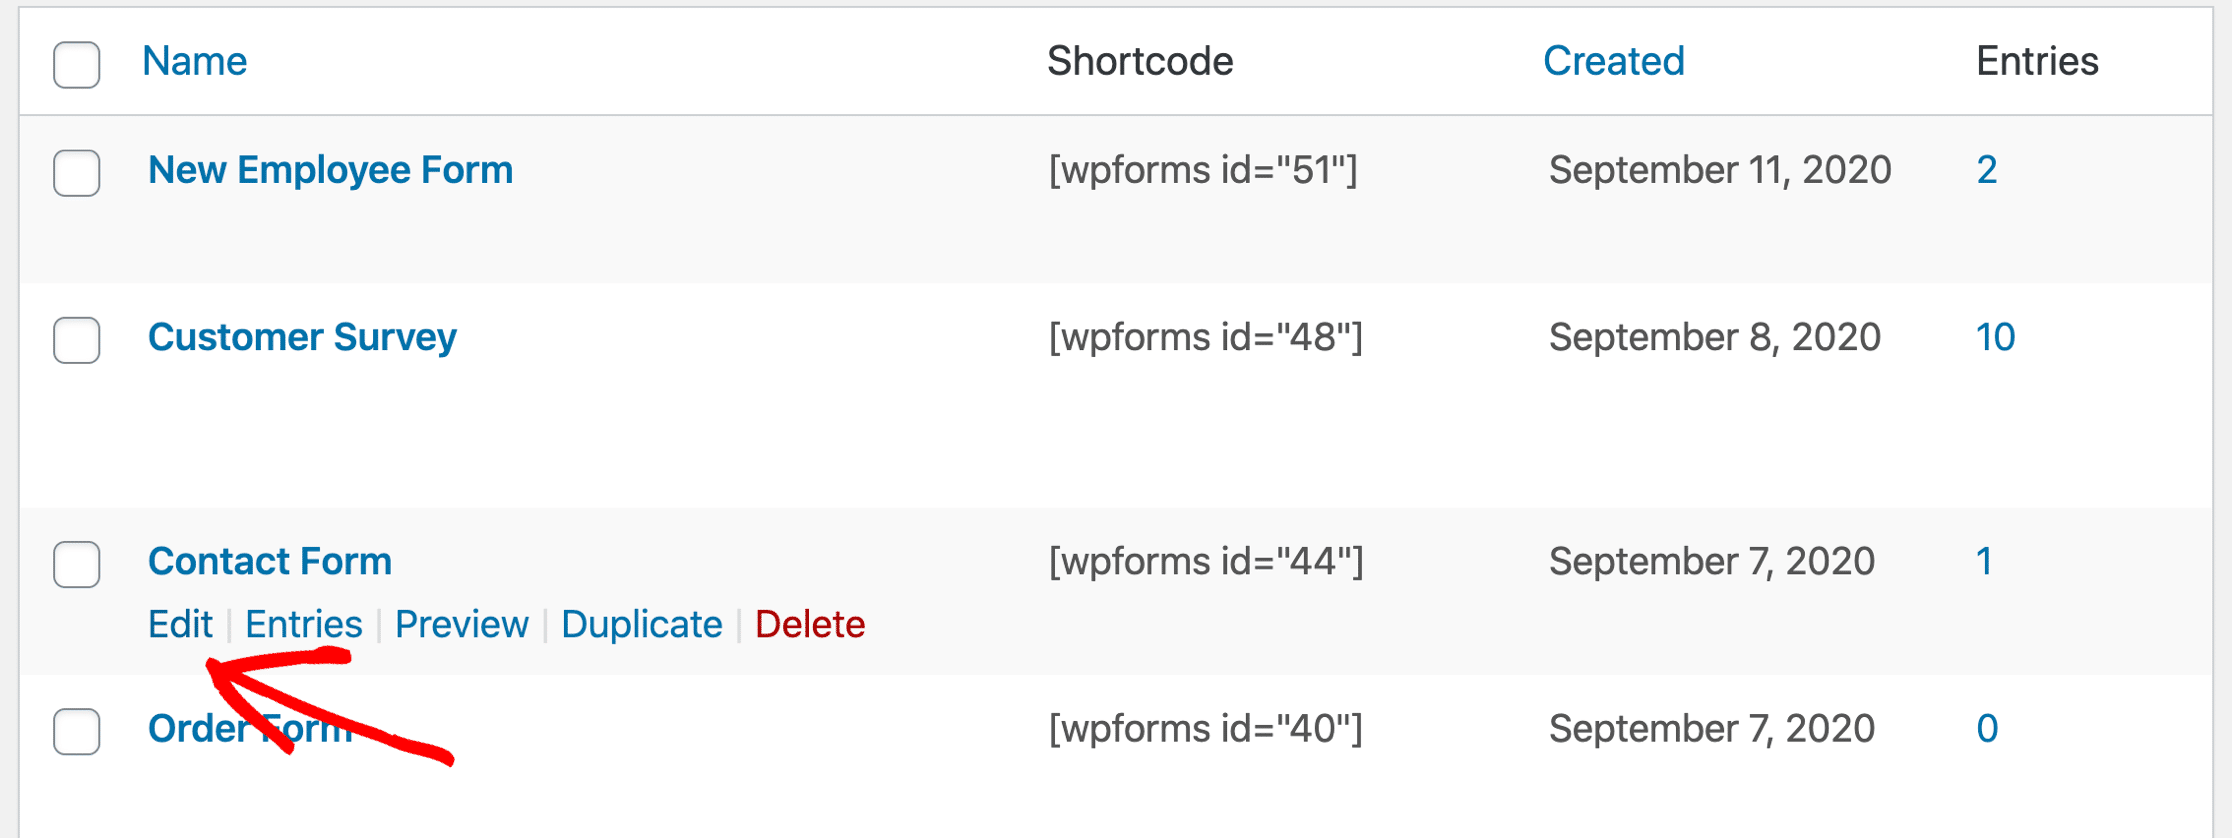
Next, you’ll want to click on the Email field on your form to open up the settings for the field.
Go ahead and click Advanced Options to expand this section.
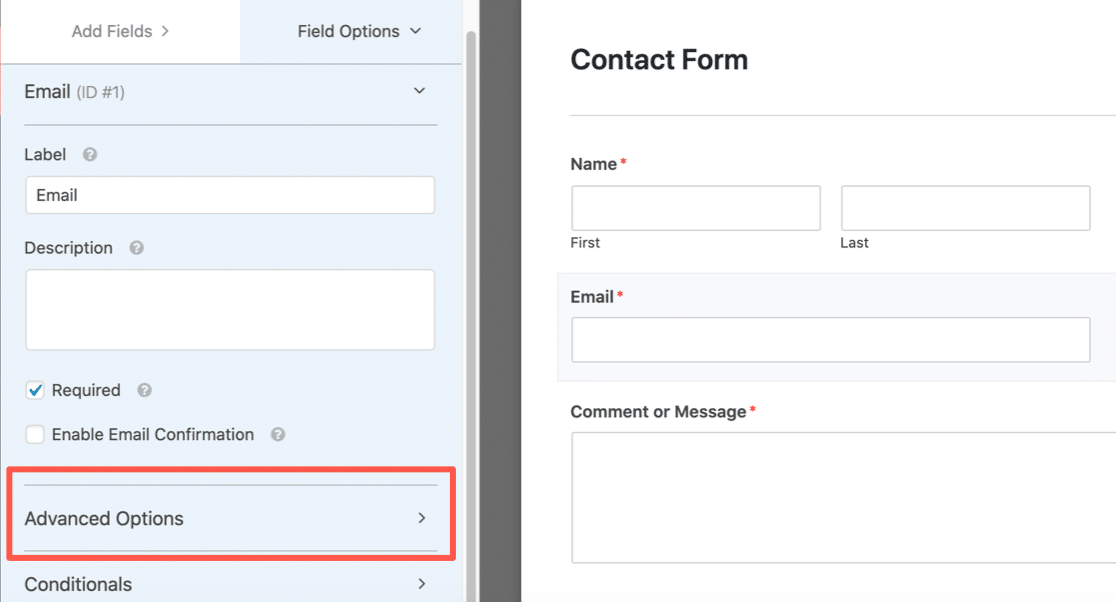
Now that Advanced Options is open, you’ll see lots of extra settings for the email field. Let’s choose the email blocking method you want to use.
Step 2: Set Up Your Allowlist or Denylist
WPForms lets you set up email restrictions in 2 ways:
- The Allowlist will only allow specified email addresses to submit your form. This is a great option if you want to allow entries from a small group of people, like users from your own domain.
- The Denylist will block email addresses or domains you specify. This helps to block persistent spammers, domains, or parts of domains.
To see how this works, scroll down and click the Allowlist / Denylist dropdown. Choose which method you want to use on this form.
We’ll select Denylist in this example.
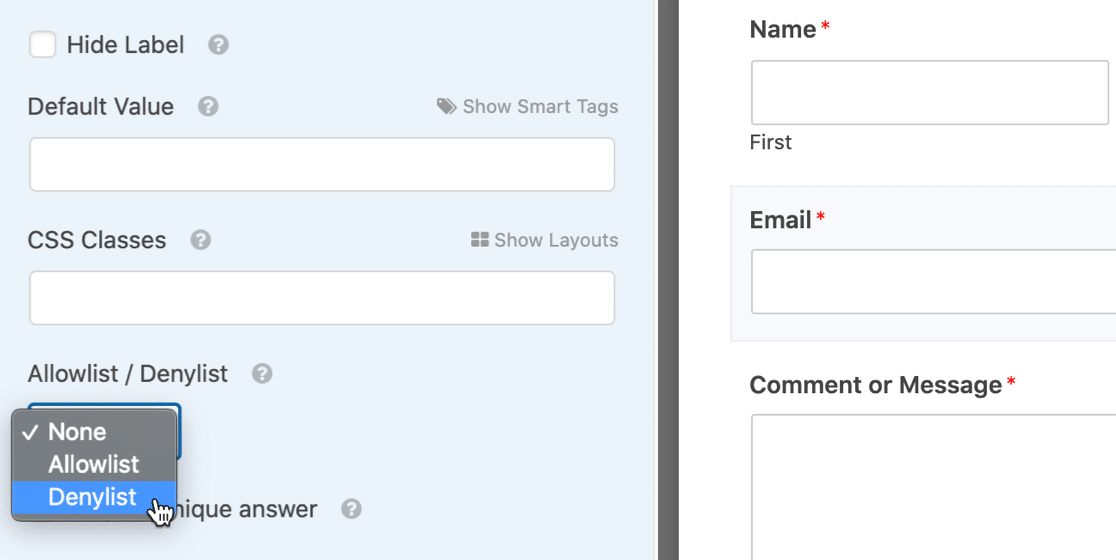
In the box underneath, type in the email addresses you want to block to stop contact form spam.
You can type a complete email, or use an asterisk * to create a partial match.

This setting is super powerful. You can create partial matches in any format you like. Here are a few examples you can try:
spammer@example.com– the exact specified email address will be blockedspammer*– this blocks all email addresses starting with ‘spammer’*@example.com– blocks all email addresses at theexample.comdomains*@example.com– this blocks all email addresses starting with the letter ‘s’ at theexample.comdomainspammer@example.com,spammer2@example.com,spammer@*.co.uk– blocks the first 2 email addresses, and creates a partial match with the 3rd.
You can add as many comma-separated emails or partial matches as you need, and place the asterisk anywhere you want.
When you have your denylist set up, save your form.
Step 3: Test Your New Allowlist or Denylist
After saving your form, it’s a good idea to test out the denylist or allowlist on the frontend.
When you type in an email you’ve blocked, you’ll see an error message and the form won’t submit.
If you want to change the message that shows up for blocked email addresses, you can customize it easily. Just open up WPForms » Settings in the WordPress dashboard and click the Validation tab.

And that’s it! Now you know all of the ways WPForms helps to stop contact form spam.
Create Your Spam-Free Contact Form Now
Next Steps: Publish Your Spam-Free Contact Form
You’re all set! Now you know all of the ways to stop contact form spam in WordPress.
Have you set up your form? If you haven’t already published it, we can help with the next steps. Check out these guides on:
- How to create your first form and publish it on a post or page
- How to publish a contact form in the WordPress sidebar
- How to add a contact form to the footer of your WordPress site.
Ready to build your form? Get started today with the easiest WordPress form builder plugin. WPForms Pro includes lots of free templates and offers a 14-day money-back guarantee.
If this article helped you out, please follow us on Facebook and Twitter for more free WordPress tutorials and guides.
The post How to Stop Contact Form Spam on WordPress in 2021 appeared first on WPForms.
source https://wpforms.com/how-to-build-spam-free-wordpress-contact-forms-the-ultimate-guide/

