Do you want to add a Date/Time Picker field to a WordPress form?
It’s super simple to let your users select a date and time right on your forms.
So in this article, we’ll show you how to easily add a Date/Time Picker form field in WordPress, plus a few tips if you’d like to customize it.
How to Create a WordPress Form With a Date/Time Picker
Using WPForms, it’s super simple to add a field that lets people select a specific date, time, or both.
Here’s a step-by-step tutorial on making a WordPress form with a Date/Time Picker:
Step 1: Create A WordPress Form
The first thing you’ll need to do is install and activate the WPForms plugin. You’ll need a paid version of the plugin as the Date/Time Picker field isn’t available in the free version. For more details, see this step-by-step guide on how to install a plugin in WordPress.
Once you’ve purchased and installed the WPForms plugin, go to WPForms » Add New to create a new form.
On the setup screen, name your form and select the form template you want to use. The great thing is, WPForms comes with over 100 pre-designed templates.
In our example, we’ll use the Simple Contact Form template.
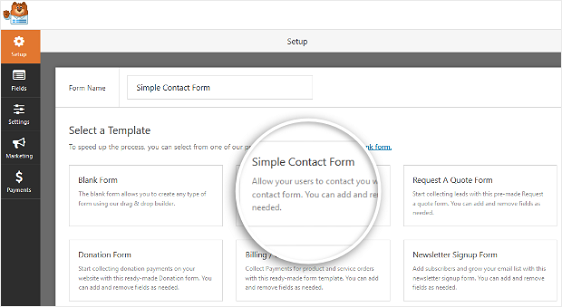
Once you click on the template, WPForms will generate a simple contact form for you. It will load with the following fields:
- First Name and Last Name
- Comment
Now let’s use the form builder to add fields to your form.
Step 2: Customize Your Form
You can add additional fields by dragging them from the left-hand panel to the right-hand panel. Then, click on the field to make any changes.
You can also click on a form field and drag it to rearrange the order on your form.
So let’s go ahead and go to Fancy Fields and drag the Date/Time field onto your form, wherever you’d like it.
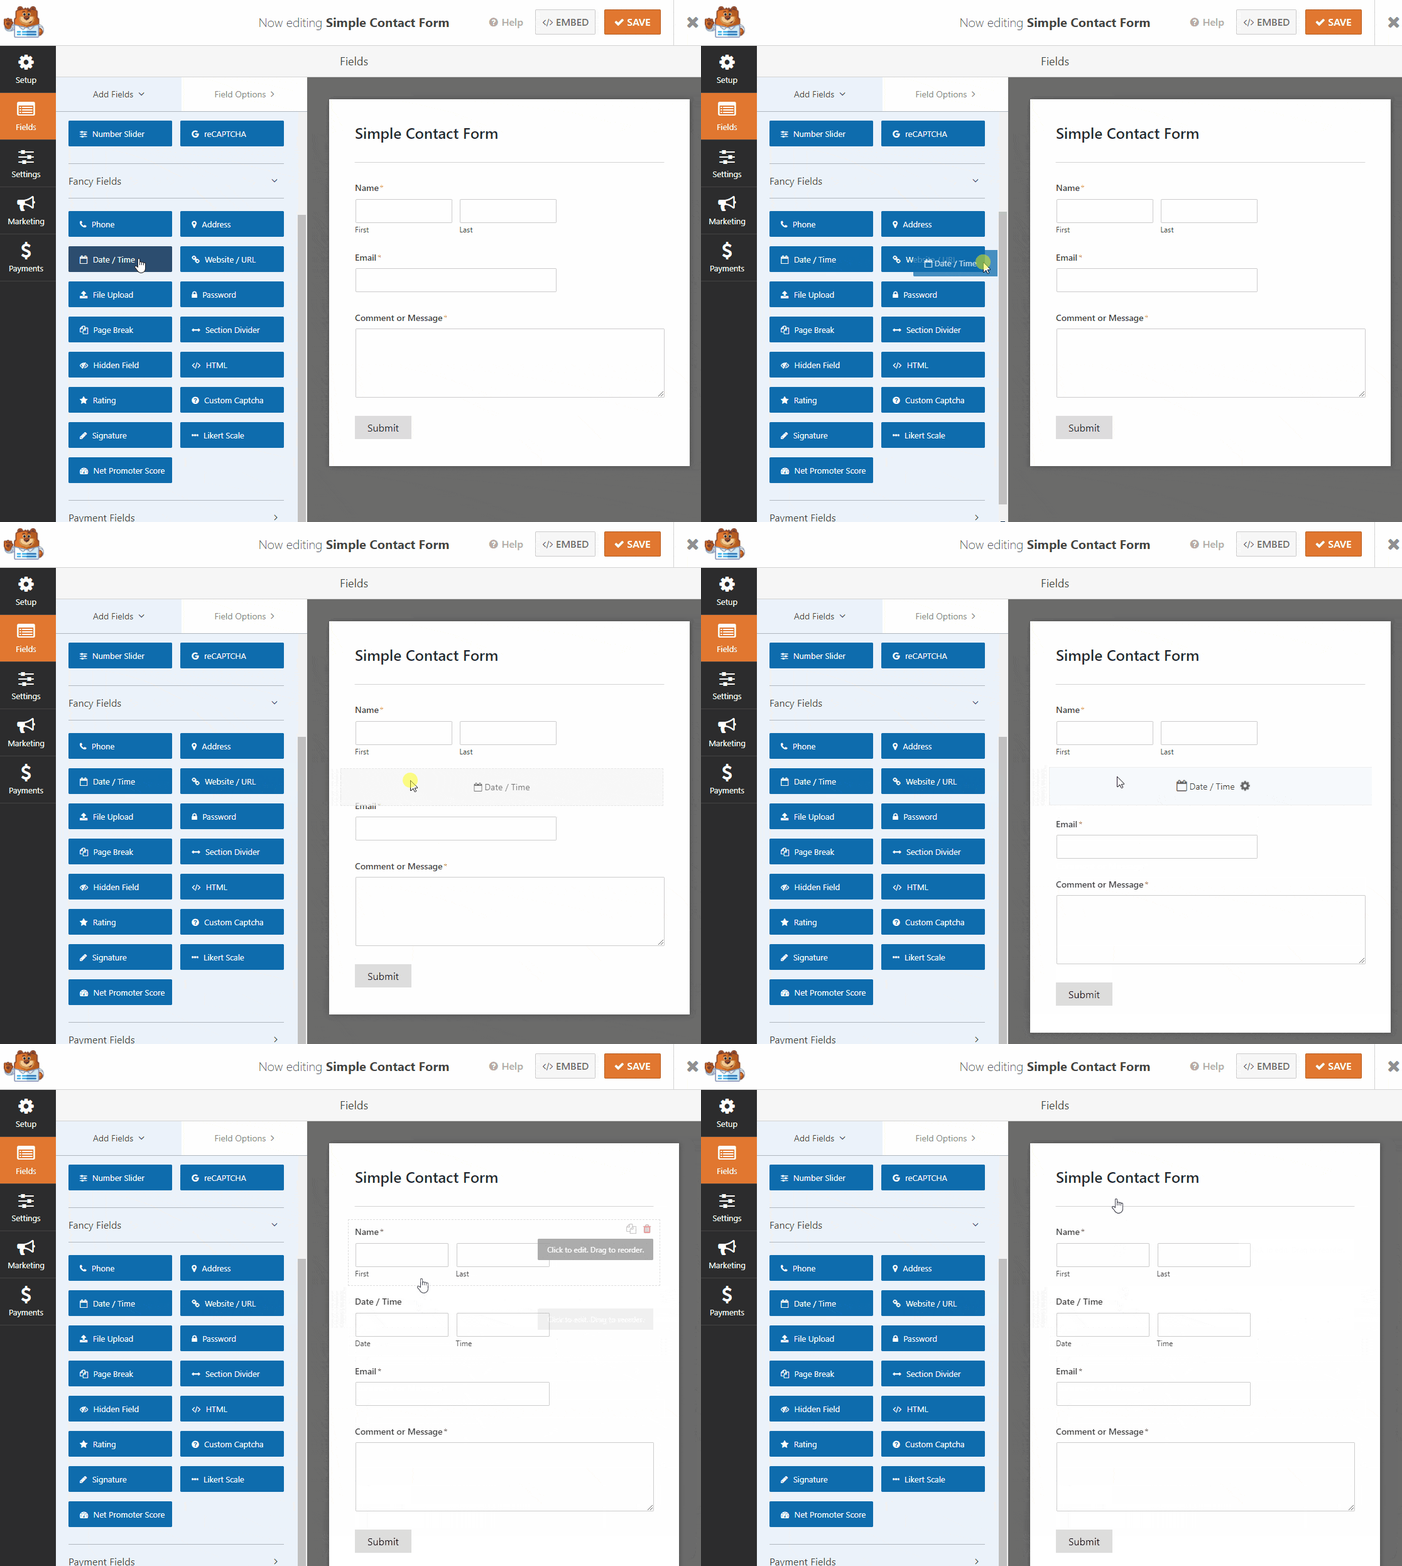
Once it’s on your form, you can drag it up and down to place it somewhere else and click the field again to open its settings and customize it.
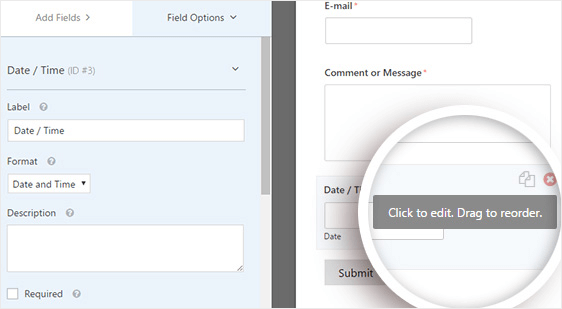
When you click on the Date / Time form field, you’ll see the following options:
- Label: This is the title of the field that site visitors will see on your form.
- Format: Here’s where you can adjust the date format, and ask your customer to choose just the date, just the time, or both.
- Description: Add a description for the field. This is a good spot for adding instructions or details for your users.
- Required: When this box is checked, users can’t submit the form unless they fill out this field.
If you scroll down and click on Advanced Options, you can customize the Date/Time Picker field even more, and this is where you’ll adjust the Date/Time Picker from a calendar format to a dropdown if you’d like.
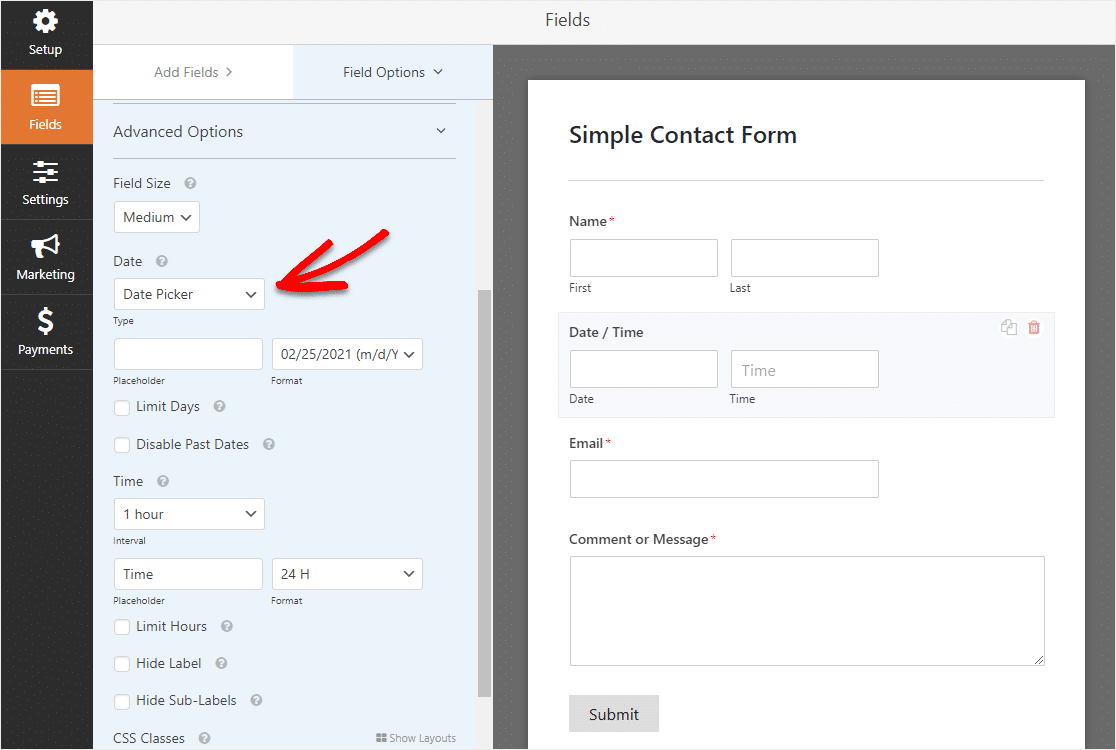
The Date/Time Picker is a powerful field with lots of great settings and options, so let’s take a closer look at everything you can do with it.
Field Size
Here you can choose how big you want the field to be.
Date Type
By default, the Date/Time Picker field will display fields for both Date and Time selections. Here you can choose whether you want the field to be a Date/Time Picker that displays a calendar or has dropdown fields for the month, day, and year.
Date Format
Switch from a month/day/year format to day/month/year in this field.
Time Interval
You can increase or decrease the time intervals here by choosing between 15 minutes, 30 minutes, or 1 hour (great for booking forms).
Time Placeholder
Adjust what the inside of the Time box says.
Time Format
Choose between a standard 12-hour format or a ‘military’ 24-hour format.
Limit Hours (With Date Dropdown Format)
Adjust the range in which someone can enter a specific time, like if you’re only open from 9am-5pm. See more details on this setting in Step #3.
Limit Days (With Date Picker Format)
Adjust days available, for example, if you only work on weekdays. See more details on this setting in Step #3.
Hide Label & Hide Sub-Labels
This option shows or hides the label and sub-labels for the field.
CSS Classes
This field allows you to style specific fields without impacting other fields. You can change the colors, spacing, and more with CSS.
If you’re curious what the different Date/Time Picker formats look like, here’s the Date Picker format:
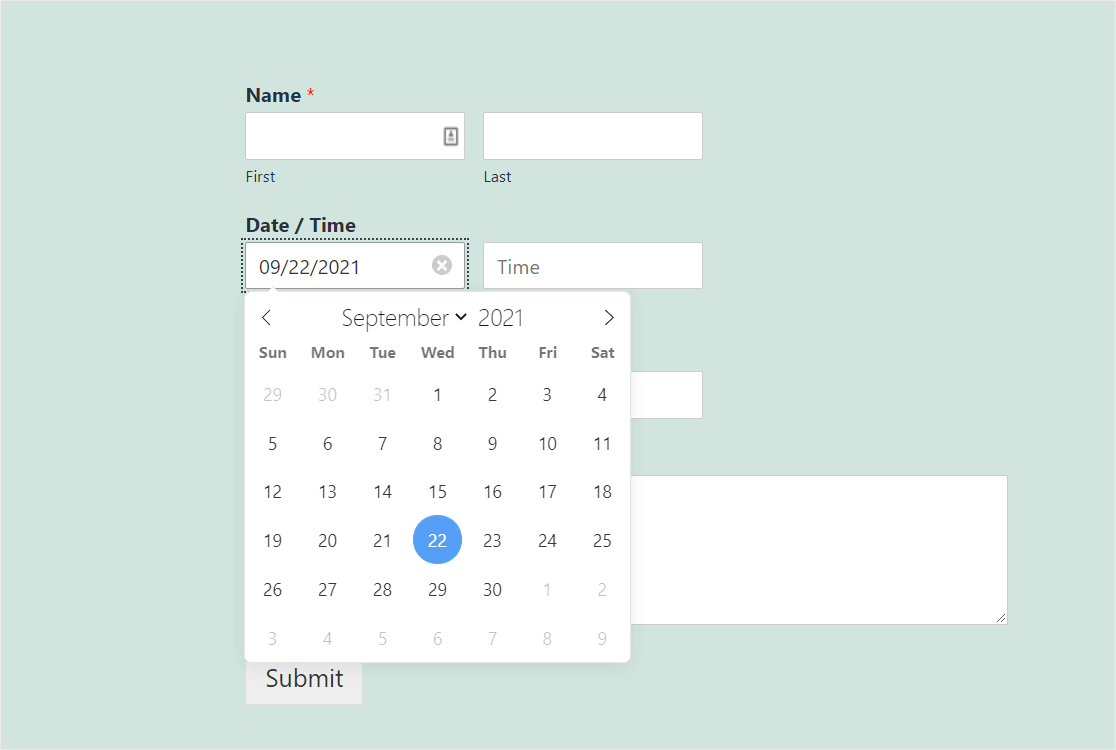
And here’s what the Date Dropdown format looks like:
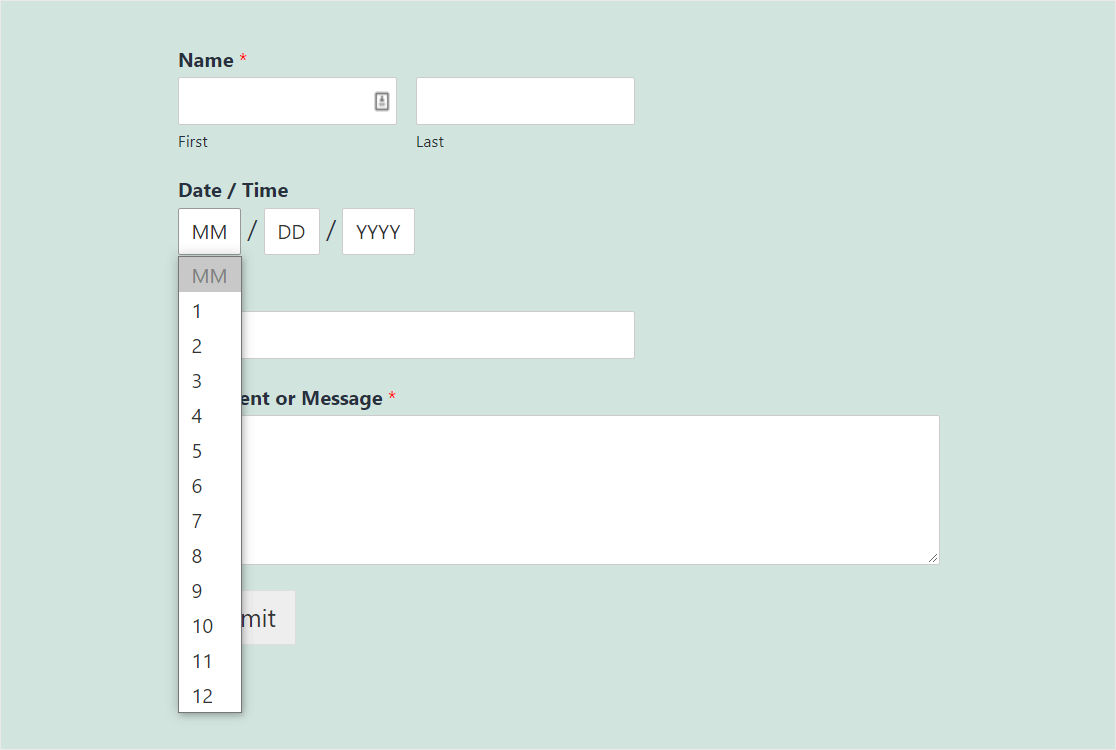
Whichever format you pick, know that the Date/Time Picker field is a great way to get accurate data on your forms. The date will always be validated and in the correct format within the Date/Time Picker field.
Want to customize it even further? We’ve got some more advanced options for you next.
Step 3: Advanced Date/Time Picker Customizations
There are a few other fun hacks you might want to try with the Date/Time Picker field:
- If you want to style the look and layout of your form to match your theme, check out how to add custom CSS to your WPForms.
- Only want someone to fill out your Date/Time Picker form once? If you’d like to see how to limit entries for users, check out this tutorial on how to limit the number of WordPress form entries.
- Need someone to give you a super-specific time down to the minute? Customize the time interval on your Date/Time Picker with a piece of custom code.
- Want a different date/time format? You can change the date and time format by using any available PHP variables.
- Although there’s no conditional logic on the Date/Time Picker field yet, you can verify ages with a plugin or use a Yes/No dropdown field near your Date/Time Picker field to ask if a user is over a certain age.
Once you’re done customizing your settings, go ahead and click Save.
Step 4: Limit the Date + Time (Optional)
If you’d like to restrict which date and time options can be selected on your Date/Time Picker field, it’s easy to do.
You’ve got a ton of control over the Date/Time Picker field. You can:
- Limit dates that are available for users to choose
- Disable past dates so no one can select a day in the past
- Limit the times people can select
Whichever you need to use on your forms, we’ve got you covered in our instructions on how to limit options for the Date/Time Picker field.
Step 5: Configure Your Form’s Settings
Form confirmations are messages that are displayed to people once they complete your form. Confirmations let them know that their form has been processed and offers you the chance to tell them what steps they need to take next.
WPForms has 3 confirmation types to choose from:
- Message: This is the default confirmation type in WPForms. When a site visitor submits your form, a simple message will appear, letting them know their form is being processed.
- Show Page: This confirmation type will take your people to a specific web page on your website thanking them for filling out the Date/Time Picker form and let you tell them what they need to do next. For help doing this, check out our tutorial on redirecting customers to a thank you page.
- Go to URL (Redirect): This option is for when you want to send people to a specific page containing related information that’s found on a different website.
So let’s see how to set up a simple form confirmation in WPForms so you can customize the message people will see when they submit their Date/Time Picker form.
To start, click on the Confirmation tab in the Form Editor under Settings.
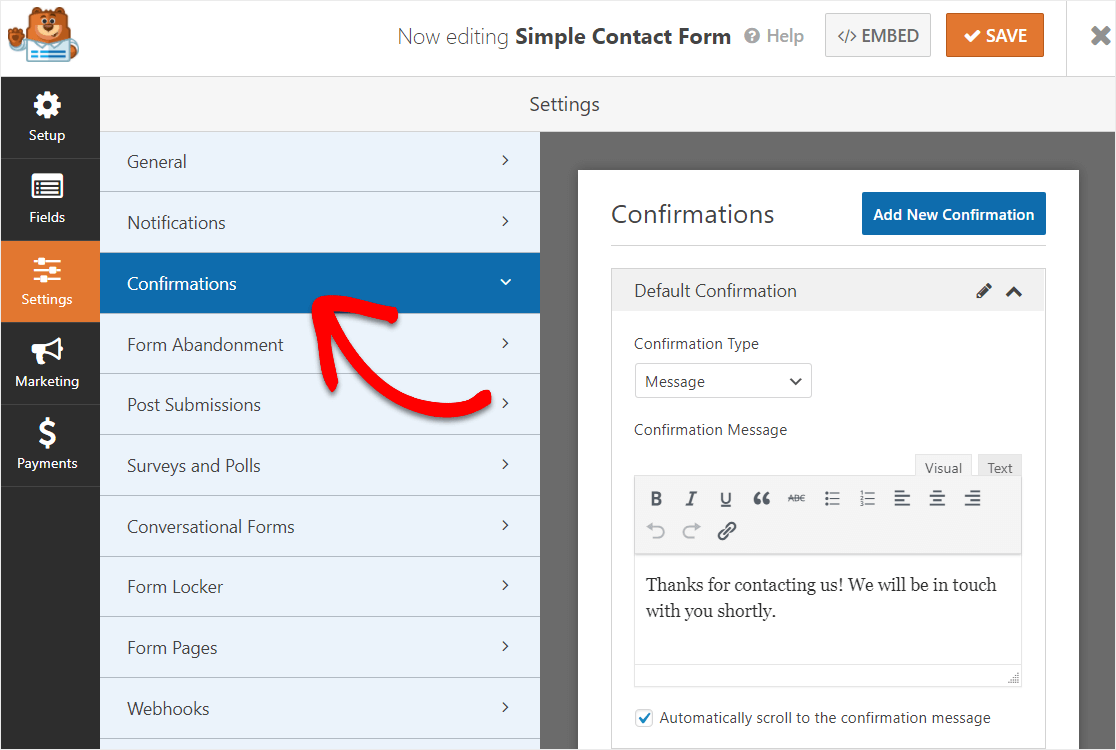
Then, customize the confirmation message to your liking and click Save.
For help with other confirmation types, see our documentation on setting up form confirmations.
Now, let’s set up your form notifications.
Step 6: Configure Your Form Notifications
Want the date and time that someone fills out on your forms sent to you right away in an email? Let’s set up your form notifications to do just that.
Notifications are a great way to automatically email yourself, your employees, and the person who filled out your form.
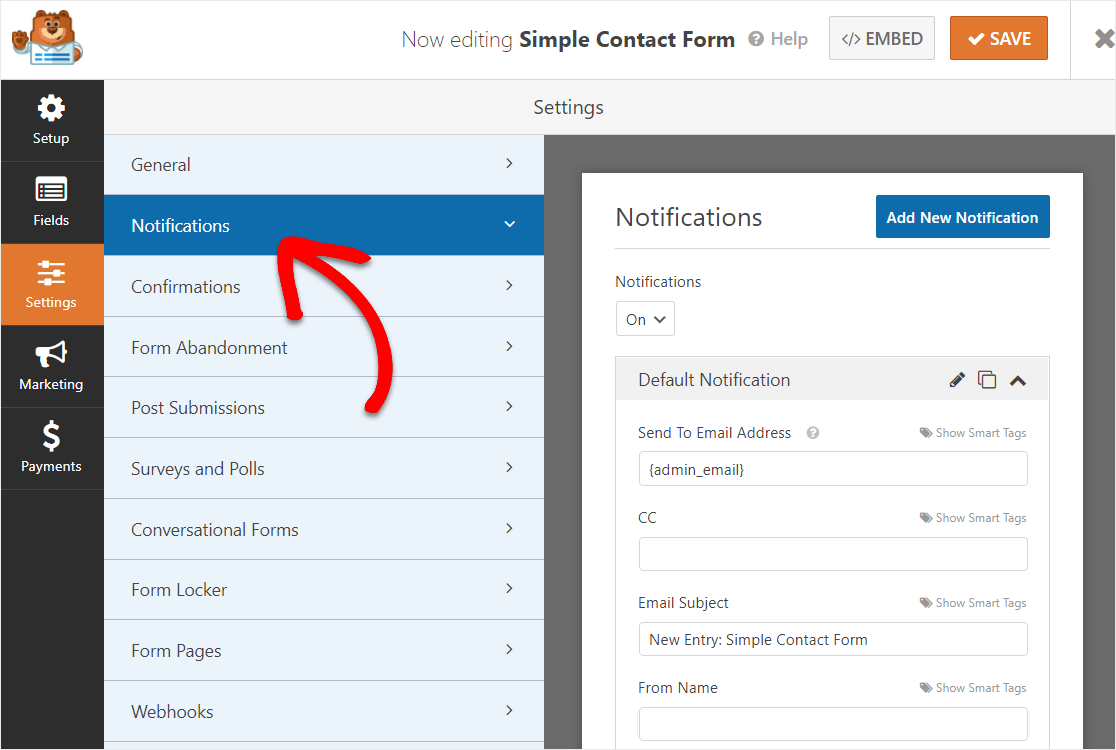
Unless you disable this feature, whenever someone submits a form on your site, you’ll get a notification about it.
If you use Smart Tags, you can also get just the date and time sent to you in your form notifications.
To do this, simply add a timestamp into your notification email by using this smart tag – {date format=”m/d/Y”}
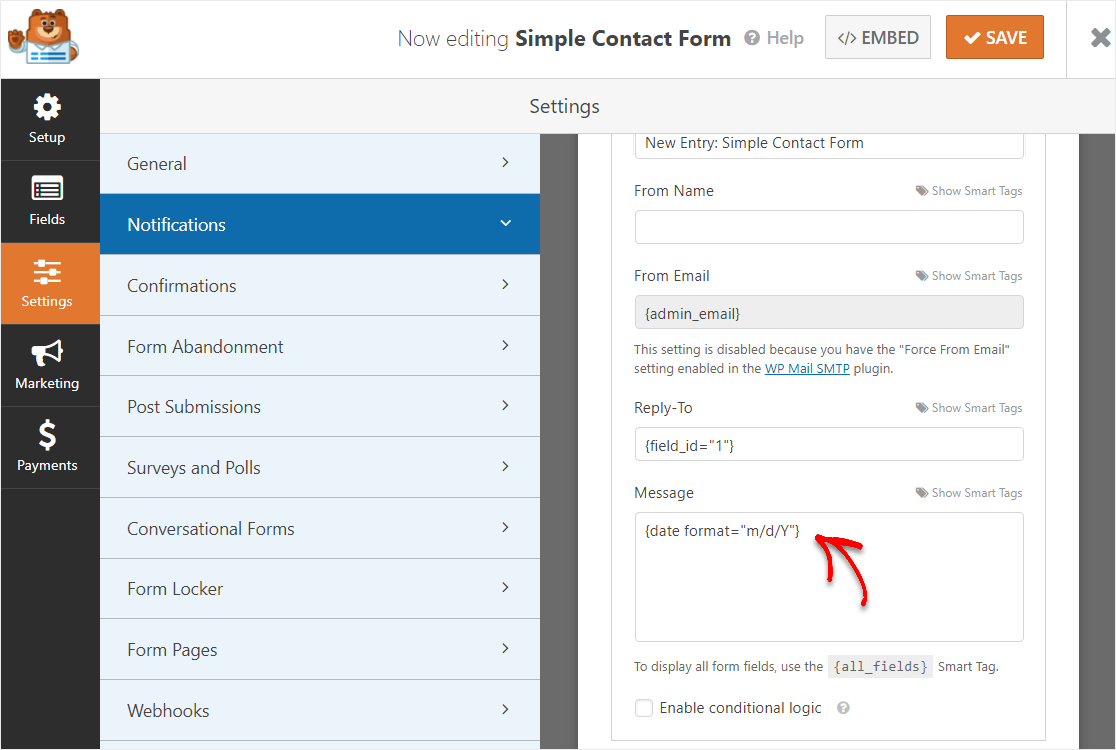
WPForms also lets you notify more than one person when a form is submitted.
For help with this step, check out our documentation on how to set up form notifications in WordPress.
Last, if you want to keep the branding of your emails consistent, you can check out this guide on adding a custom header to your email template.
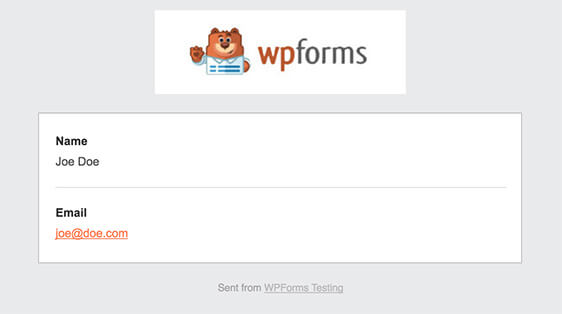
Great job. You’re now ready to add your Date/Time Picker form to your website.
Step 7: Add Your Form to Your Site
WPForms allows you to add your forms in various locations from your blog posts, pages, footer, and your sidebar.
First, let’s take a look at the most common option: embedding your form in a post or page.
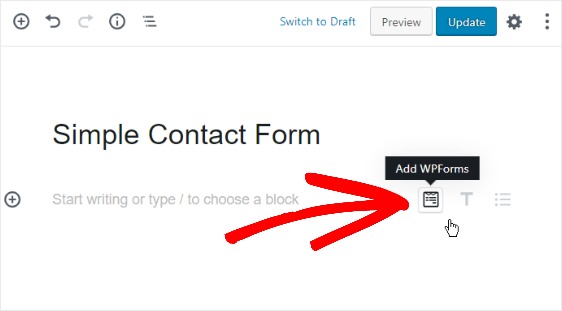
To begin, create a new page or post in WordPress. Then, click inside the first block (the blank area below your page title) and click on the Add WPForms icon.
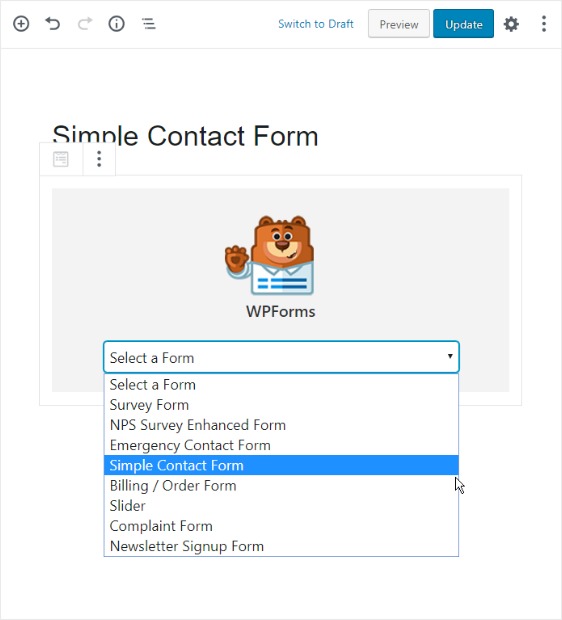
The handy WPForms widget will appear inside of your block. Click on the WPForms dropdown that appears and pick which one of the forms you’ve already created that you want to insert into your page.
Select the Simple Contact Form.
Publish your post or page so your form will appear on your website.
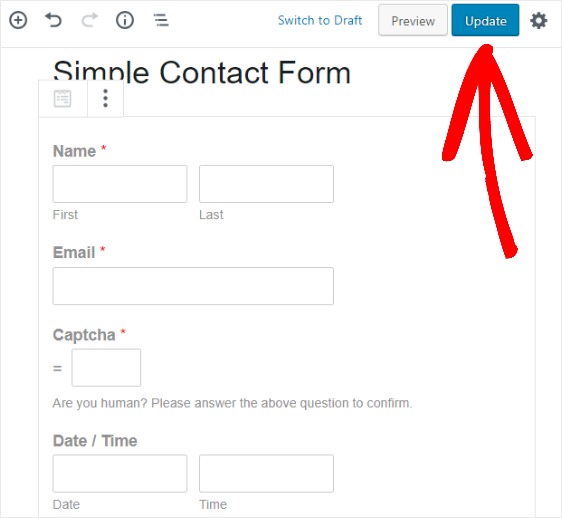
Another place you can add a form to your site is in the sidebar widget area.
Go to Appearance » Widgets and add a WPForms widget to your sidebar. After that, select the Simple Contact Form from the dropdown menu and save your changes to the widgets area.
Next Steps: Use a Date/Time Picker Field Now
And there you have it! You now know how to add a WordPress form with a Date/Time Picker to your website.
The WPForms Date/Time Picker field is easy to use and mobile-friendly, so all of your website visitors will be able to use it. Besides being a great WordPress Date/Time Picker plugin, WPForms comes with tons of useful features.
Just check out what’s included with the WPForms Pro plan:
- Zapier Integration – Connect with thousands of different web apps like Google Calendar, so you can instantly fill your calendar dates with form entries.
- 100+ Templates – Never build a form from scratch again with pre-built templates to the most popular form types out there.
- Email Marketing Integrations – Connect your Date/Time Picker form to the most popular email services to automate your marketing.
- Offline Forms – Let people submit their forms once they regain internet connection and quit losing so many leads.
- Multi-step Forms – Break up long forms into multi-page forms to keep your conversion rate high.
- Landing Pages – Get more people finishing your forms by creating distraction-free form pages in just a single click.
- Secure Forms – Protect forms with different anti-spam options like custom captcha, hCaptcha, or Google reCAPTCHA v2 or v3.
- Conversational Forms – Watch conversion rates skyrocket with highly engaging interactive forms.
- Premium Support – Access a friendly and knowledgeable team that will help guide you in the right direction if you need help with your website forms.
- …and a ton more
Click Here to Start Using a Date/Time Picker Form Now
Also, do you want to know how to boost form conversions on your website? Check out this roundup of simple ways to design your forms so people will complete them.
So, what are you waiting for? Get started with the most powerful WordPress forms plugin today.
And don’t forget, if you like this article, then please follow us on Facebook and Twitter.
The post How to Create a WordPress Form With a Date/Time Picker appeared first on WPForms.
source https://wpforms.com/how-to-add-a-wordpress-form-with-datepicker/

