Do you want to create an online class reunion registration form that increases attendance at your event? Using an online registration form makes it easy to organize your class reunion and get former classmates signed up fast.
In this tutorial, we’ll show you how to create an online class reunion registration form for your WordPress website.
Click Here to Make Your Class Reunion Registration Form Now
Why Use an Online Class Reunion Registration Form?
The thought of old classmates being back together for a reunion is exciting, but getting all the information you need can be tricky. Your job as the reunion organizer is to get as many of your classmates together as possible. So what’s the best way to do that?
It’s no secret that people don’t enjoy filling out long forms asking for lots of information. It’s an immediate turn off when they open an envelope and see a long drawn out registration form.
With that in mind, your online form should be super simple, and it should take less than 2 minutes for your classmates to fill out.
So why not try an online class reunion registration form? Taking registrations online will make your reunion planning a lot easier with benefits like:
- More Responses: Easy registration on desktops and mobile phones mean your classmates are more likely to complete the registration process.
- Better Information: No more trying to decipher handwriting, you’ll get accurate and legible details the first time.
- Faster Replies: Since it’s online, you’ll get instant replies from your classmates by using WPForms Pro’s free online reunion form template.
- Easier Organization: Keep all your classmate’s information in one easy to access place, send follow-up emails, and other important reunion information. Plus, you’ll have all your classmate’s contact records handy for planning the next reunion.
- Increased Visibility: If you’re the class reunion organizer, this is a splendid opportunity to introduce your website to them by hosting the registration form on your website.
So now that you know why to use an online class reunion registration form, let’s dive into how it’s done.
How to Create an Online Class Reunion Registration Form
Step 1: Create an Online Class Reunion Registration Form
Using WPForms is the simplest way to create an online class reunion registration form. WPForms Pro has an extensive collection of pre-built templates for every niche and business, including a lot of online registration form templates.
Getting started is easy. Just install and activate the WPForms plugin. If you need a little help, you can check out this step-by-step guide on how to install a plugin in WordPress.
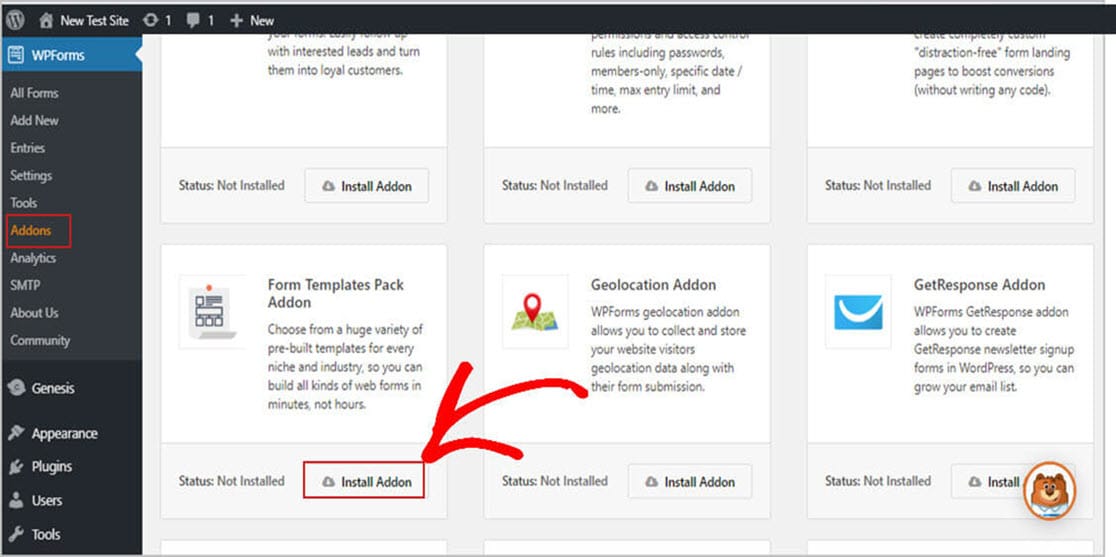
Next, you must install and activate the Form Templates Pack addon.
To do this, go to WPForms » Addon and find the one labeled Form Templates Pack addon.
Next, click on Install Addon.
Okay, now that your plugin is active, you must create a new form.
Need to get your students signed up for classes? Read how to create a student enrollment form in WordPress.
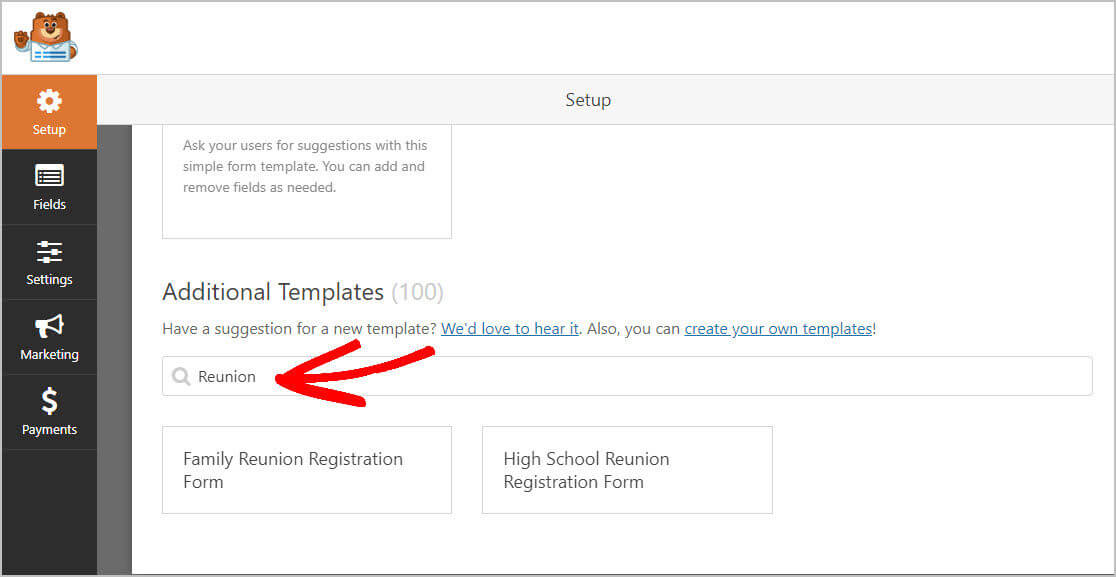
Now, go to WPForms » Add New and give your class reunion registration form a name. Then scroll down to the area labeled Additional Templates and type “Reunion” in the search bar. Next, select the High School Reunion Registration Form.
Once the form template loads, you’ll find that most of the fields you’ll need are already included. You can add, delete, arrange, and edit these fields any way you want. Here are the default fields on the class reunion registration form:
- Name
- Spouse or Guest Name
- Phone
- Which events will you be attending?
- Would you like to pre-order a reunion DVD ($19.95)?
- Comments or Questions
It’s best if you don’t ask for a lot of information at registration. Just to use the email they submit at sign-up and send them a questionnaire. Since they’ve already registered for your class reunion, filling out those details won’t be an issue.
One of the best things about WPForms is that you can add additional fields to your form by dragging and dropping fields where you want them.
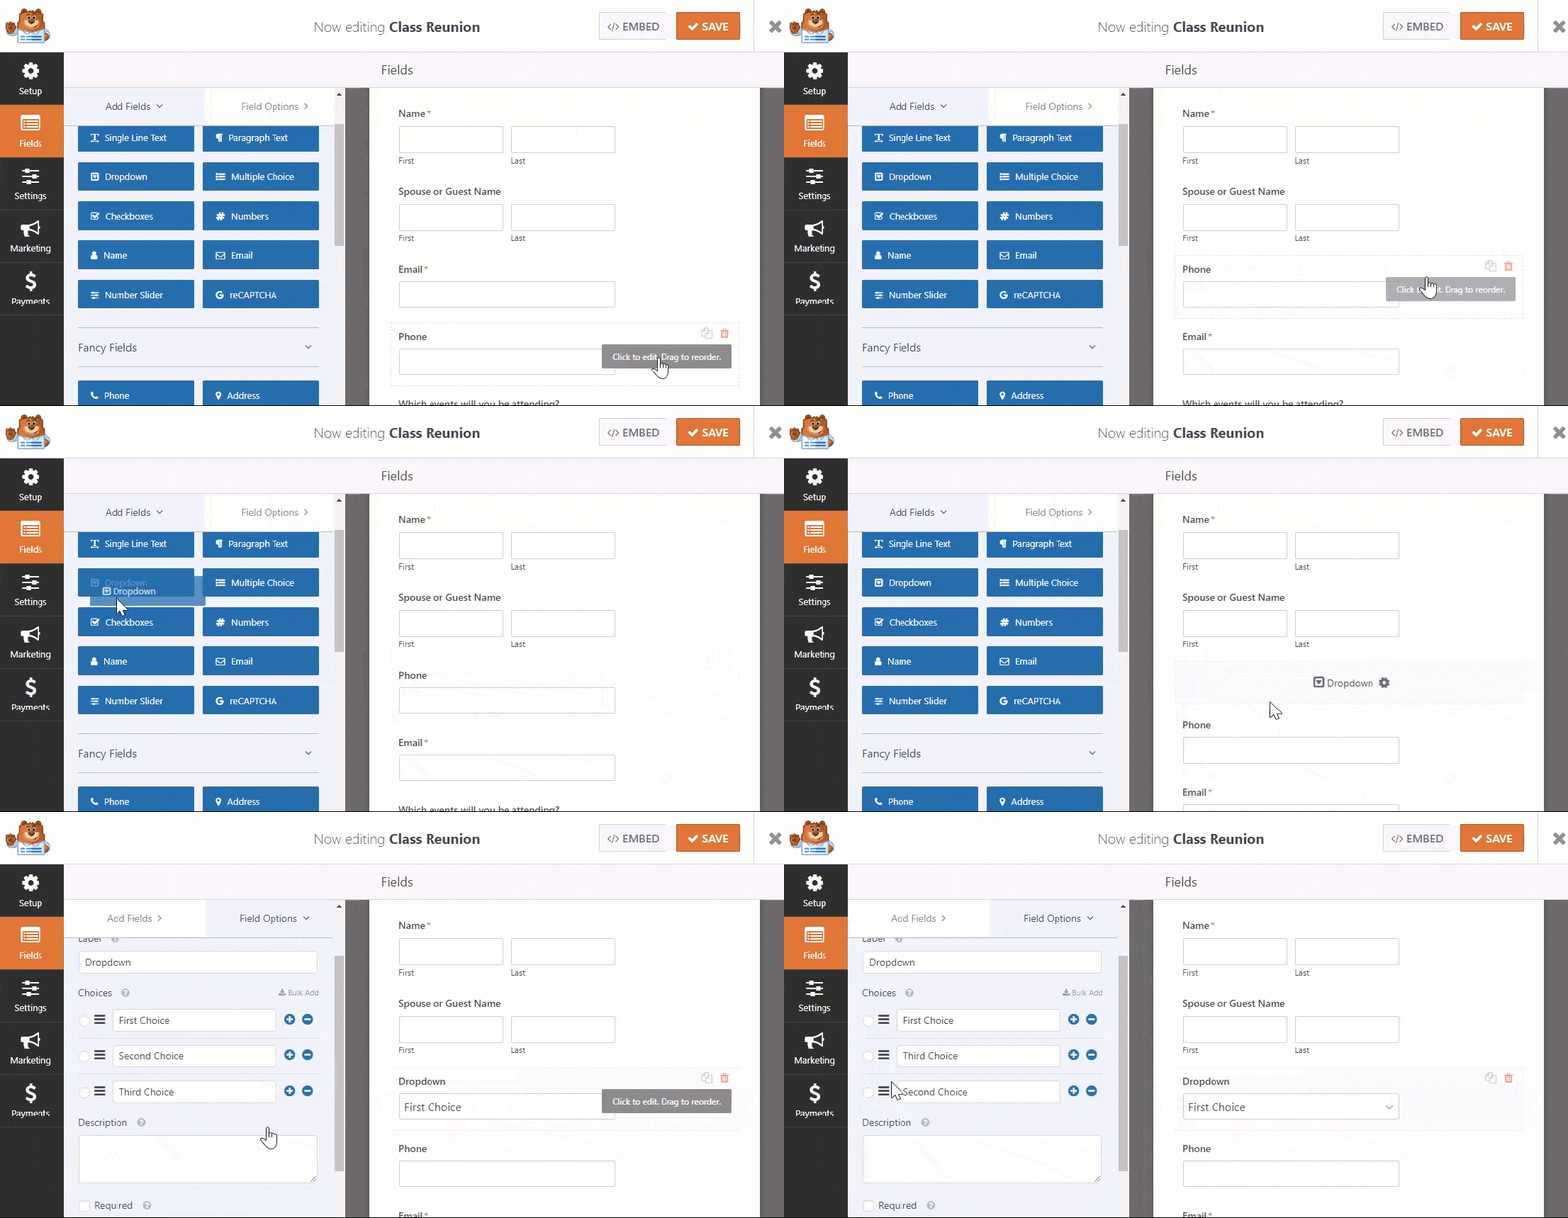
Then, just click on the field to make any changes. You can also click on a field and drag it to reposition the order on your reunion registration form.
Accepting Payments on Class Reunion Forms
There are many costs involved in putting together a great class reunion, including:
- Venue rental
- Speaker fees
- Bands or DJs
- Decorations
- Photographers and more
Collecting money from your classmates is the best way to fund your class event. So, here’s where you can ask your classmates to chip in to make the event a success.
Nowadays, people prefer to pay with a debit or credit card. Unfortunately, many class reunion organizers only take checks and won’t accept cards. This only creates an unnecessary step for you and your classmates.
So, how do you eliminate that obstacle? WPForms makes it easy to accept payments right on your online class reunion registration form.
Taking payments online will help you in 2 ways.
First, you’re more likely to get people to register since online payments are more convenient. Second, it’ll provide you with instant cash so you can buy items for your get-together or secure a venue for your class reunion. If you want to boost sign-ups, offer a discount to the first 20 people who sign up.
You can take registration fee payments on your form using either Stripe or PayPal. If you want to use both Stripe and PayPal integrations on your form, we have some excellent documentation on how to allow users to choose a payment method.
Curious which payment service to use? Read our guide on Stripe vs PayPal.
Once you’re all done, and your form looks the way you want it to, click Save.
Step 2: Configure Your Form Settings
To start, go to Settings » General.
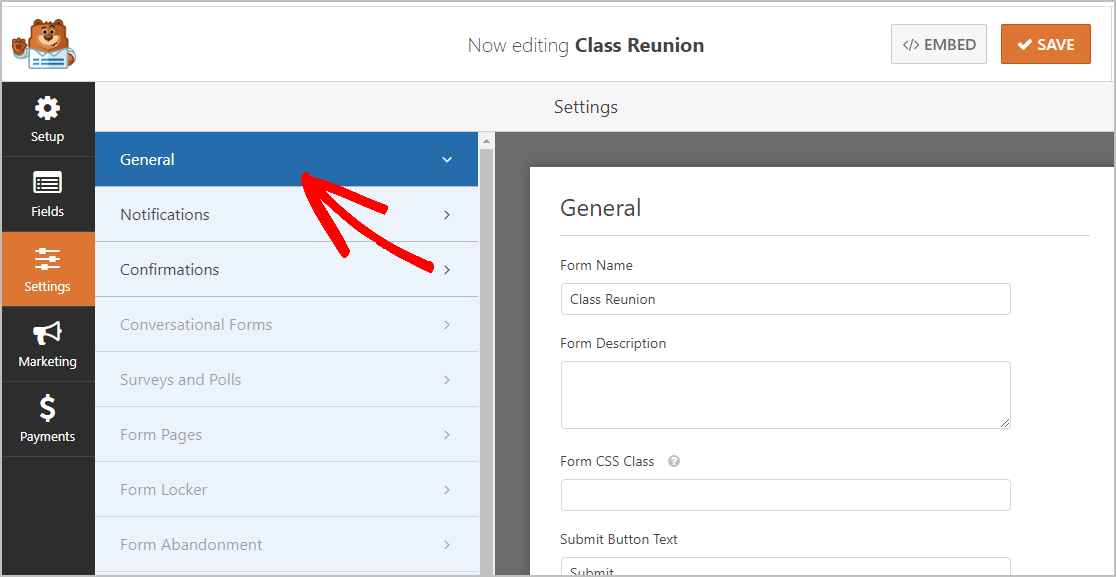
On this screen you can configure:
- Form Name — Change the name of your form here if you’d like.
- Form Description — Give your form a description.
- Submit Button Text — Customize the copy on the submit button.
- Spam Prevention — Stop contact form spam with the honeypot feature or Google reCAPTCHA. The honeypot feature is automatically enabled on all WordPress forms so if you decide to use another form of spam prevention, unclick this option.
- AJAX Forms — Enable AJAX settings with no page reload.
- GDPR Enhancements — You can disable the storing of entry information and user details, such as IP addresses and user agents, in an effort to comply with GDPR requirements. In addition, check out our step-by-step instructions on how to add a GDPR agreement field to your simple contact form.
When you’re done, click Save.
Just a couple more steps, and you’re finished.
Step 3: Configure Your Form Notifications
Notifications are an excellent way to receive an email update once someone registers on your website.
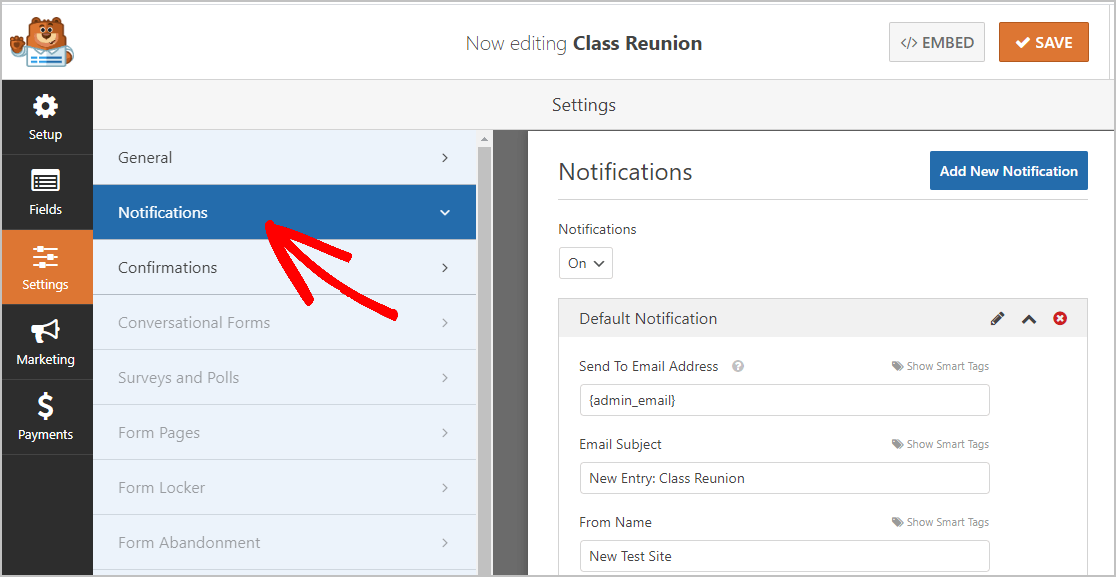
You don’t even need to enable this because it’s on by default.
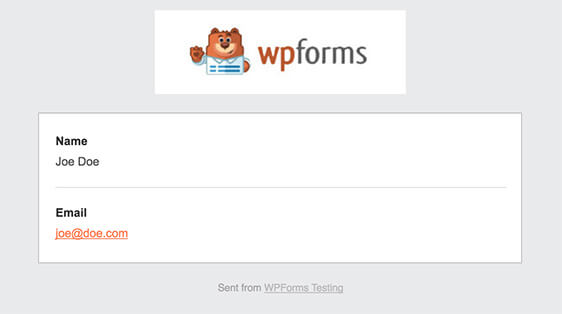
If you use the Smart Tags feature, you can also email notifications to your classmates when they sign up. This lets them know that their registration has gone through.
If you need some guidance with this step, then see our documentation on how to set up form notifications in WordPress.
You can also notify more than just one person when a class reunion registration form is submitted. For example, you can send a notification to yourself, your classmate, another reunion coordinator, and others helping plan the reunion.
For help, just check out our easy step-by-step tutorial on how to send multiple form notifications in WordPress.
Last, if you want to brand your email using a class mascot or other emblem to make all your email correspondence look consistent, check out this guide on adding a custom header to your email template.
Step 4: Configure Your Form Confirmations
A form confirmation is a message that your classmates will see once they’ve completed the sign-up. Confirmations let people know that you have processed the submission and allow you to tell them what they need to do next.
There are 3 confirmation types in WPForms:
- Message: This confirmation is the default type used in WPForms. It’s just a simple, customizable message letting visitors know their registration is being processed. You can reword the message if you want to. If you’re unsure where to start, check out some great success messages to show your classmates that you’re excited about seeing them.
- Show Page: This option will take your classmates to a specific page on your site created to thank them for registering for your reunion. Check out our tutorial on redirecting your visitor to a thank you page if you need some help. You’ll also want to read our article on creating effective Thank You pages.
- Go to URL (Redirect): This confirmation option sends those that register to a page you’ve chosen on an entirely different website.
Now we’ll set up a customized message that your guests will see when they register for your class reunion.
To begin, click on the Confirmation tab in the Form Editor just under Settings.
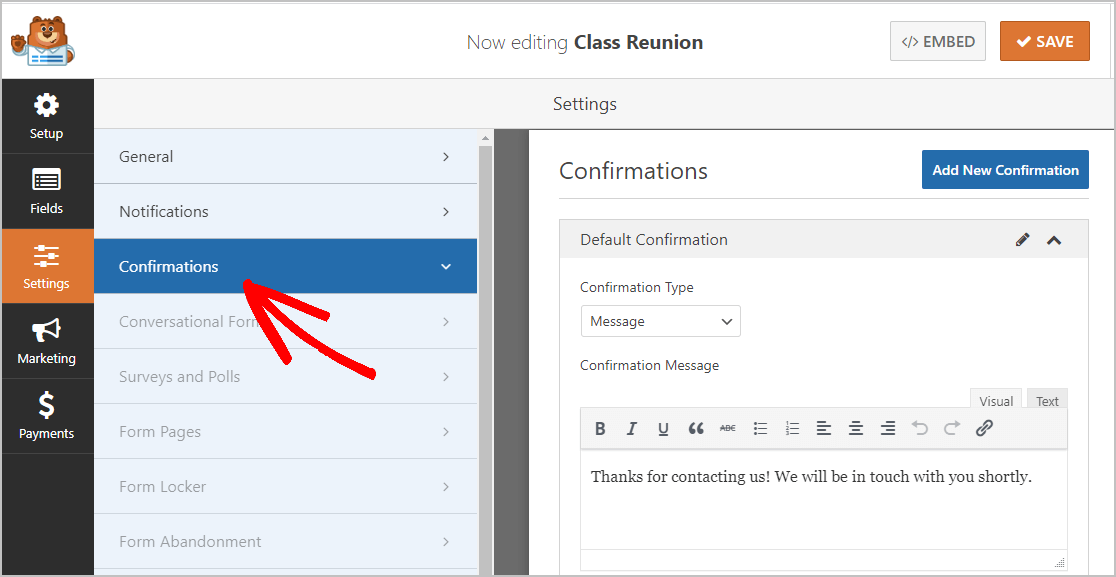
Then, customize your confirmation message. Once you’re done, click Save.
For help with other confirmation types, see our documentation on setting up form confirmations in WPForms.
Now, you’re at the last step.
Step 5: Add Your Online Class Reunion Registration Form to Your Website
Now that you’ve finished building your online class reunion registration form, you must add it to your WordPress website. This is the easiest part. WPForms lets you place your forms on blog posts, pages, and even lets you use sidebar widgets.
To begin, create a new page or post in WordPress, or you can just update an existing one if you like.
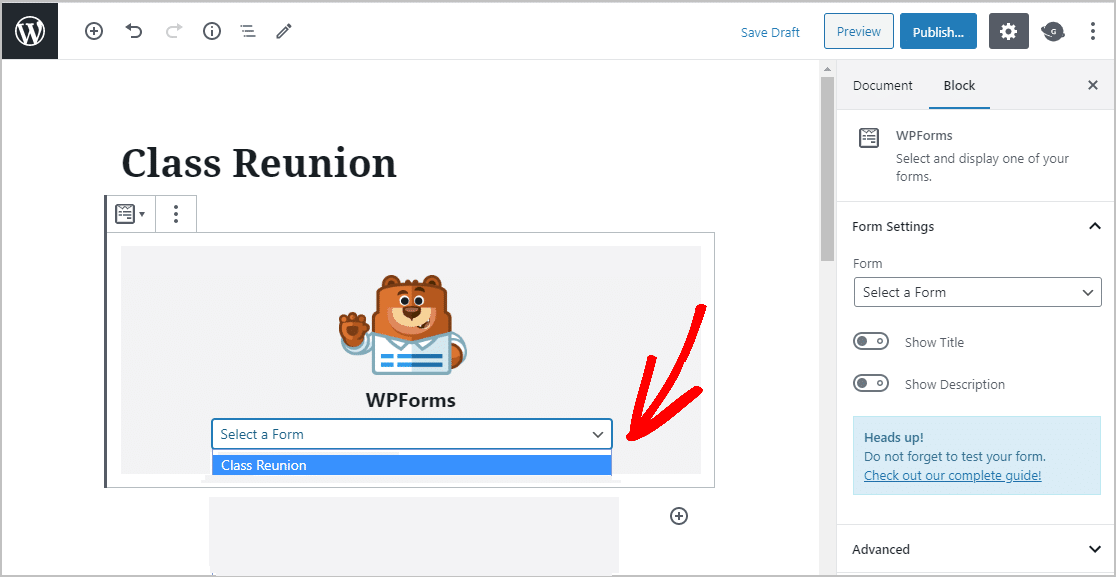
Next, click inside the first block, that’s the blank area right underneath the page title, once it’s opened up type in WPForms, then click on the Add WPForms icon.
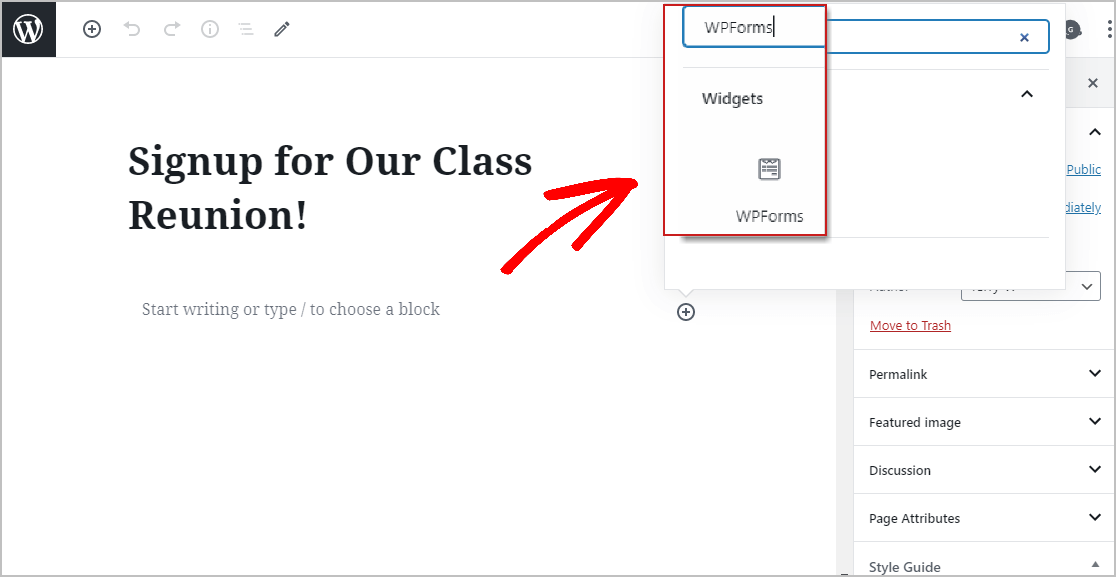
The handy WPForms widget will appear inside of your block. Now, click on the WPForms drop-down menu and select the form you just created.
Next, click Preview, so you can view your class reunion registration form as it will appear on your website.
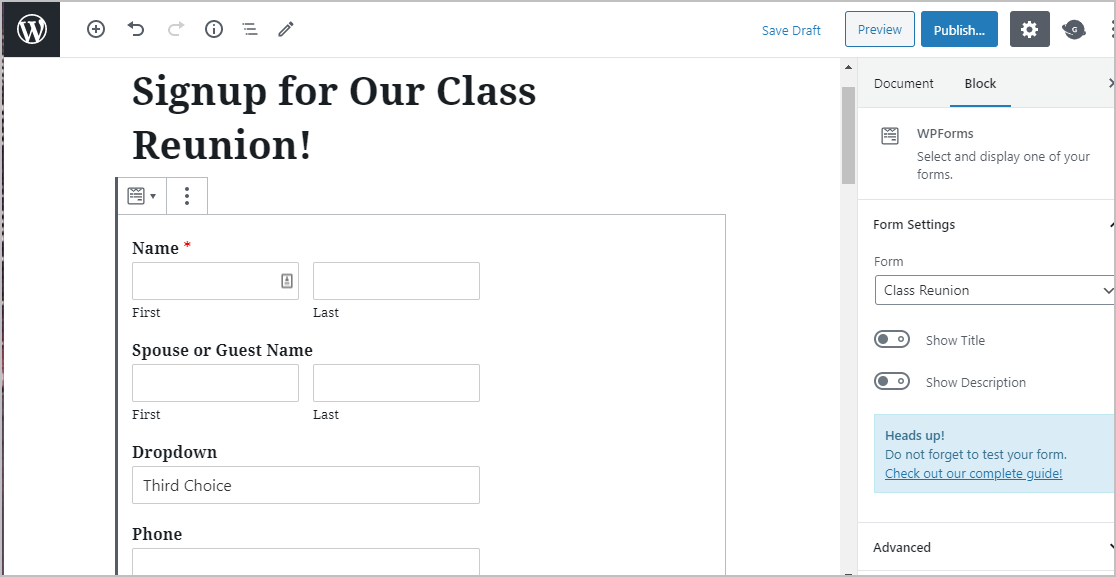
Once you’re satisfied with how it looks, hit that Publish, button and your form will go live on the Internet.
You can easily view your registration form entries once they are submitted. To do this, just check out our complete guide to form entries. WPForms makes it easy to view, search for, filter, print, and delete any registration form entries, making your class reunion planning so much easier.
Click Here to Make Your Class Reunion Registration Form Now
Final Thoughts
So there you have it. Now you know precisely how to create an online class reunion registration form on your WordPress website. You’ll also want to read our post on the best WordPress pop-up plugins.
Keeping things as simple as possible on your form is a powerful way to get more people to register for your class reunion.
So what are you waiting for? Get started with the most powerful WordPress forms plugin today. WPForms Pro includes a free online class reunion registration form template and offers a 14-day money-back guarantee.
And if you enjoyed this post, follow us on Facebook and Twitter for more free WordPress tutorials.
The post How to Create an Online Class Reunion Registration Form appeared first on WPForms.
source https://wpforms.com/class-reunion-registration-form/

